
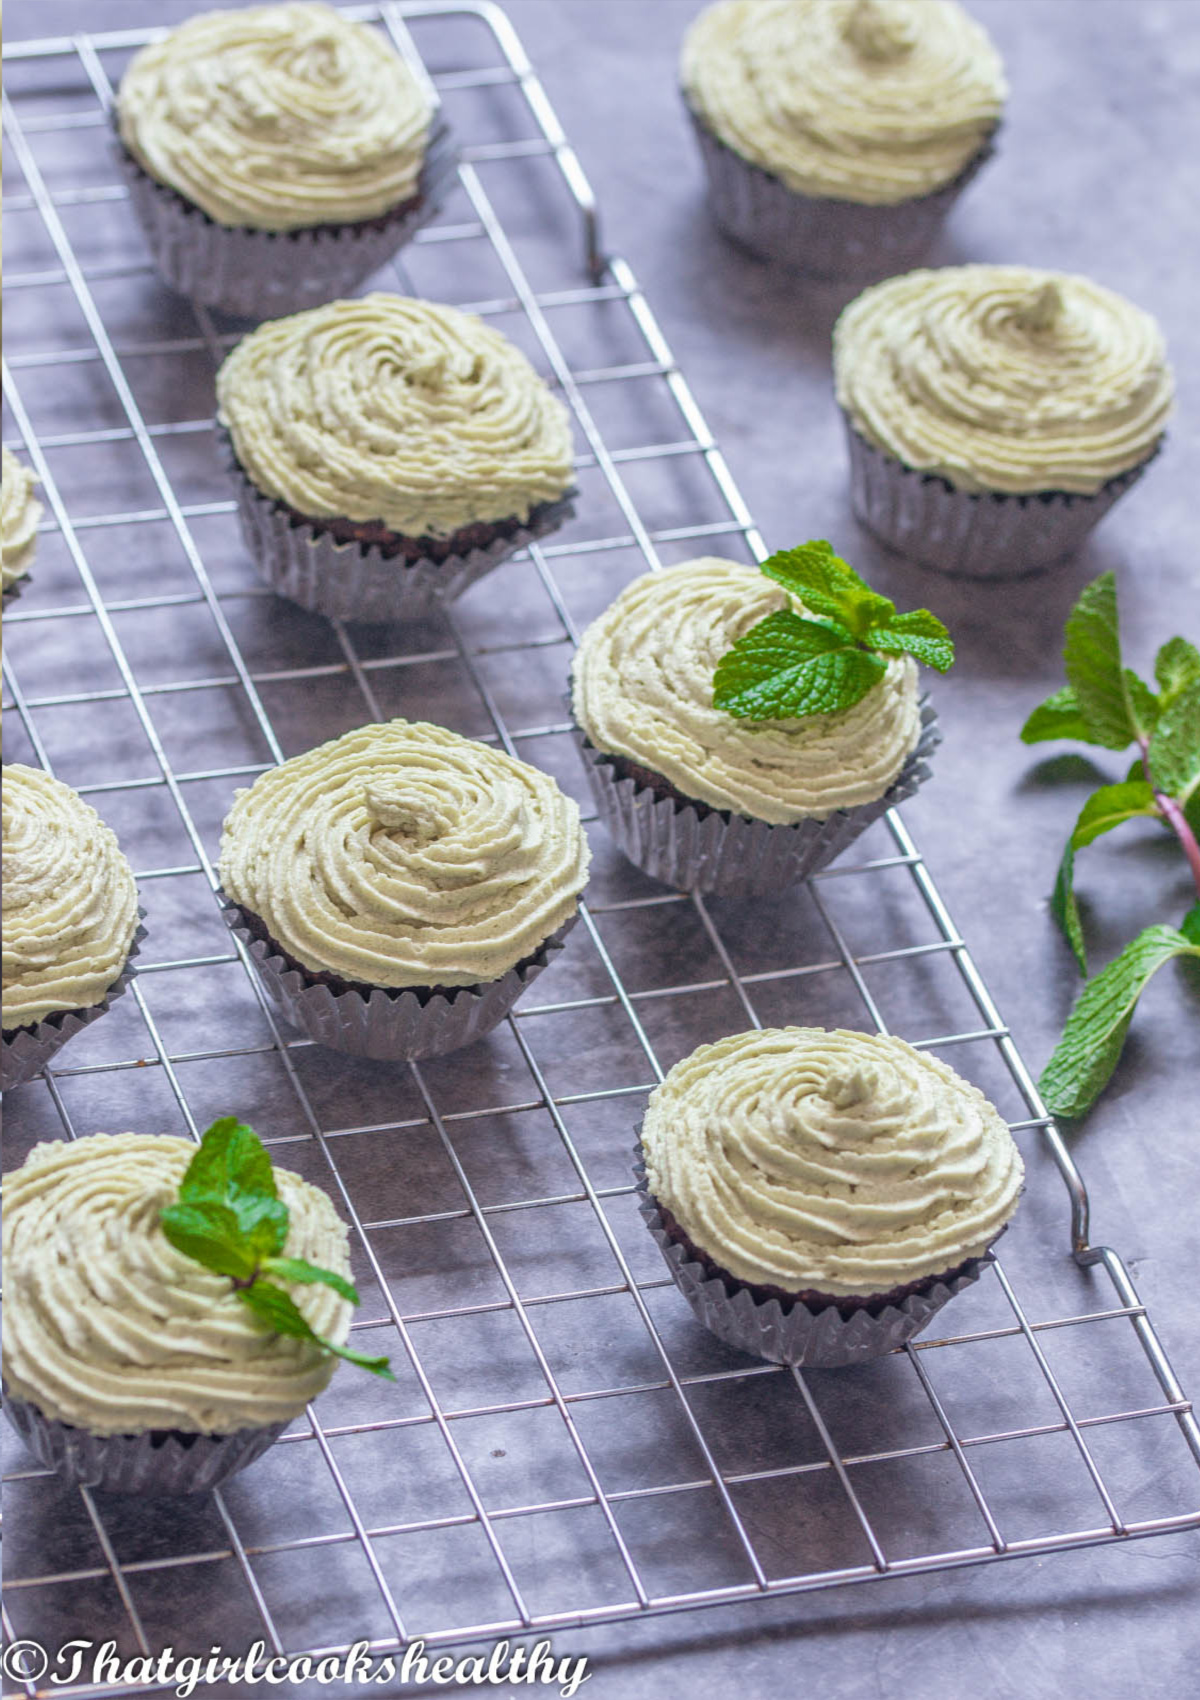
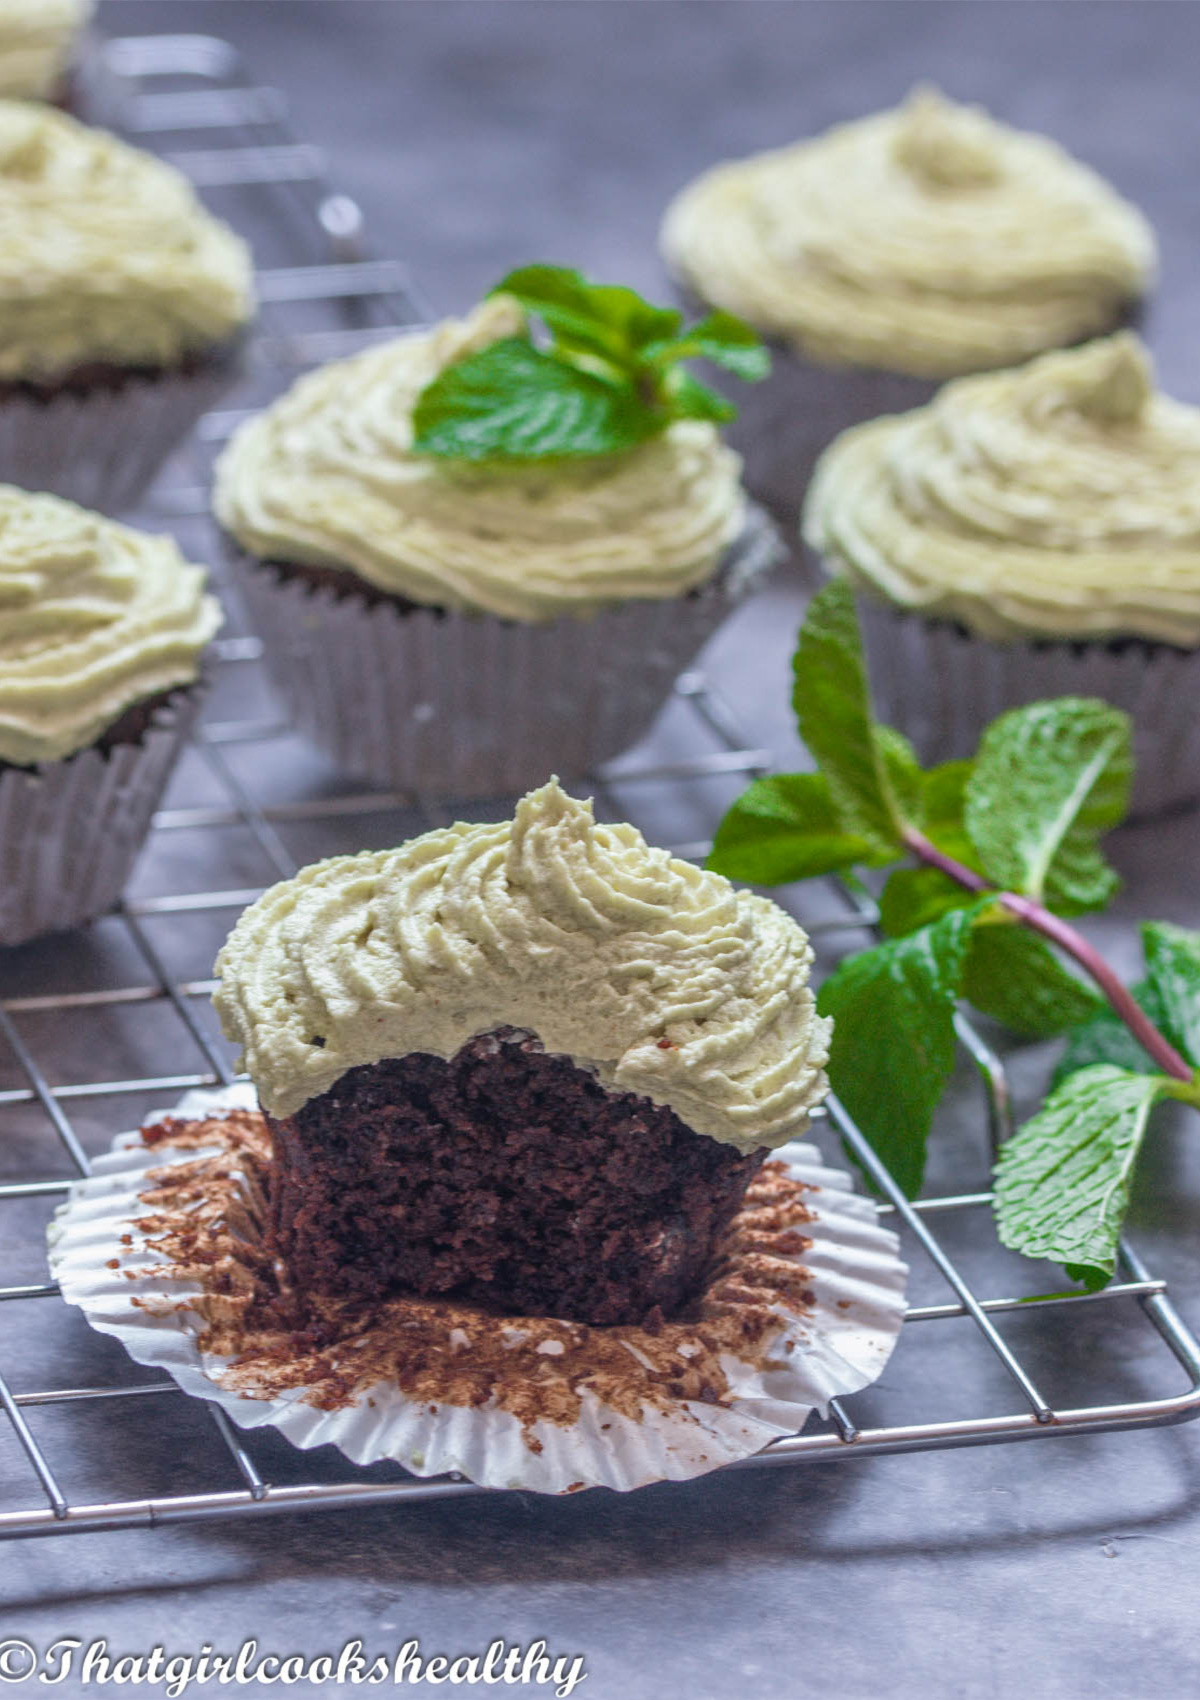
Learn how to make some delicious chocolate mint cupcakes. They are super moist, fragrant, chocolately topped with a mint infused buttercream frosting. These cupcakes are naturally gluten-free courtesy of the almond flour, grain free and contain no eggs making them suitable for vegans.

If you have been following the blog for a while now then you will know that I tend to shy away from baking.
I'm slowly coming out of my comfort zone by trying more gluten free baking recipes.
My biggest challenge to date was making my own Gluten Free Flour Blend coupled with making some homemade Gluten Free Dinner Rolls.
Enough about my personal win, and lets talk about this recipe. Chocolate pairs SO well with mint, it's one of my favourite combinations.
A seasonal duo or one that you can consume throughout the entire year (I bet this would make awesome birthday cake, hint, hint)
I can think of various foods that I enjoy with this combo and I'm sure you can too. I'm more of a muffin girl but cupcakes have a special place in my heart too.
I'm overjoyed because these cupcakes are vegan friendly, which is even better because that means it covers most of my audience.
I love when my recipes cover everyone because it means no one will feel excluded. Also the "flour" choice to make these cupcakes are almond flour and tapioca starch.
Both of these ingredients are pseudo flour replacements meaning they aren't actually made from wheat flour.
When paired together they make a great would-be-flour replica without actually being flour.
These cupcakes aren't overly sweet despite the sweetness from the frosting. I'm not a huge fan of sickly sweet cupcakes so I'm very conscious of the amount of sweetener that is used.
Speaking of the topping, the frosting is a type of buttercream made from dairy free vegan butter.
You will want the butter to be at room temperature and not firm. This is crucial to yield some ultra silky smooth buttercream.
I also use unrefined powdered sugar that is made from raw cane sugar. For this recipe I used the store bought but there is no reason why you can't use my homemade version instead.
This is a small batch of frosting, which is just enough for the cupcakes without any leftovers or excess waste.
Please be mindful of the quantity, again, this is a zero waste recipe so I wouldn't recommend doing any trial and error as you will loose vital amounts of buttercream.
The steps
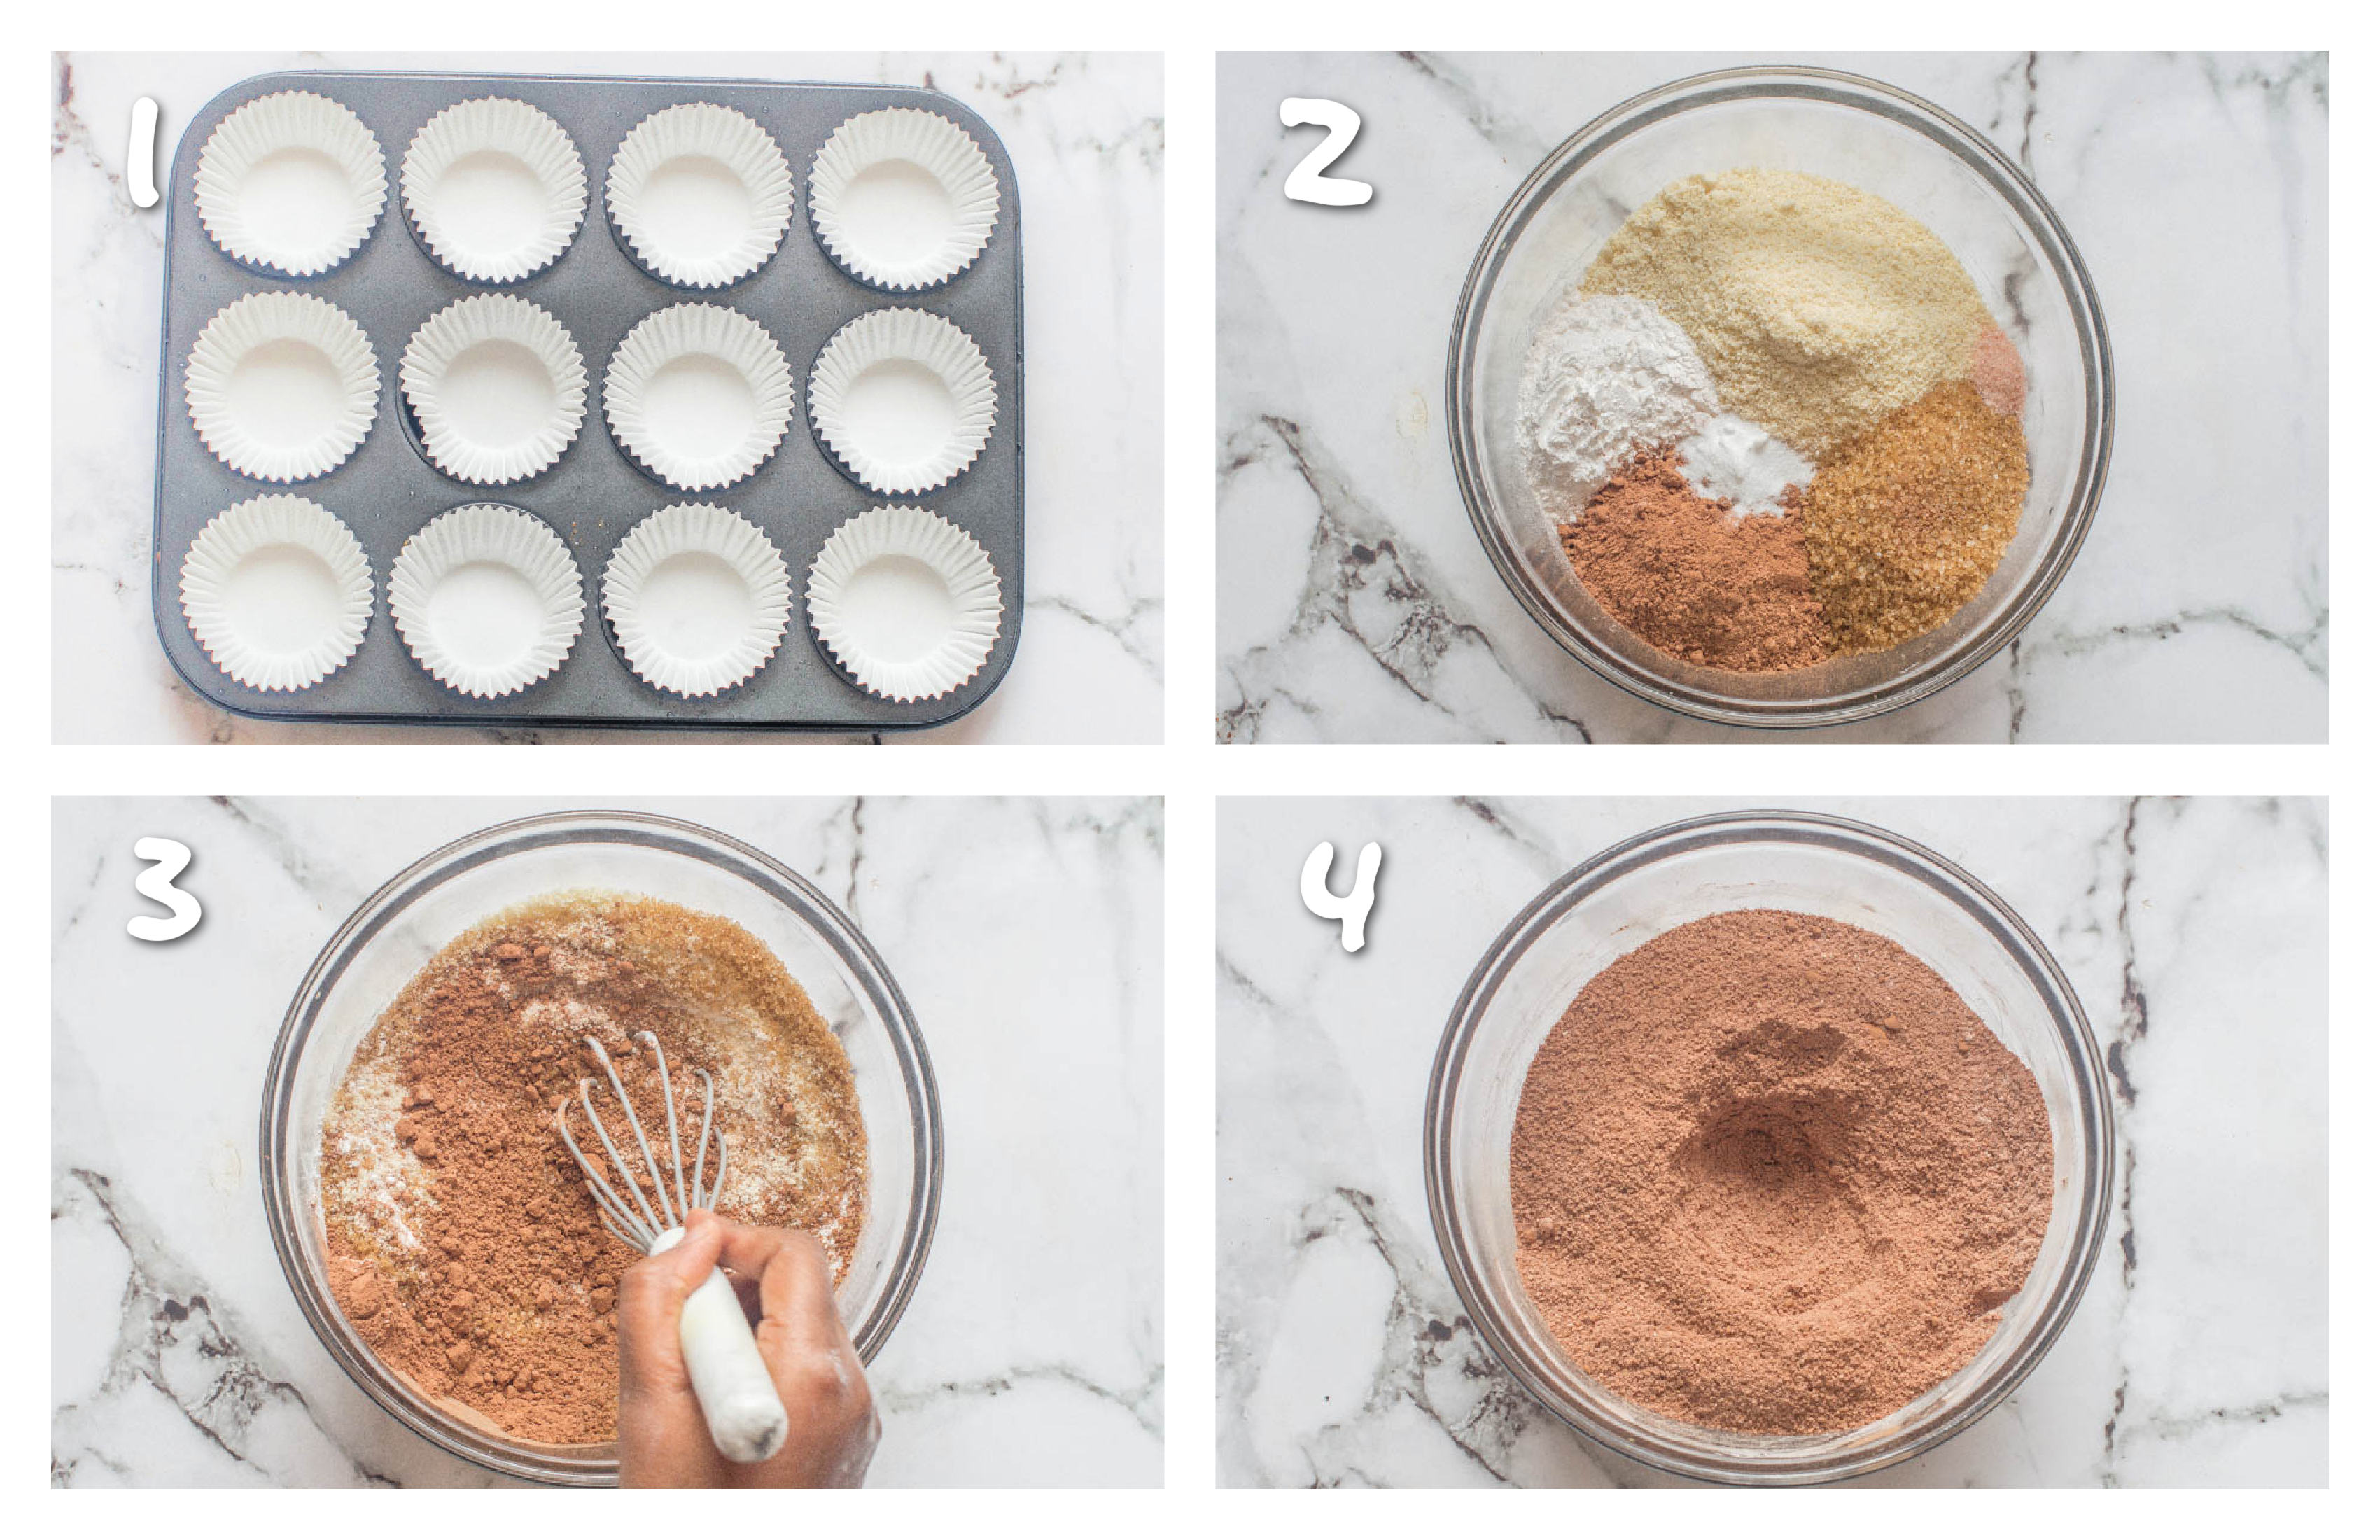
- Preheat oven to 356F/180C.
- Add the cupcake liners to the pan and set aside.
- In a medium sized bowl, add the almond flour, tapioca starch, cacao powder, raw cane sugar, baking soda and pink salt.

- Whisk the dry ingredients together to combine.
- In a jug, add the almond milk, olive oil, apple cider vinegar and peppermint extract.
- Whisk the wet ingredients together to combine.
- Slowly pour the wet ingredients to the dry bowl, in stages, whisking at the same time (you can use an electric whisk for this), only stir enough until everything is fully combined and smooth. Do not overbeat the batter.
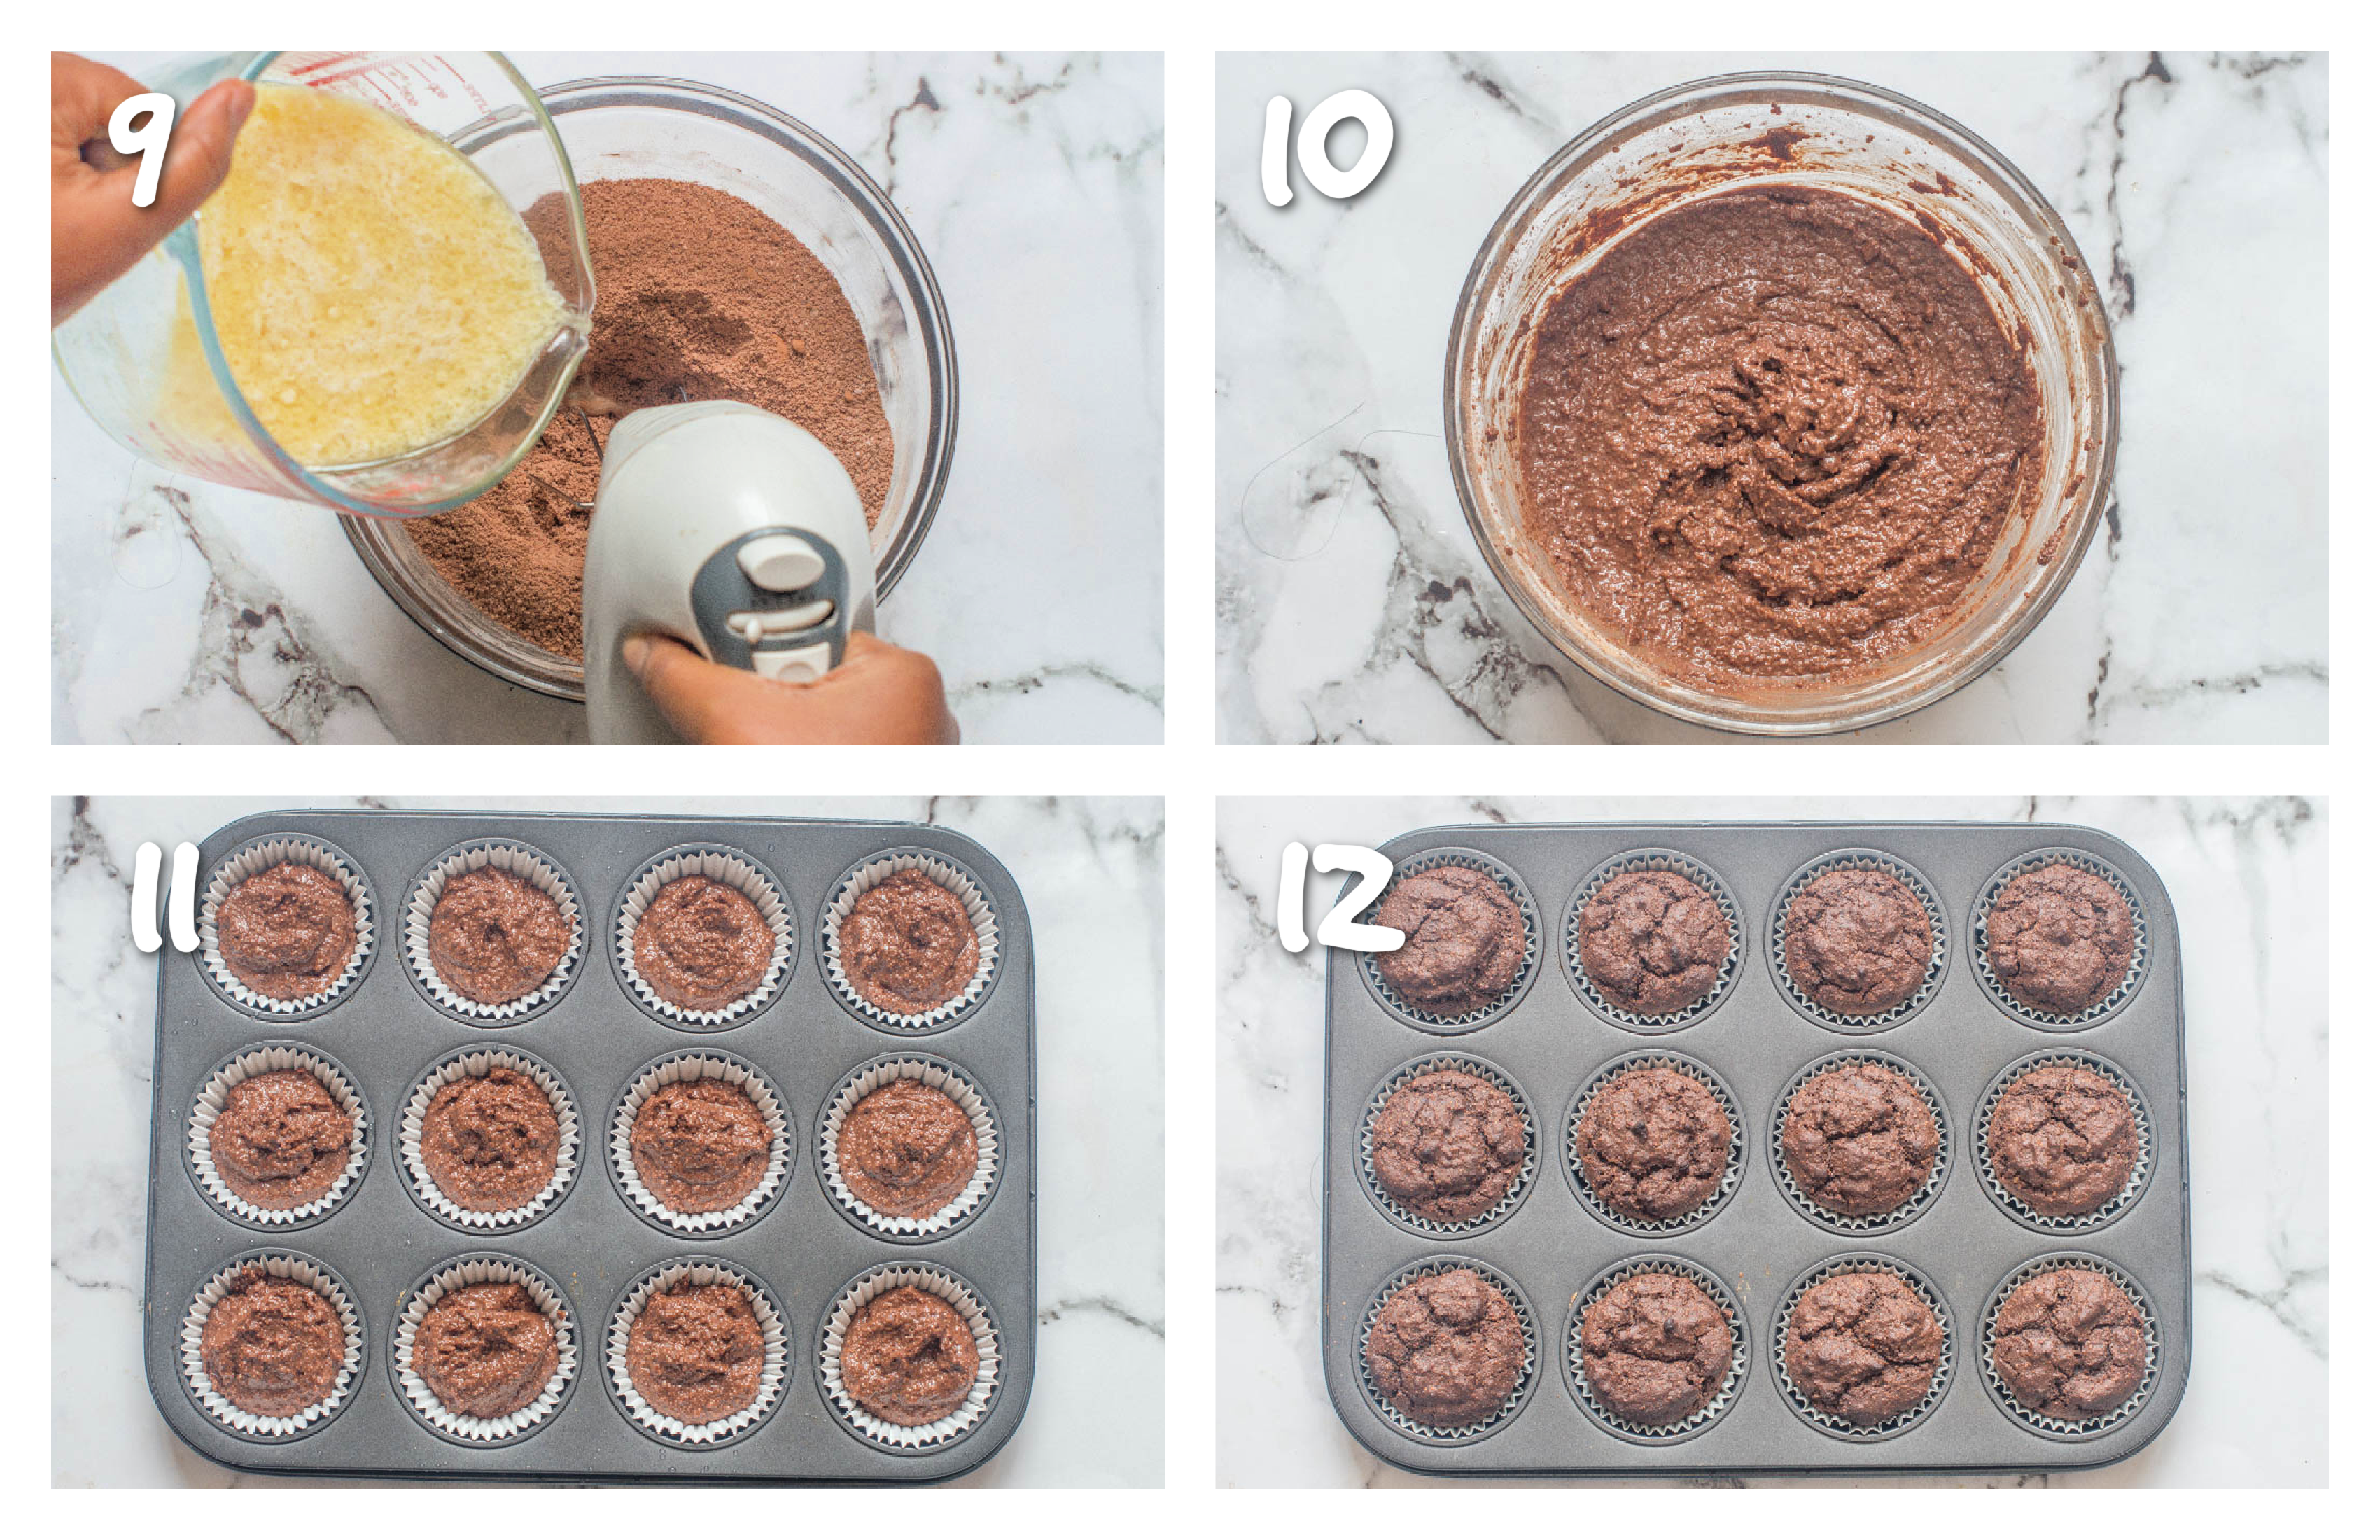
- Spoon the batter into the cupcake liners (fill the cups no more than ¾).
- Bake the cupcakes for 15-20 minutes (mine took 18 minutes) or until a toothpick inserted in the middle comes out clean.
- Remove the cupcakes from the oven, leave them to cool for 5 minutes before placing them on a cooling rack to completely cool down before applying any frosting.
To make the buttercream frosting
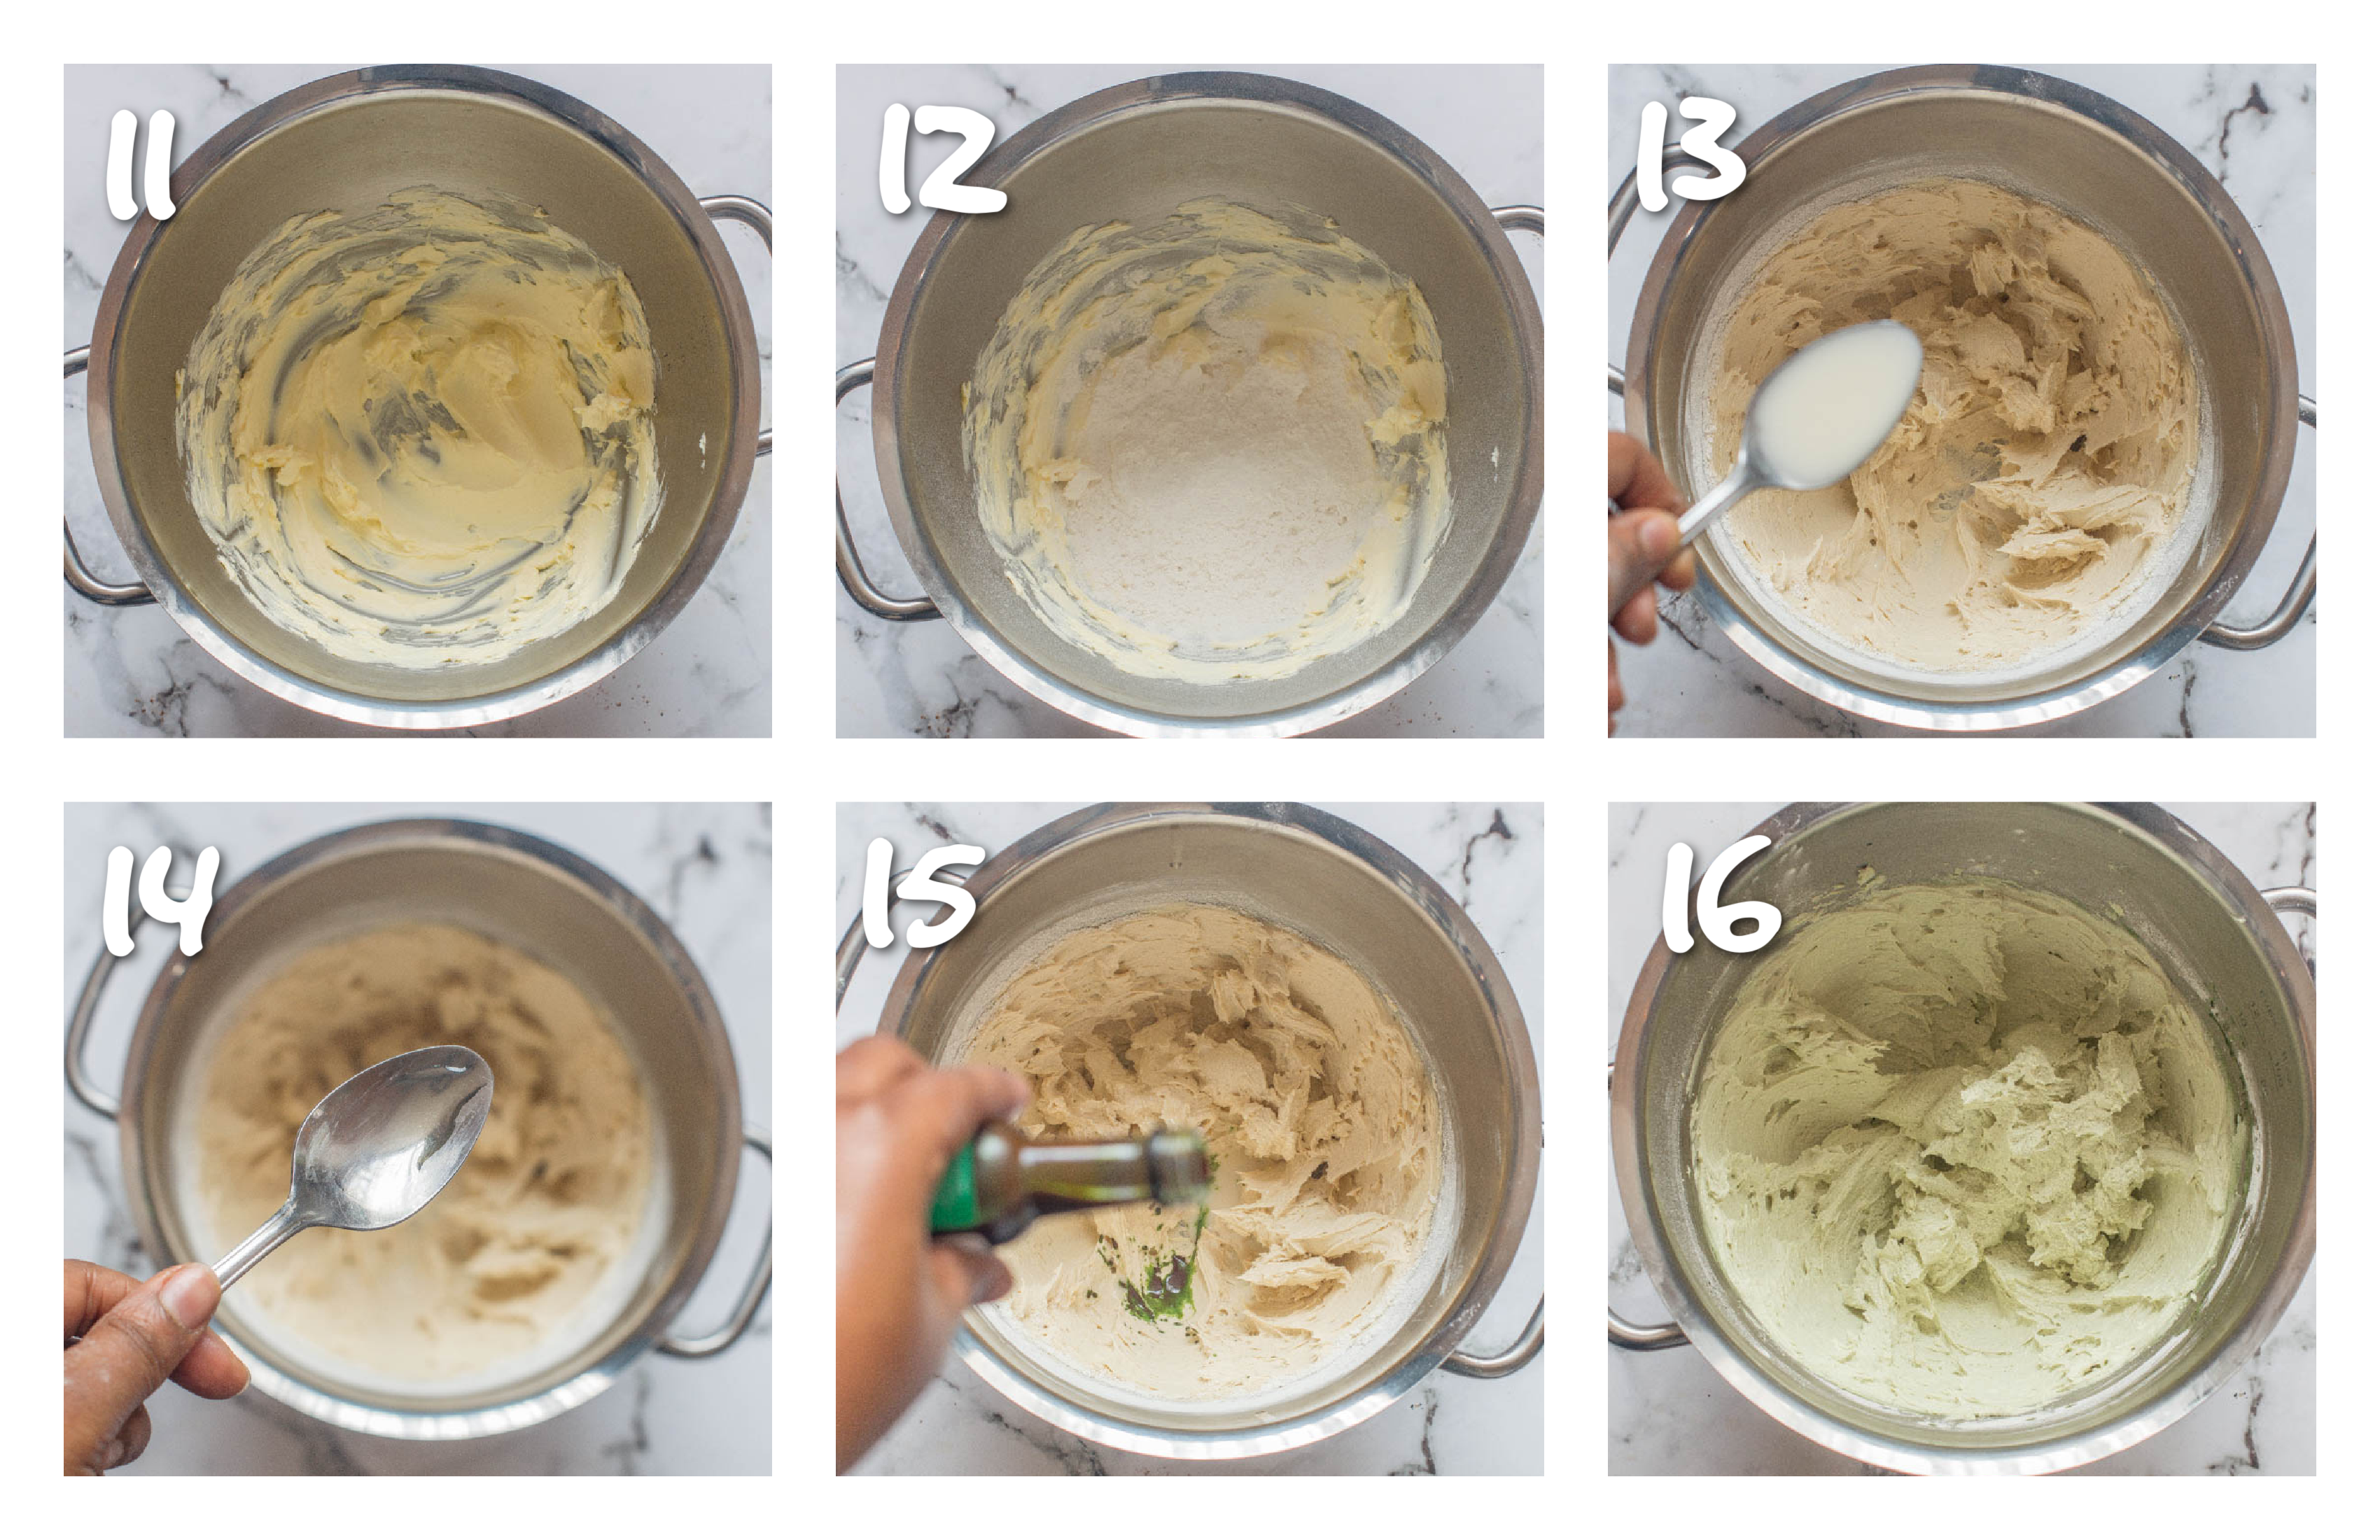
- Add the butter to a stand mixer bowl fitted with a paddle (you can follow the instructions by using an electric whisk instead).
- Proceed to beat the butter, starting on the lowest and gradually increasing to medium speed until the butter is creamy.
- While the mixer is still running, carefully add the powdered sugar, in intervals. Be sure to scrape down the sides of the bowl.
- Add the peppermint extract and the almond milk (a tablespoon at a time) while continuing to beat the buttercream until it is fluffy.
- Add the green food colouring, a drop at a time, until you reach your desired shade of green.
To frost the cupcakes using a spoon
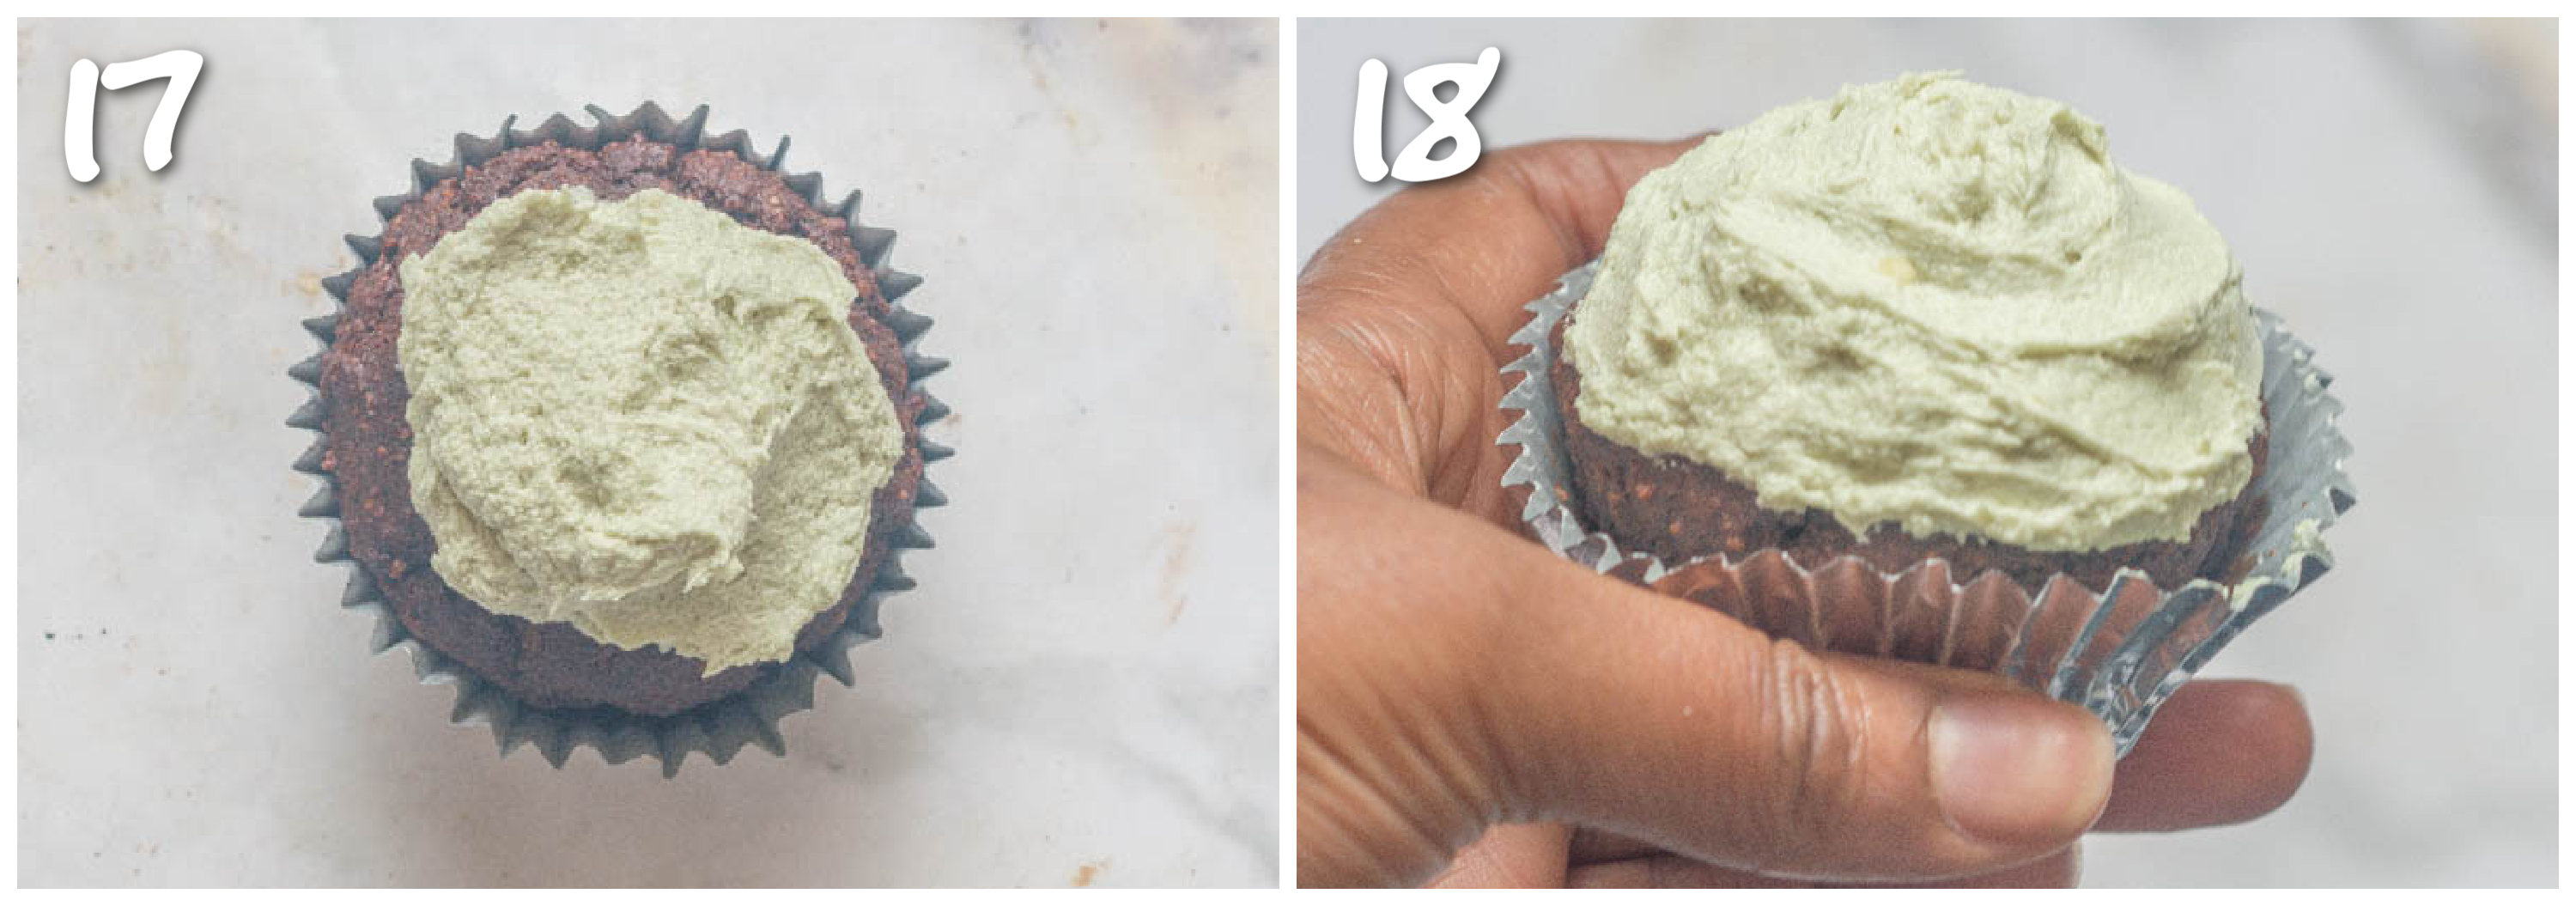
- Spoon a large dollop of frosting onto your cupcake.
- Pick up the cupcake and use the back of the spoon to smooth it around the edges
- Run the tip of the spoon around the edge in an upwards motion to create a swirl.
- Repeat the above steps with the remaining cupcakes.
To frost the cupcakes using a piping bag with a nozzle

- Trim off the tip of the piping bag.
- Insert the nozzle inside the piping bag, and push the nozzle through towards the end that you trimmed off so it is sticking out. It should feel secure and not burst through the bag.
- Place the bag, nozzle first, downwards inside of a tall glass (the nozzle should hang inside the glass freely and not be squashed) and roll the excess part of the piping bag over the glass.
- Fill the piping bag with the buttercream by ¾ (do not overfill the bag or you won't be able to close it/use it).
- Twist the remaining part of the piping bag to secure the buttercream.
- Place the piping bag in your hand so that your thumb and first finger are resting by the part that you just twisted.
- Hover the piping nozzle over the edge of the cupcake and gently squeeze the top of the piping bag to release the buttercream, moving in a circular motion around the edge of the cupcake to where you first started.
- While still applying some pressure, bring the nozzle more inwards while still moving in a circular motion to create a upwards swirls to cover the rest of the cupcake.
- Repeat the above steps with the rest of the cupcakes
Frequently asked questions
You can determine their readiness by inserting a tooth pick or a skewer directly in the centre of the cupcake.
The tooth pick/skewer should come out clean when it is ready. If it doesn't then you will need to bake abit longer.
I generally do this in 10 minute intervals, checking until they are done.
The apple cidar vinegar sort of acts like an egg replacement where it activates the baking soda to help with raising in vegan recipes.
The key to making cupcakes light and fluffy is being careful not to overmix the batter.
You only want to mix the batter enough until everything is folded in and full combined.
If your cupcakes are dry it could be because the batter has been overbeaten. Also, it may be because the cupcakes have been over baked which will draw out the moisture.
Another thing, are the liquid levels to flour, the batter should be thick, but easy to mix, if the batter is too heavy this will make the cupcakes dry.
Notes and tips
- Store the cupcakes (frosted and unfrosted) in an air tight container for up to 3 days.
- Alternatively you can carefully wrap the cupcakes in plastic wrap on the countertop, away from heat.
- This recipe makes a total of 12 cupcakes.
- Do not refrigerate the cupcakes, they hold up much better when stored correctly at room temperature.
- Freeze the cupcakes (unfrosted) for up to 3 months , be sure to wrap them securely in several layers of plastic wrap and defrost them before using them.
- Don't overmix the batter, you only want to stir enough times to fully combine the ingredients.
- You can use either cassava flour or arrowroot starch in place of tapioca starch.
- When making the buttercream, you will want the butter to be at room temperature and very soft to the touch (leave the butter out on the countertop a few hours or overnight ahead of time).
- Don't overbake the cupcakes or the texture will be dry and crumbly.
- Don't overfill the cup liners with too much batter, fill by no more than ¾ on the liner..
- You can use a spoon if you are a beginner or piping bag with a nozzle to apply the buttercream.
- If you are a beginner or not confident with using the piping bag method then simply opt to use the spoon method instead.
- Don't make your buttercream too thin in texture or else you may struggle to apply your topping.
More vegan cookies and cakes to try
- Sorrel Cookies
- Cassava Pone
- Vegan Pistachio Cookies
- Guava Cheesecake
- Vegan Chocolate Orange Cake
- Gluten Free Shortbread Cookies
- Vegan Chocolate Cherry Cookies
**Don't forget to comment below and star rate if you have tried my recipes. Let's be friends and engage on YouTube, Facebook and Instagram I also like to pin on Pinterest, where you can find more amazing recipes.**

Chocolate Mint Cupcakes (Vegan, Gluten Free and Grain Free)
Ingredients
To make the cupcakes
- 2½ cups almond flour (280g)
- ½ cup tapioca starch (60g)
- ½ cup cacao powder (43g)
- ½ cup raw cane sugar (100g)
- 1 teaspoon baking soda (4g)
- ¼ teaspoon pink salt (1.5g)
- 1¼ cup almond milk (300ml)
- ¼ cup olive oil (60ml)
- 1 tablespoon apple cider vinegar (15ml)
- 2 teaspoon peppermint extract (8g)
To make the buttercream frosting (This makes only enough for exactly 12 cupcakes!)
- ½ cup vegan butter (113g) softened
- 2½ cups powdered sugar (300g)(I used unrefined powdered cane sugar)
- 3-4 tablespoon almond milk (45ml)
- ½ teaspoon peppermint extract (3g)
- green food coloring see instructions
Instructions
To make the cupcakes
- Preheat oven to 356F/180C.
- Add the cupcake liners to the pan and set aside.
- In a medium sized bowl, add the almond flour, tapioca starch, cacao powder, raw cane sugar, baking soda and pink salt.
- Whisk the dry ingredients together to combine.
- In a jug, add the almond milk, olive oil, apple cider vinegar and peppermint extract.
- Whisk the wet ingredients together to combine.
- Slowly pour the wet ingredients to the dry bowl, in stages, whisking at the same time (you can use an electric whisk for this), only stir enough until everything is fully combined and smooth. Do not overbeat the batter.
- Spoon the batter into the cupcake liners (fill the cups no more than ¾).
- Bake the cupcakes for 15-20 minutes (mine took 18 minutes) or until a toothpick inserted in the middle comes out clean.
- Remove the cupcakes from the oven, leave them to cool for 5 minutes before placing them on a cooling rack to completely cool down before applying any frosting.
To make the buttercream frosting
- Add the butter to a stand mixer bowl fitted with a paddle (you can follow the instructions by using an electric whisk instead).
- Proceed to beat the butter, starting on the lowest and gradually increasing to medium speed until the butter is creamy.
- While the mixer is still running, carefully add the powdered sugar, in intervals. Be sure to scrape down the sides of the bowl.
- Add the peppermint extract and the almond milk (a tablespoon at a time) while continuing to beat the buttercream until it is fluffy.
- Add the green food colouring, a drop at a time, until you reach your desired shade of green.
To apply the buttercream frosting (spoon method)
- Spoon a large dollop of frosting onto your cupcake.
- Pick up the cupcake and use the back of the spoon to smooth it around the edges.
- Run the tip of the spoon around the edge in an upwards motion to create a swirl.
- Repeat the above steps with the remaining cupcakes.
To apply the buttercream (piping bag with nozzle method)
- Trim off the tip of the piping bag.
- Insert the nozzle inside the piping bag, and push the nozzle through towards the end that you trimmed off so it is sticking out. It should feel secure and not burst through the bag.
- Place the bag, nozzle first, downwards inside of a tall glass (the nozzle should hang inside the glass freely and not be squashed) and roll the excess part of the piping bag over the glass.
- Fill the piping bag with the buttercream by ¾ (do not overfill the bag or you won't be able to close it/use it).
- Twist the remaining part of the piping bag to secure the buttercream.
- Place the piping bag in your hand so that your thumb and first finger are resting by the part that you just twisted.
- Hover the piping nozzle over the edge of the cupcake and gently squeeze the top of the piping bag to release the buttercream, moving in a circular motion around the edge of the cupcake to where you first started.
- While still applying some pressure, bring the nozzle more inwards while still moving in a circular motion to create a upwards swirls to cover the rest of the cupcake.
- Repeat the above steps with the rest of the cupcakes.
Notes
- Store the cupcakes (frosted and unfrosted) in an air tight container for up to 3 days.
- Alternatively you can carefully wrap the cupcakes in plastic wrap on the countertop, away from heat.
- This recipe makes a total of 12 cupcakes.
- Do not refrigerate the cupcakes, they hold up much better when stored correctly at room temperature.
- Freeze the cupcakes (unfrosted) for up to 3 months , be sure to wrap them securely in several layers of plastic wrap and defrost them before using them.
- Don't overmix the batter, you only want to stir enough times to fully combine the ingredients.
- You can use either cassava flour or arrowroot starch in place of tapioca starch.
- When making the buttercream, you will want the butter to be at room temperature and soft to the touch (leave the butter out on the countertop a few hours or overnight ahead of time).
- Don't overbake the cupcakes or the texture will be dry and crumbly.
- Don't overfill the cup liners with too much batter, fill by no more than ¾ on the liner..
- You can use a spoon if you are a beginner or piping bag with a nozzle to apply the buttercream.
- If you are a beginner or not confident with using the piping bag method then simply opt to use the spoon method instead.
- Don't make your buttercream too thin in texture or else you may struggle to apply your topping.


TAYLER ROSS says
I made these cupcakes last night and they were fantastic! And so easy to make too!
Charla says
Thank you for your positive feedback Tayler.
Stephanie says
I've never had a vegan cupcake that tasted this good! I'm not a vegan but do try to eat as many plant based recipes as I can just because they're better for you. This one is delicious and I will be definitely making it again!
Charla says
Yay! I'm so glad to hear that Stephanie.
Angela says
Love chocolate and mint combo! This is a great and healthy dessert. Thanks for sharing.
Charla says
You are more than welcome Angela.
Ned says
Chocolate mint is the perfect combo for these cupcakes! Delicious!
Charla says
I totally agree!
kushigalu says
One if the best flavor combo. These cupcakes look fantastic.
Charla says
Thank you so much Kushigalu.