
Learn how to make a basic beginner friendly pie crust that's vegan and free from gluten. Use it for all of your sweet and savoury dishes, each and everytime!

Pie crust can be very intimidating, in fact it's not unusual to hear people express their disdain for making their own pie crust and buying a premade one instead.
I cannot say I blame them because I lacked the patience for rolling out the dough until I started blogging.
Gluten free pie crust is on a different level to wheat flour based crusts and making one that's perfect is a tall order.
While I won't claim my recipe is the best ever, I am confident enough to share how I make mine because I believe it is satisfactory.
This is one of the most basic GF pie crust recipes you'll get, it's straight forward and entry level without overcomplicating this with additional folding and rolling to yield flakiness (we can leave that for another time).
I will forewarn you that making aesthetically pleasing pie crust takes practice, so don't worry if yours isn't picture perfect just as long as it is close to what is pictured, that is the main thing.
I endeavour to walk you through the steps so you can use this pie crust for both sweet and savoury recipes.
Especially during the holiday season where pies are a must have in most households.
Although I am slightly late to hop on the GF pie crust wagon, what I have to share is noteworthy and a must try!

Making your pie crust
You don't need any fancy equipment, you do need my homemade gluten free flour blend.
I use my hands to breakdown the vegan butter into the flour rather then use a pastry cutter because I've been making crumbles/topping using my hands for years with no problems.
With that being said, if you have a pastry cutter by all means use it.
You will notice that I use both vegan butter and coconut yoghurt in this recipe. Rather than use sour cream which contains dairy.
The secret to a good pie crust is in the fat, butter being one component but when you add sour cream or in this case coconut yoghurt, it's a game charger.
By using yoghurt, you are adding an extra layer of fat which results in a more moist and flaky crust (if you choose to fold the dough over several times when rolling it out).
If I want a flaky pie crust then I will fold the dough over like a letter several times to achieve flakiness but today I am keeping things simple and beginner friendly by making a basic GF pie crust.
The amount of water that you will need when forming the dough is subjective. I simply add a tablespoon at a time until a pliable dough is formed.
You won't need much and it is essential not to overwork the dough as you will break down the fats too much and possibly compromise the texture.
The dough will need to rest in the freezer to firm up some more before being rolled out and shaped in your pie dish.
I prefer to use the freezer to chill the dough as opposed to the refrigerator to hasten things up.
I have included how to blind bake the crust before you use it for your recipes.
If you choose not to use your pie crust straight away then omit this step and come back to it when necessary.
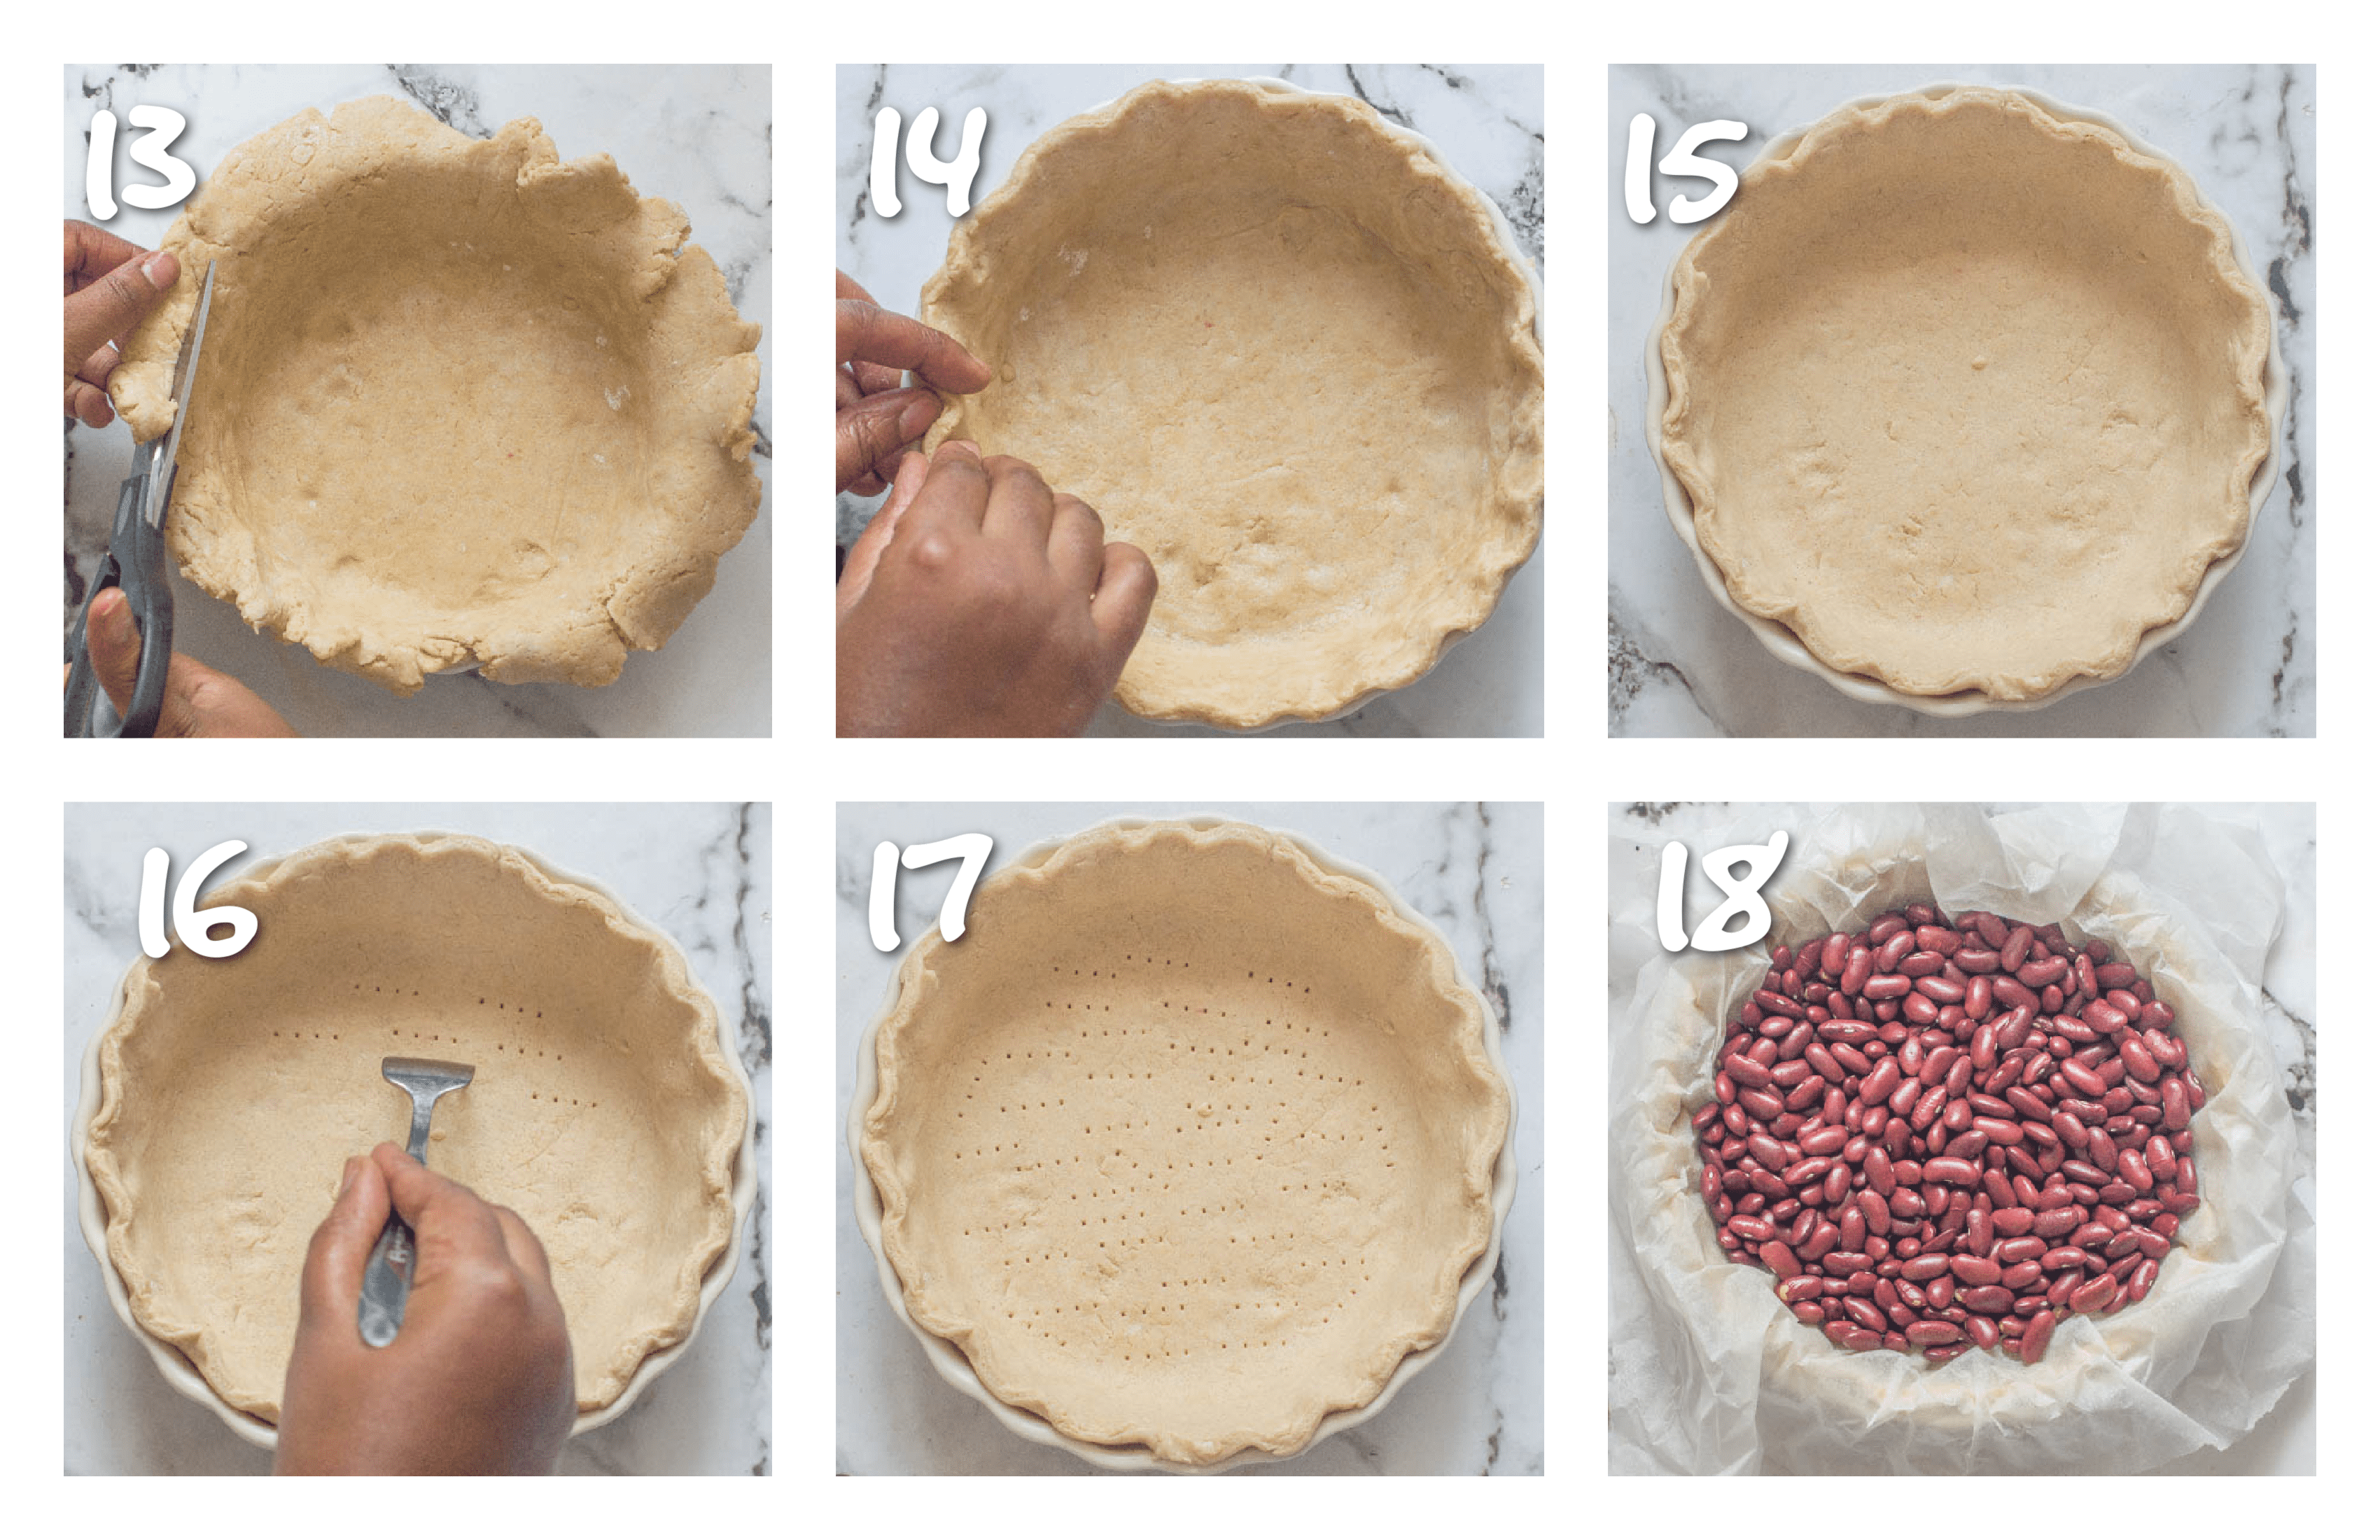
When I blind bake my pie crust I do it using parchment paper and dried beans (any that I have to hand).
This is something that I saw my mom and grandmother do, it was a budget friendly method that I still like to humbly use rather than purchase pie weighs.
By no means am I condemning the use of pie weighs but if you want to save some money then use a copious amount of dried rice or beans instead.
The steps
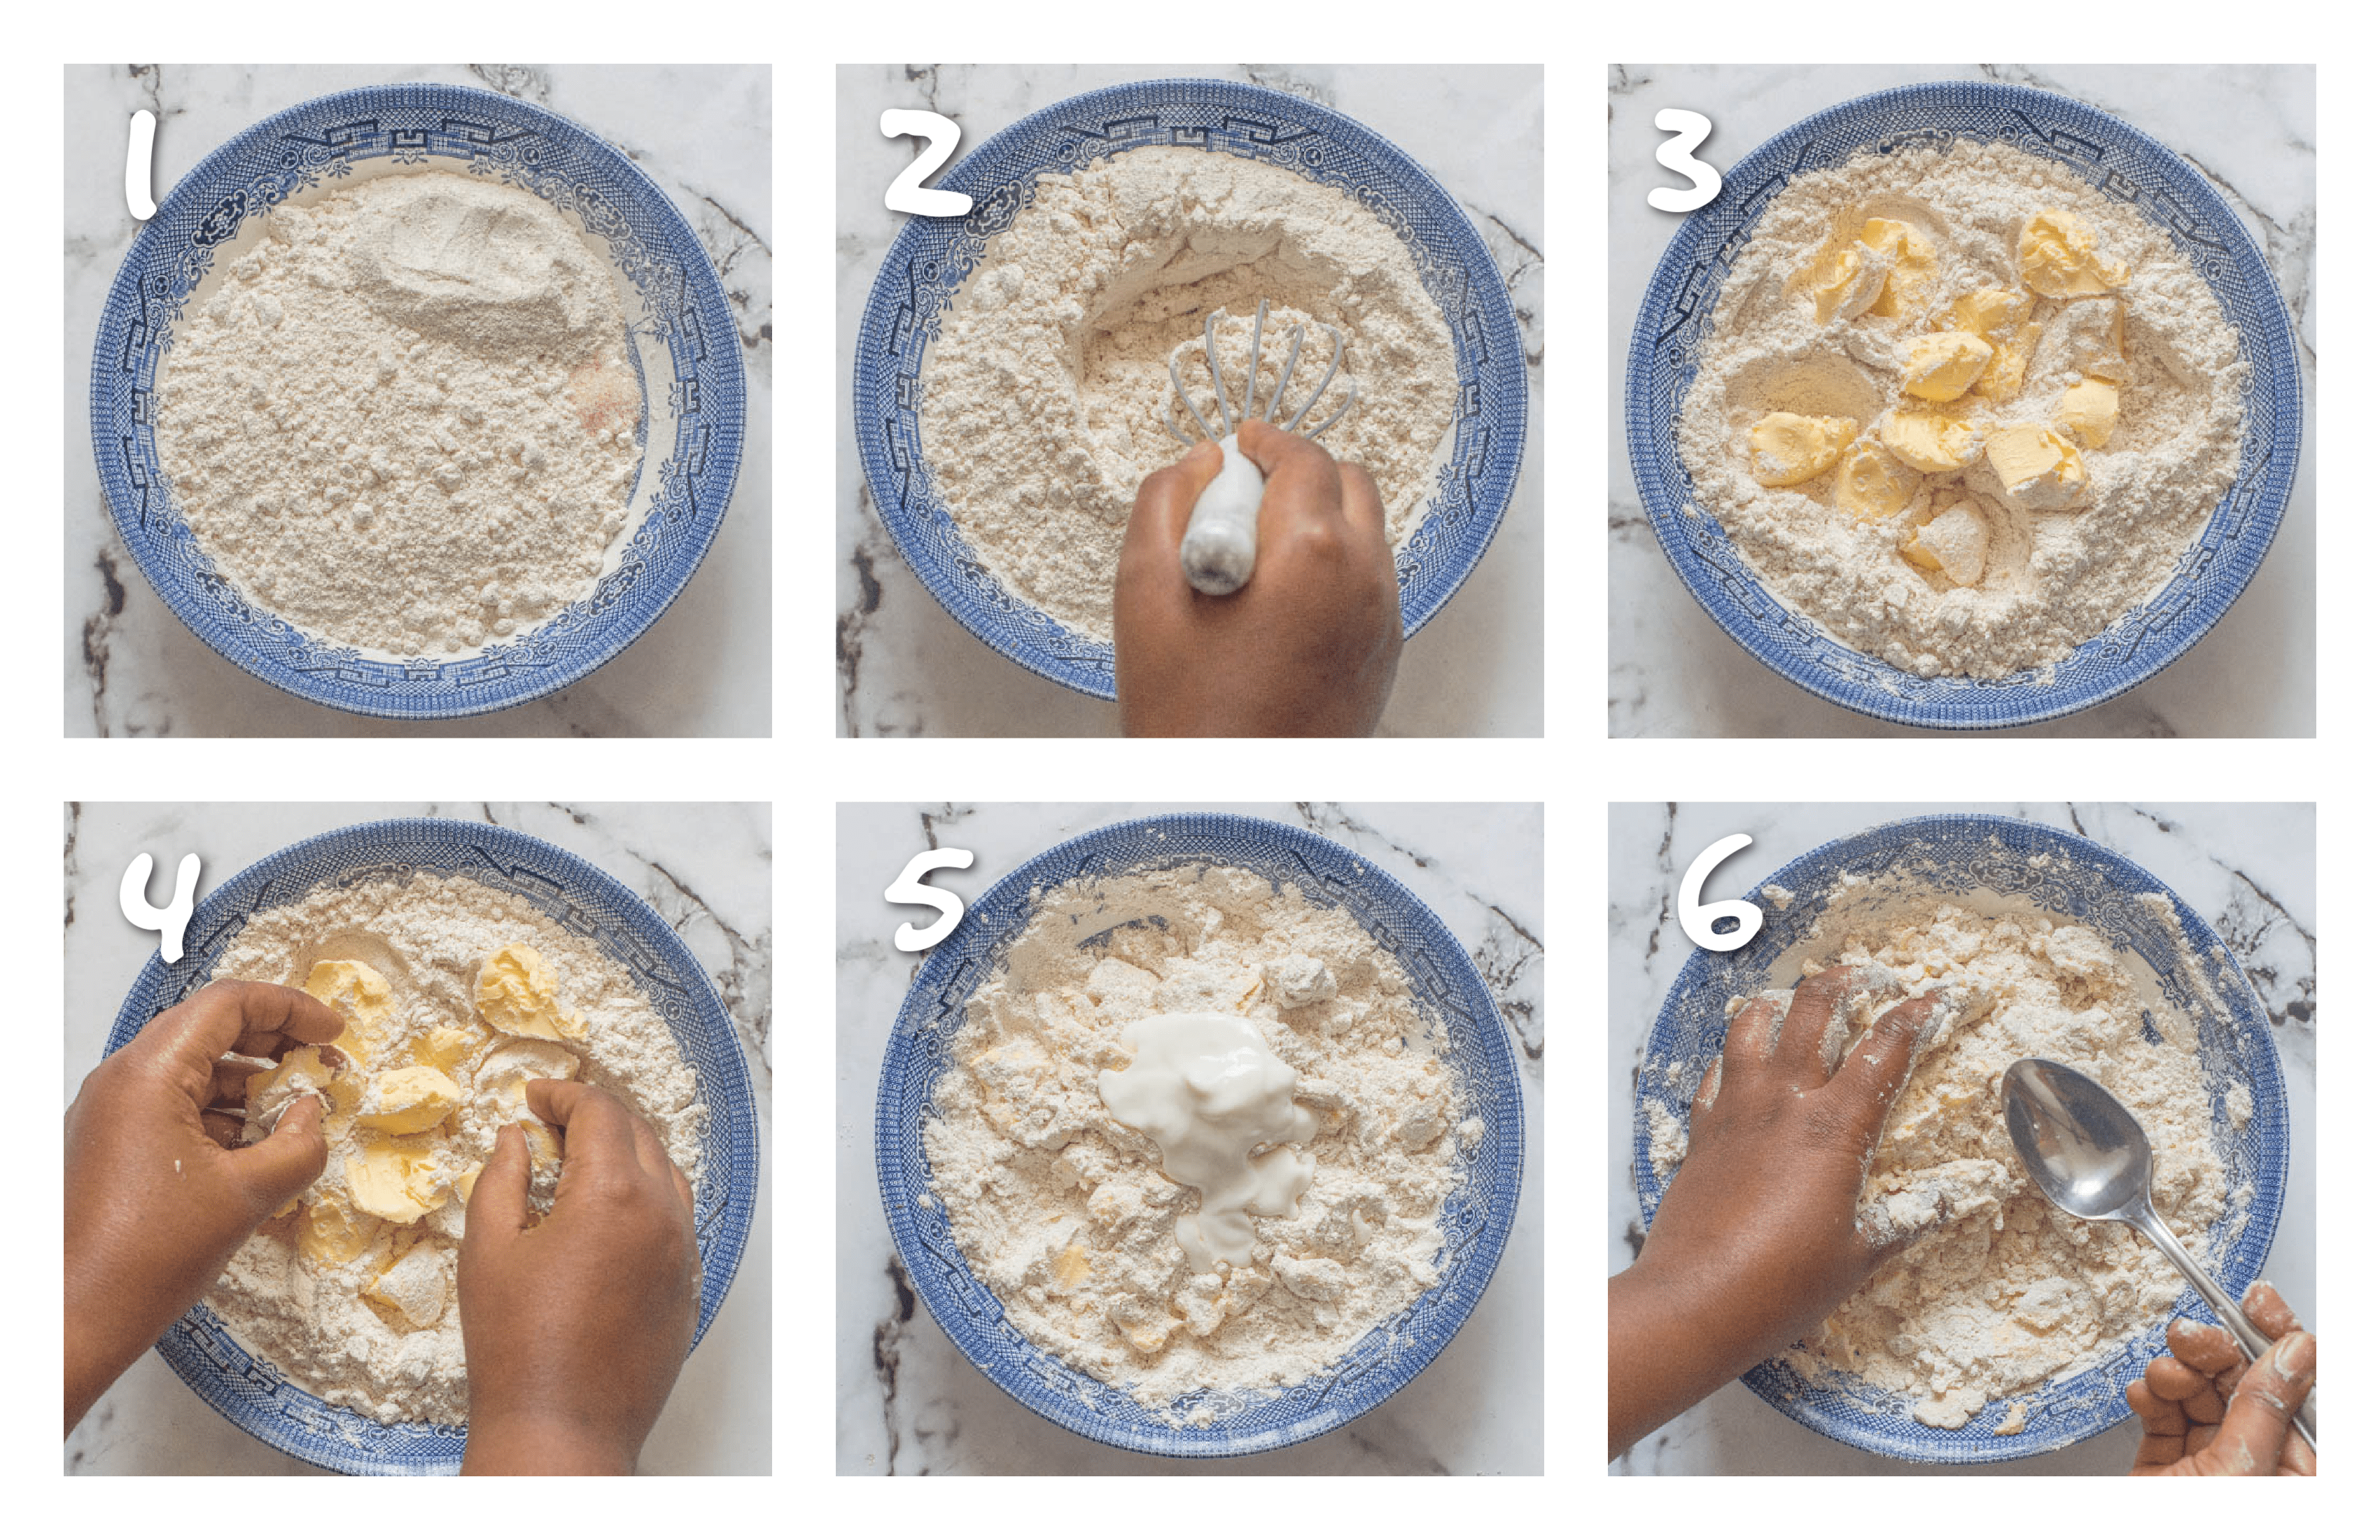
- In a large bowl, add the gluten free flour, coconut sugar (if making a sweet pie) and pink salt.
- Add the butter to the flour and make a crumble, try not to breakdown the chunks of butter too much, if possible.
- Add the coconut yoghurt and start to form a pliable dough (it won't be smooth and will have cracks, that's normal). The main focus is that the dough is firm enough to roll). Add ice cold water one tablespoon at a time, if needed.
- Transfer the dough onto some plastic wrap/cling film and flatten it as you wrap it up.
- Place the dough in the freezer (yes that's right) to chill for 30 minutes or longer if it still feels too soft.

- Meanwhile grease an 8 inch ceramic or glass pie dish and set aside.
- Unwrap the dough and turn it out on a lightly floured piece of parchment paper (make sure your workstation is big enough to accommodate rolling).
- Lightly dust the rolling pin and roll out the dough so it is wider than the pie dish (I like to hover the dish over the dough to ensure accuracy) the dough should be about ⅛ inch in thickness or around that region.
- Invert the pie dish over the dough that is rolled out and carefully flip everything over so the dough is now inside the dish.
- Use the pads of your fingers/knuckles to neatly press the dough into the pie dish, a section at a time to lessen the chances of the dough ripping. If it does, it's okay, just use your fingers to repair it by smoothing out the dough or using abit of the excess dough.
- Use kitchen scissors to trim off the extra at the top, trim so that only a small amount of extra dough is hanging from the dish.
- Crimp the edges by using an index finger and thumb to push the pastry forward and use the forefinger of another hand to pinch the pastry.
- Cover the pastry with plastic wrap/cling film and chill for 30 minutes - 1 hour or until you are ready to use it.
To blind bake the pie crust
- Preheat the oven to 375F/180C.
- Remove the pie crust from the refrigerator and unwrap.
- Pierce the bottom of the crust with the tines of a fork.
- Line the entire pie crust with parchment paper (be sure there is enough to cover it).
- Fill the inside of the parchment paper with pie weighs, dried beans or an oven proof filling of your choice (make sure it is completely filled and weighed down to retain its shape).
- Place in the centre of an oven to parbake for roughly 10 minutes, until lightly golden.
- Allow to cool before proceeding with your recipe.
Frequently asked questions
As the crust contains coconut yoghurt, I wouldn't advise making the crust no more than 2 days in advance.
During this time, you will want to keep the crust wrapped with saran/cling film and refrigerated.
YES! If you plan to make a recipe with your pie crust, then you will need to blind bake crust before using it.
The reason for this is when you add your filling to an uncooked pie crust this will result in a soggy bottom and the filling most likely won't be cooked through.
There are a few reasons for this, usually if you add too much water. Also if you don't allow the pie crust to rest for an adequate amount of time.
Another cause could be that you overworked the dough, this is a no no.
If you roll the dough out too thin and stretch it this could be another culprit. On the contrary, if the dough is not rolled out wide enough this can cause shrinkage.
It's abit difficult to determine how that happened without being present but the above are the most common causes for this.
Yes, you can but this tutorial is to show you how to make a basic pie crust for beginners.
In the future I will consider updating the post with instructions on how to make a flaky pie crust.
You will need to make another separate batch to accommode any additional dough that is needed.
I have only just started rolling out recipes using this flour blend/pie crust but this Vegan Sweet Potato Pie is a great starting point.
Notes and tips
- I highly recommend weighing out your ingredients rather than solely depending on cups. This is important for achieving the best results possible.
- This recipe is for a basic beginner friendly pie crust only, it doesn't include how to make a flaky crust.
- This is the link that you will need to make Homemade Gluten Free Flour Blend.
- This recipe is for an 8 inch ceramic pie dish.
- The time that is listed in the recipe card doesnt include resting time.
- DON'T throw away the dried beans if you are using them. Save yourself some money by storing the beans in a zip lock bag and freezing them and just thaw them out before doing your blind baking.
- If the dough breaks apart while you are transferring it to the pie dish, simply use your fingers to re-shape it.
- It is extremely important to use butter and yoghurt that is extremely COLD. Place the butter in the freezer for a short period of time prior to making the dough if you need to.
- DON'T over work the dough, you just want to form a dough ball and retain some chunks of butter if possible.
- Add the ice cold water a tablespoon at a time, if needed to form the dough.
- If you don't plan on using the pie crust straight away, keep it refrigerated for up to 2 days.
- YOU MUST BLIND BAKE the pie crust at some point, DON'T use it in its raw state.

More recipes to try
- Gluten Free Roti
- Plantain Flour
- Sweet Potato Flour
- How to Dehydrate Peppers
- How to Make Sea Moss Gel
- How to Steam Vegetables On The Stove
- How to Cook Brown Rice
**Don't forget to comment below and star rate if you have tried my recipes. Let's be friends and engage on YouTube, Facebook and Instagram I also like to pin on Pinterest, where you can find more amazing recipes.**

Gluten Free Vegan Pie Crust
Ingredients
- 2 cups Charla's gluten free flour blend (250g)
- 2 tablespoon powdered coconut sugar (25g)(only use for a sweet pie crust)
- ½ teaspoon pink salt
- 6 tablespoon vegan butter (80g) chopped + must be COLD!
- 5 tablespoon vegan yoghurt (85g) (I used coconut yoghurt)
- water (ice cold, if needed)
- extra GF flour for dusting
Instructions
To make the dough
- In a large bowl, add the gluten free flour, powdered coconut sugar (if making a sweet pie) and pink salt.
- Add the butter to the flour and make a crumble, try not to breakdown the chunks of butter too much, if possible.
- Add the coconut yoghurt and start to form a pliable dough (it won't be smooth and will have cracks, that's normal). The main focus is that the dough is firm enough to roll). Add ice cold water one tablespoon at a time, if needed.
- Transfer the dough onto some plastic wrap/cling film and flatten it as you wrap it up. Place the dough in the freezer (yes that's right) to chill for 30 minutes or longer if it still feels too soft.
To roll out and shape the dough
- Meanwhile grease an 8 inch ceramic or glass pie dish and set aside.
- Unwrap the dough and turn it out on a lightly floured piece of parchment paper (make sure your workstation is big enough to accommodate rolling).
- Lightly dust the rolling pin and roll out the dough so it is wider than the pie dish (I like to hover the dish over the dough to ensure accuracy) the dough should be about ⅛ inch in thickness or around that region.
- Invert the pie dish over the dough that is rolled out and carefully flip everything over so the dough is now inside the dish.
- Use the pads of your fingers/knuckles to neatly press the dough into the pie dish, a section at a time to lessen the chances of the dough ripping. If it does, it's okay, just use your fingers to repair it by smoothing out the dough or using abit of the excess dough.
- Use kitchen scissors to trim off the extra at the top, trim so that only a small amount of extra dough is hanging from the dish.
- Crimp the edges by using an index finger and thumb to push the pastry forward and use the forefinger of another hand to pinch the pastry.
- Cover the pastry with plastic wrap/cling film and chill for 30 minutes - 1 hour or until you are ready to use it.
To blind bake the pie crust
- Preheat the oven to 375F/180C.
- Remove the pie crust from the refrigerator and unwrap.
- Pierce the bottom of the crust with the tines of a fork.
- Line the entire pie crust with parchment paper (be sure there is enough to cover it)
- Fill the inside of the parchment paper with pie weights, dried beans or an oven proof filling of your choice (make sure it is completely filled and weighed down to retain its shape).
- Place in the centre of an oven to par bake for roughly 10 minutes, until lightly golden.
- Allow to cool before proceeding with your recipe.
Notes
- I highly recommend weighing out your ingredients rather than solely depending on cups. This is important for achieving the best results possible.
- This recipe is for a basic beginner friendly pie crust only, it doesn't include how to make a flaky crust.
- This is the link that you will need to make Homemade Gluten Free Flour Blend.
- This recipe is for an 8 inch ceramic pie dish.
- The time that is listed in the recipe card doesnt include resting time.
- DON'T throw away the dried beans if you are using them. Save yourself some money by storing the beans in a zip lock bag and freezing them and just thaw them out before doing your blind baking.
- If the dough breaks apart while you are transferring it to the pie dish, simply use your fingers to re-shape it.
- It is extremely important to use butter and yoghurt that is extremely COLD. Place the butter in the freezer for a short period of time prior to making the dough if you need to.
- DON'T over work the dough, you just want to form a dough ball and retain some chunks of butter if possible.
- Add the ice cold water a tablespoon at a time, if needed to form the dough.
- If you don't plan on using the pie crust straight away, keep it refrigerated for up to 2 days.
- YOU MUST BLIND BAKE the pie crust at some point, DON'T use it in its raw state.


Frantz Hall says
Is this recipe good for Haitian Paties?
Charla says
Hi Frentz, unfortunately, this recipe wouldn't work for Haitian Paties.
Tara says
Such a fantastic vegan and gluten-free pie crust Charla! That texture looks amazing and I love all the tips to help make it perfect.
Charla says
Aww thank you so much Tara
kushigalu says
Love this gluten-free vegan version of the pie crust. Pinned to try this holiday season. Thanks for sharing
Charla says
No problem
Lubna says
Never knew we can make gluten-free pie crust. Looks perfect. Thank you for sharing this recipe.
Charla says
Thanks Lubna
dana says
This was great! My sister-in-law recently went GF so we're all still trying to navigate this and find recipes we can trust that are tasty. So glad I found this one! We were all fans.
Charla says
Aww thank you so much for your wonderful feedback Dana.