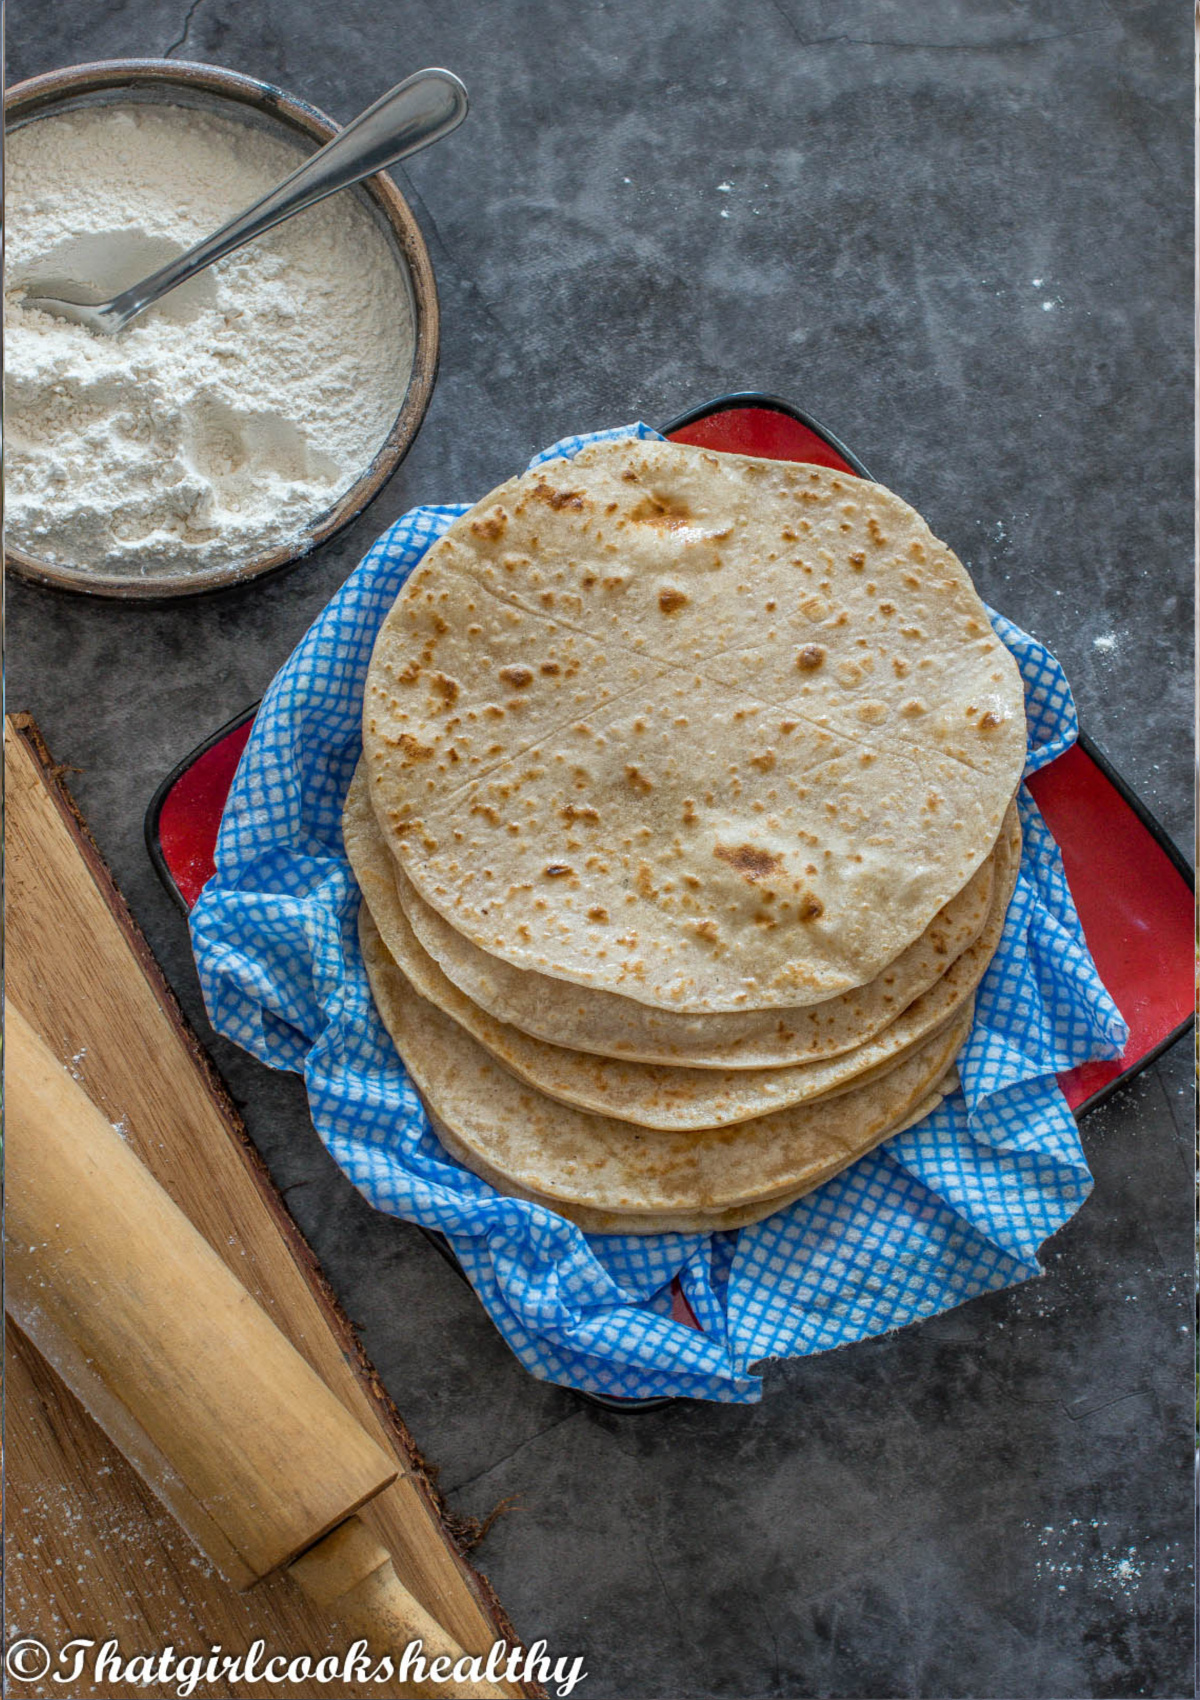
Learn how to make roti that is gluten free. It's soft, flaky, delicious, fool proof and tastes just like traditional sada roti using only a handful of ingredients.
**PLEASE READ THROUGH THE ENTIRE POST**
I'm so excited to share this recipe with my amazing readers. Trust me, this recipe is well overdue and has been heavily requested for quite some time now.
It's taken me a few years (on and off) to finally perfect this gluten free roti recipe. I cannot emphasize how important it is to follow this recipe to the tee.
It's really important to measure your ingredients, to my island folks, I know we have a tendency to eyeball the amount of ingredients from passed down knowledge and/or experience.
I grew that way too, but as a food blogger I have to measure my ingredients in order to share them to guarantee accuracy and precision.
Gluten free recipes, tend to need more adaptations to yield success so this is why it's so important to adhere to the recipe at hand.
Speaking of which, slightly off topic, but have you tried my Vegan Empanadas recipe yet? This is another example of a "dough" recipe that is very much foolproof.
What is roti?
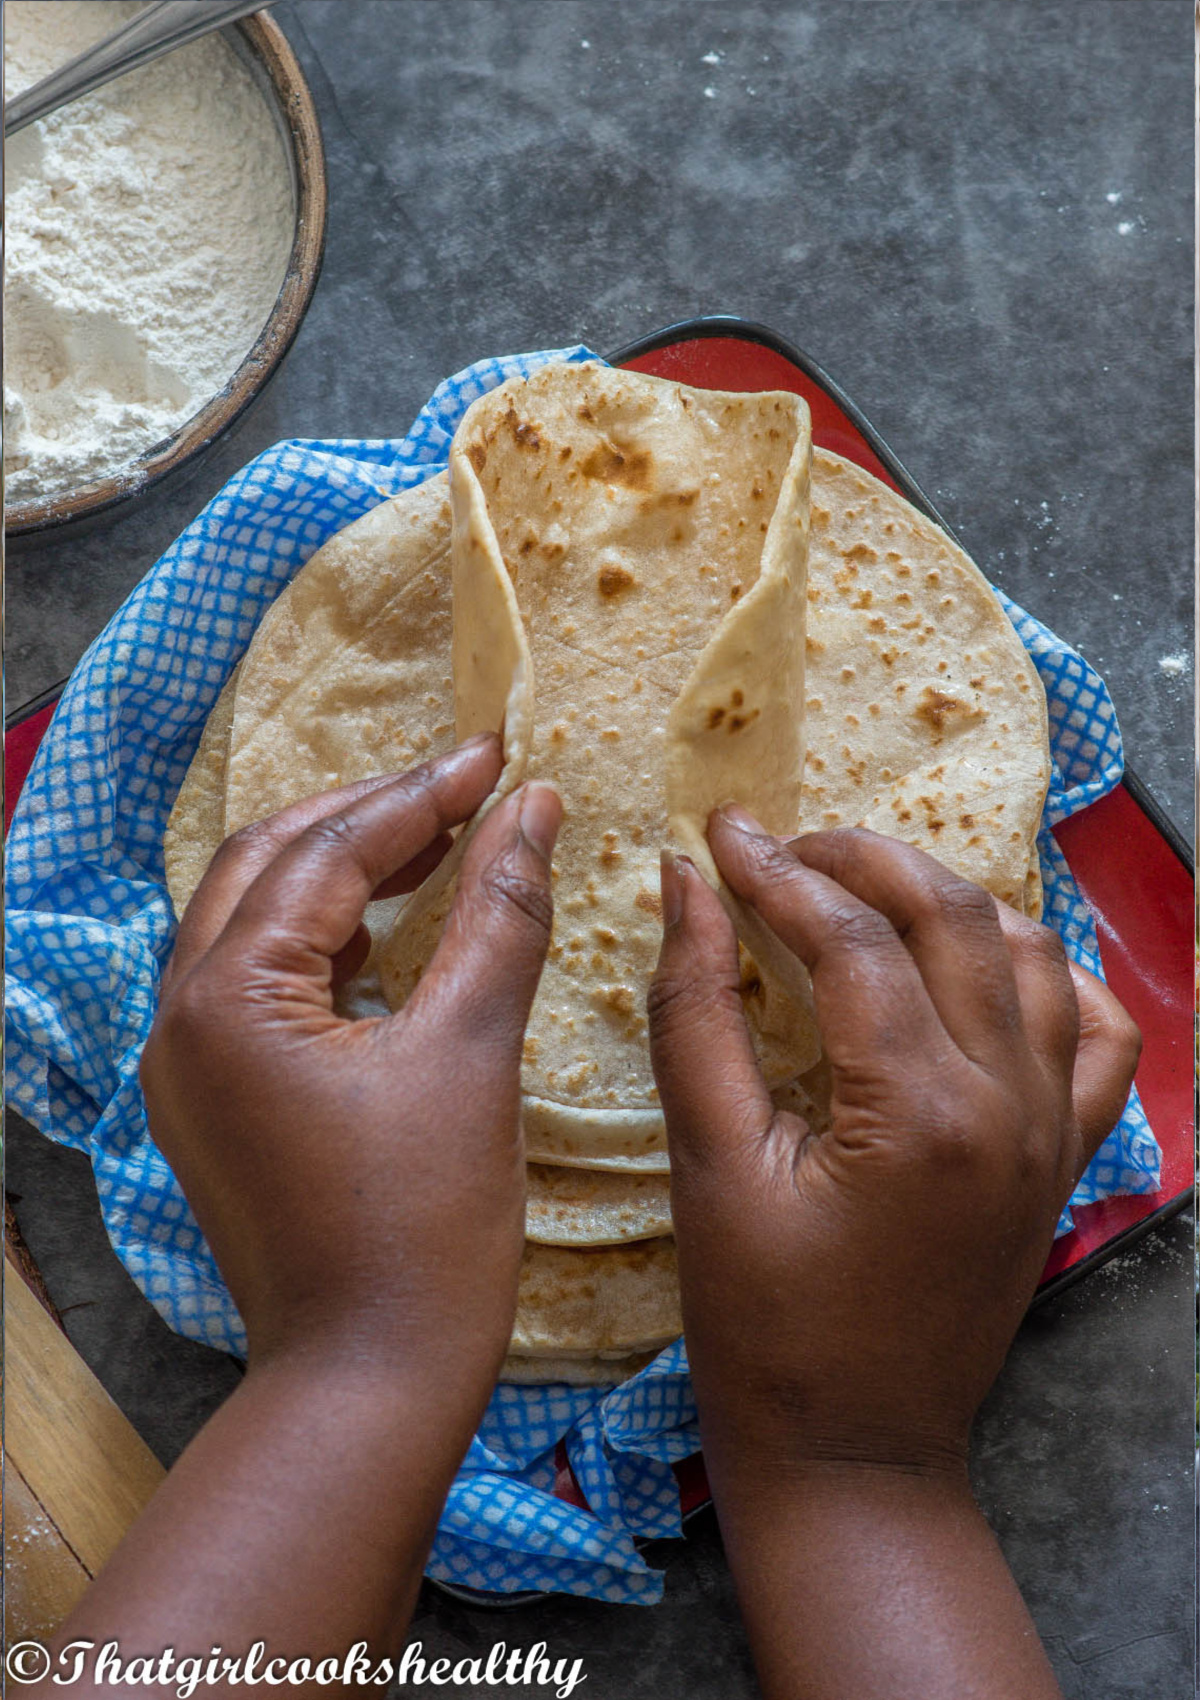
In short roti is a round flatbread that is made from stoneground wholewheat flour (atta), oil (this is optional) and water.
The aforementioned is made into a dough, the dough is then divided into smaller balls that are rolled out quite thin.
A tawa (flat pan) or an open flame is used to cook the roti. This flatbread is native to the Indian subcontinent.
Roti in the Caribbean
Roti doesn't just play a crucial role in India, due to the indentured Indians that came to the Caribbean, roti is very popular on the islands especially Trinidad and Tobago and Guyana.
There are different variations of roti here with paratha (buss up shut) and dhal puri, being the most popular.
One thing about the Caribbean Indo style roti that differs from the subcontinent Indian version is the use of baking powder.
Which means the Caribbean roti is leavened (meaning rising agents are used) whereas this isn't used in the Indian version.
Never the less, depending on what roti you're making, it still puffs up whether this is done using an open flame, the damp cloth method or roti grill.
If you are a roti lover, then please don't forget to check out my Gluten Free Naan Bread and my Gluten Free Dinner Rolls which is a bread recipe.
Making roti that is gluten free
Now that I've given you a brief explanation on what roti is and how it connects to the Caribbean. Let's talk gluten free!
First of all, making foolproof gluten free roti isn't easy, the struggle is real. If you have tried then you will feel my pain!
As I said, it took me years to perfect this recipe after copious amounts of trial and error and I'm going to share with you the do's and don'ts of making good roti that's free from gluten.
Just for the record, roti making is a skill that comes with time. It comes with lots of practice, so if you are a beginner or this is your first time making roti, then don't be so hard on yourself.
I'm going to show you how to make sada roti, which is the most basic and beginner friendly roti that you will find.
If you follow my instructions then you will be left with roti that is very much foolproof.
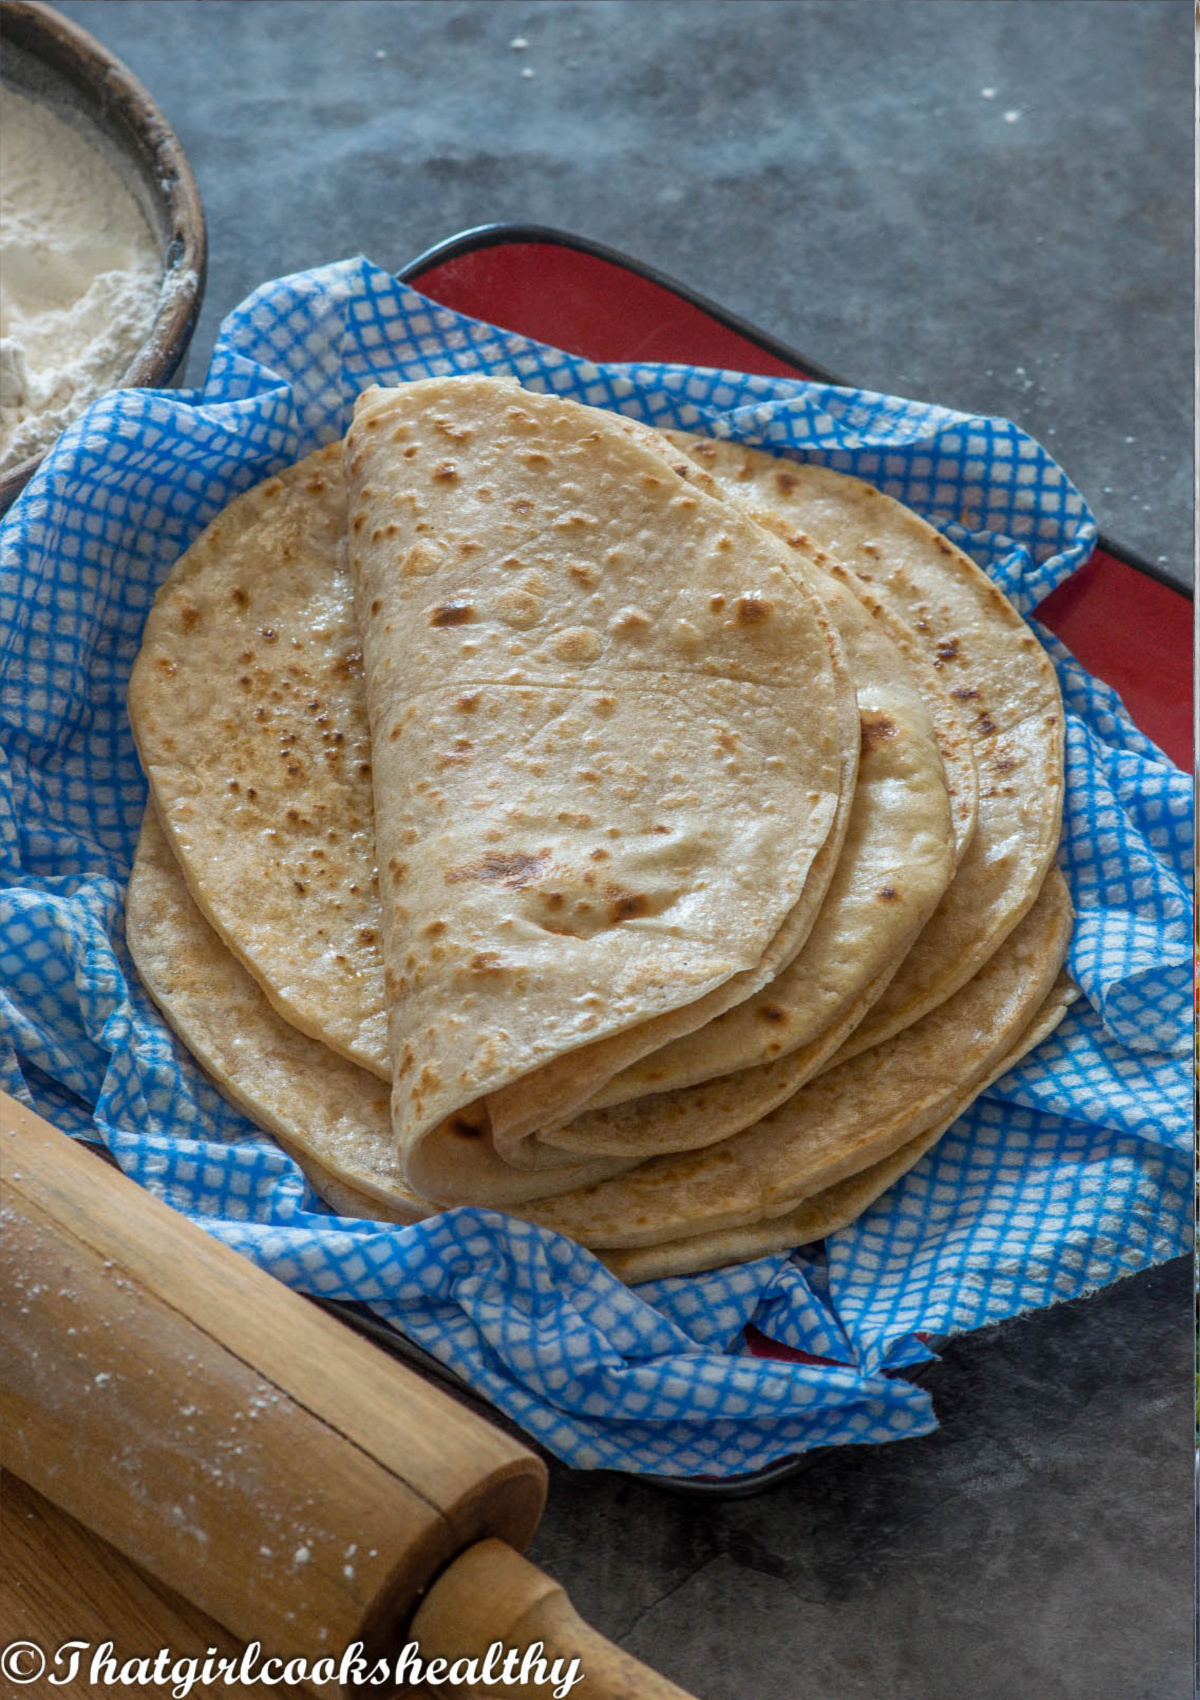
- It's soft
- It flakes
- It bends and folds!
From my trial and error the key element to making good roti that is gluten free is to use flour that is naturally doughy when water is added to it (I will explain more later).
I tried using flour blends such as millet, sorghum, brown rice, amaranth, buckwheat without and without starch and the results were terrible.
The roti didn't rise even with the use of baking powder. The overall texture was very tough and more like cardboard.
Needless to say I was very disappointed I wanted to give up but with so many of my readers asking for this specific recipe, I continued with more trial and error.
Ingredients that you will need
As we are dealing with a gluten free version, adaptations need to be made. Using a combination of cassava flour, tapioca starch, brown rice flour and other ingredients creates roti heaven.
Cassava flour - You MUST use cassava flour, this is NOT the same as tapioca starch, they are two separate things.
Cassava flour is naturally doughy when combined with water. In other words, it acts as a pseudo "gluten" the protein in flour that creates that binding element.
Cassava flour is made by grating and drying out the entire vegetable. In other words, we are using the whole vegetable not certain parts of it.
Tapioca starch - this is the extract namely from the roots of the cassava which is dried and milled. This is another essential building block that keeps the structure of the roti.
Brown rice flour - this helps to offset any gumminess from using both tapioca starch and cassava flour. Without this the roti would be very chewy and gummy, so do not skip this ingredient!!
Psyllium husk - Another binding agent, that is more gut friendly than xanthan gum.
Baking powder - This will help your roti to rise and puff (the amount of puff/swelling is subjective).
Olive oil/Pink salt - both are used to enhance the flavour and taste of your roti.
Hot water - This is a must!! Very very important, especially for this gluten free version. Hot water will keep the dough soft when you are forming it making it easy to roll.
The steps
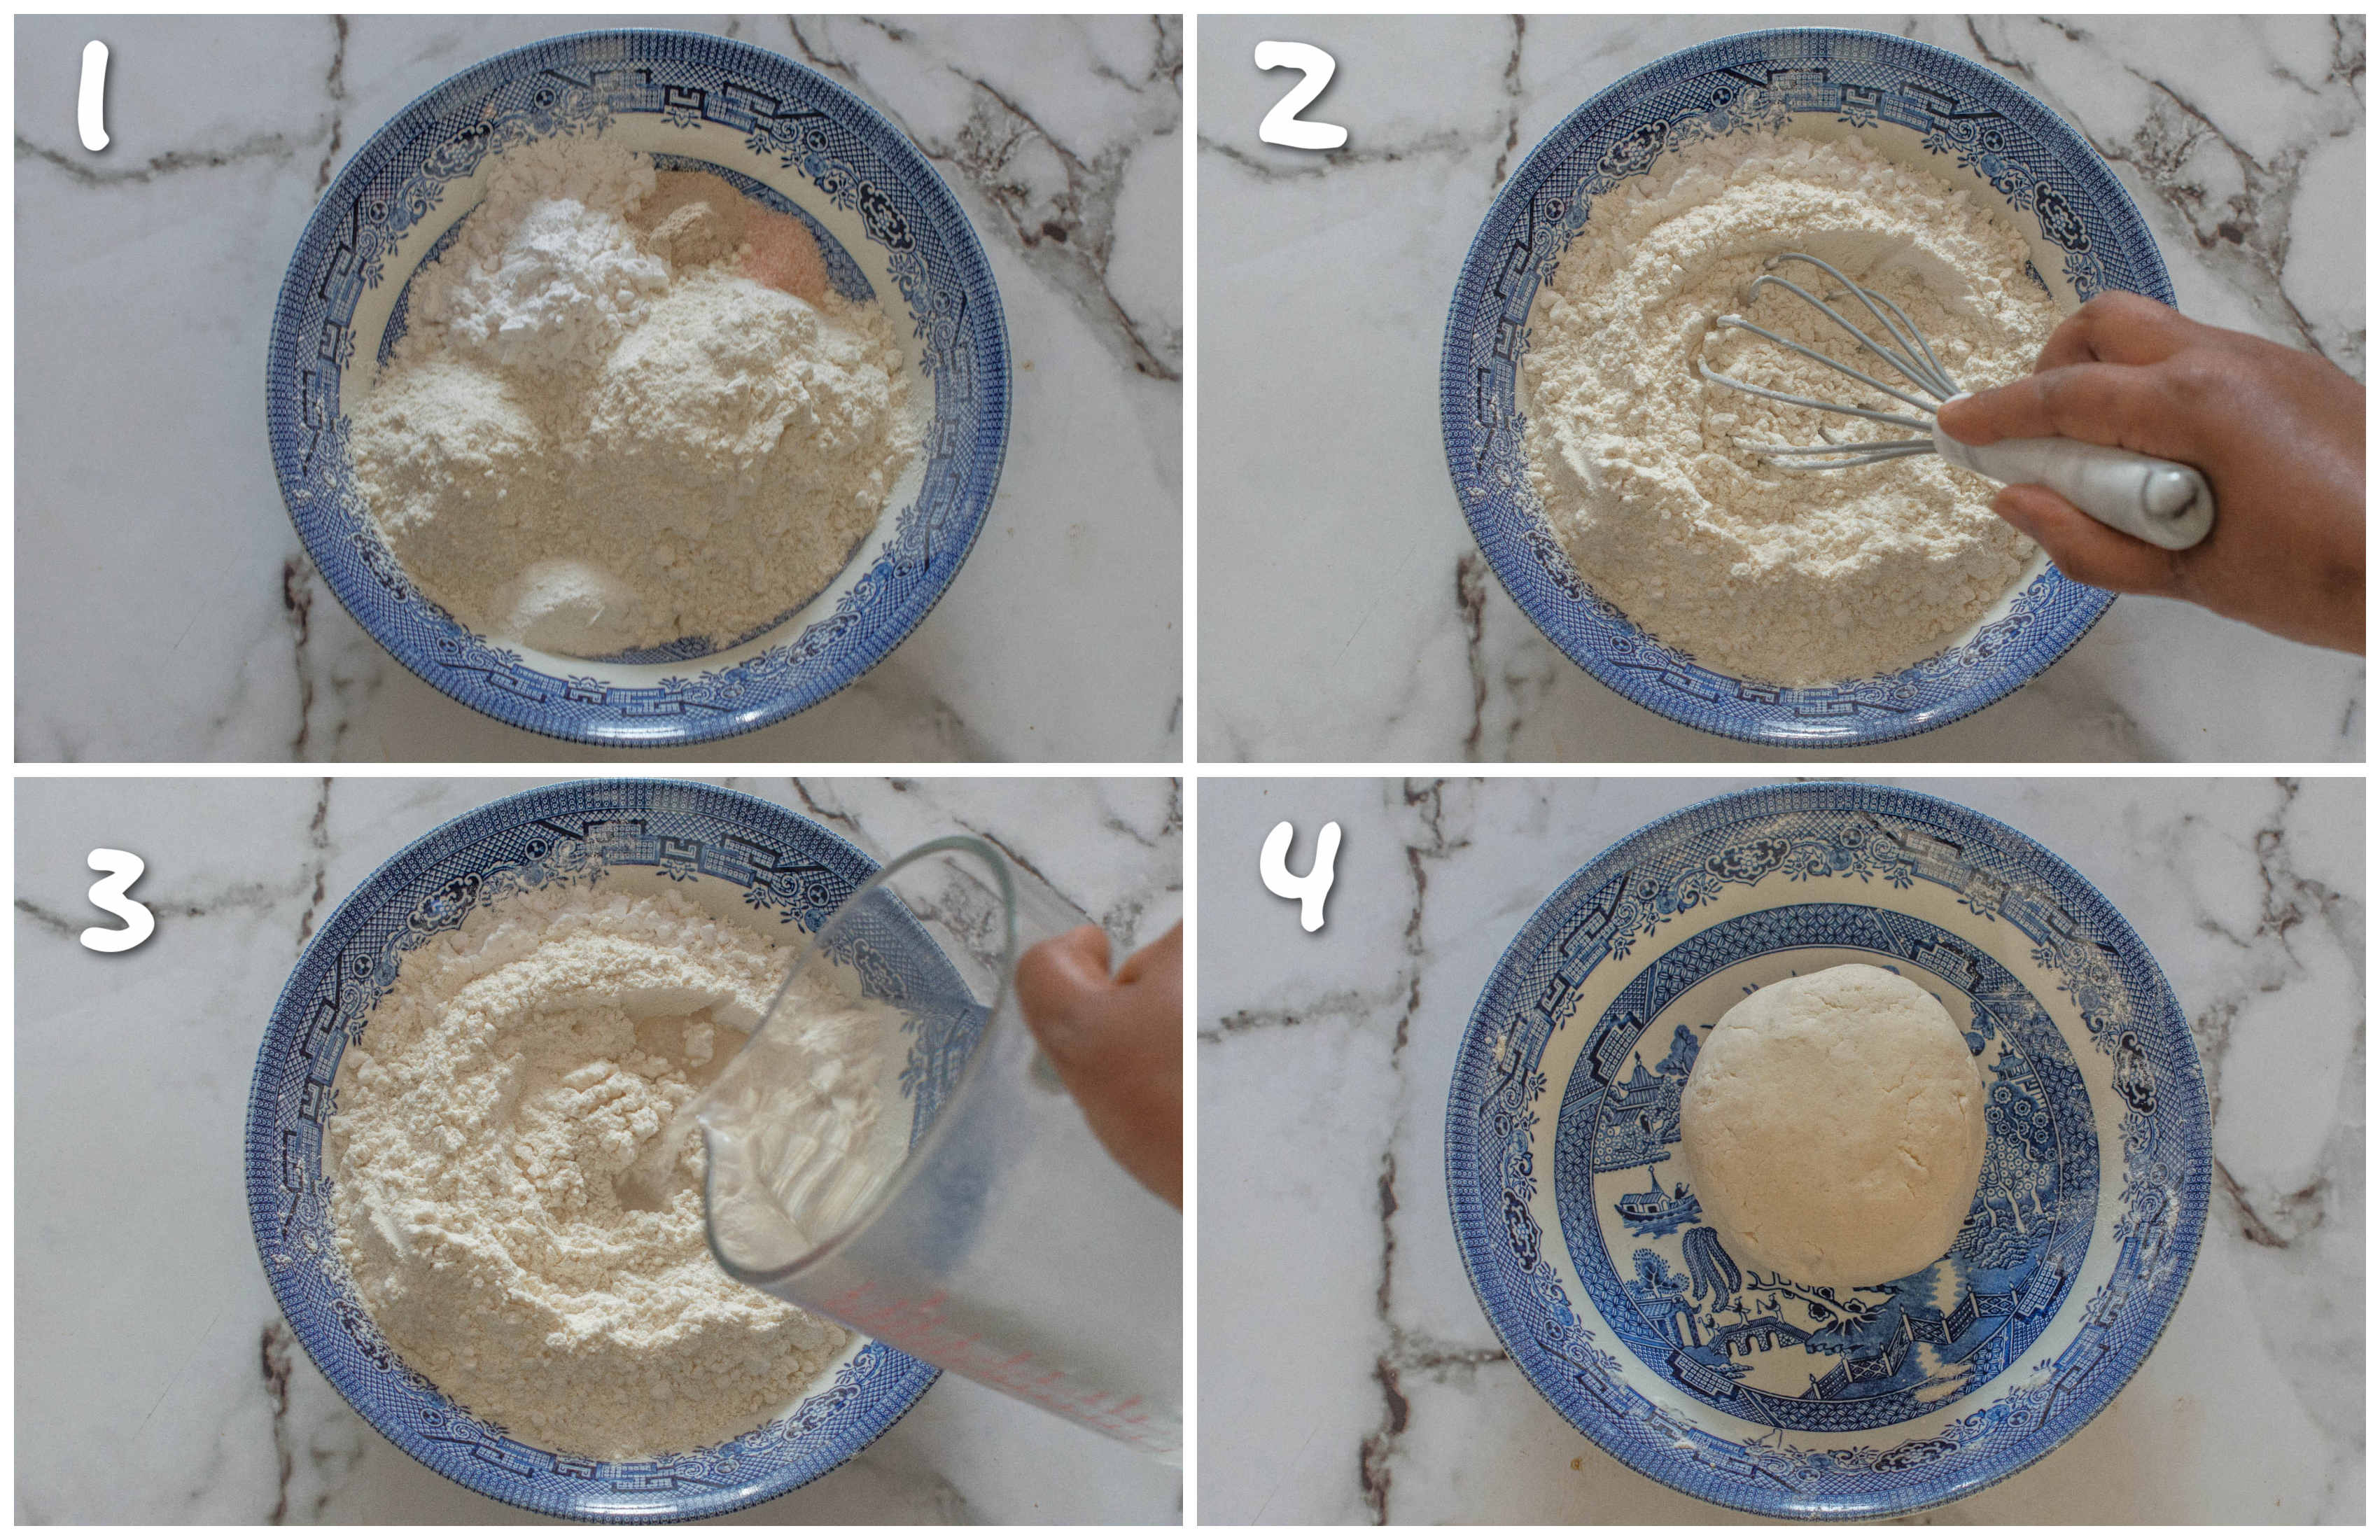
- Place all of the dry ingredients in a medium sized bowl - cassava flour, tapioca starch, brown rice flour, psyllium husk, baking powder and pink salt.
- Use a whisk or large spoon to evenly combine all of the dry ingredients.
- Drizzle in the olive oil then start to pour in the hot water, a little at a time, so in other words, do so in increments using a spatula/spoon to form a big pliable doughball (you won't need all of the hot water).
- The dough should be soft, firm but not too sticky.
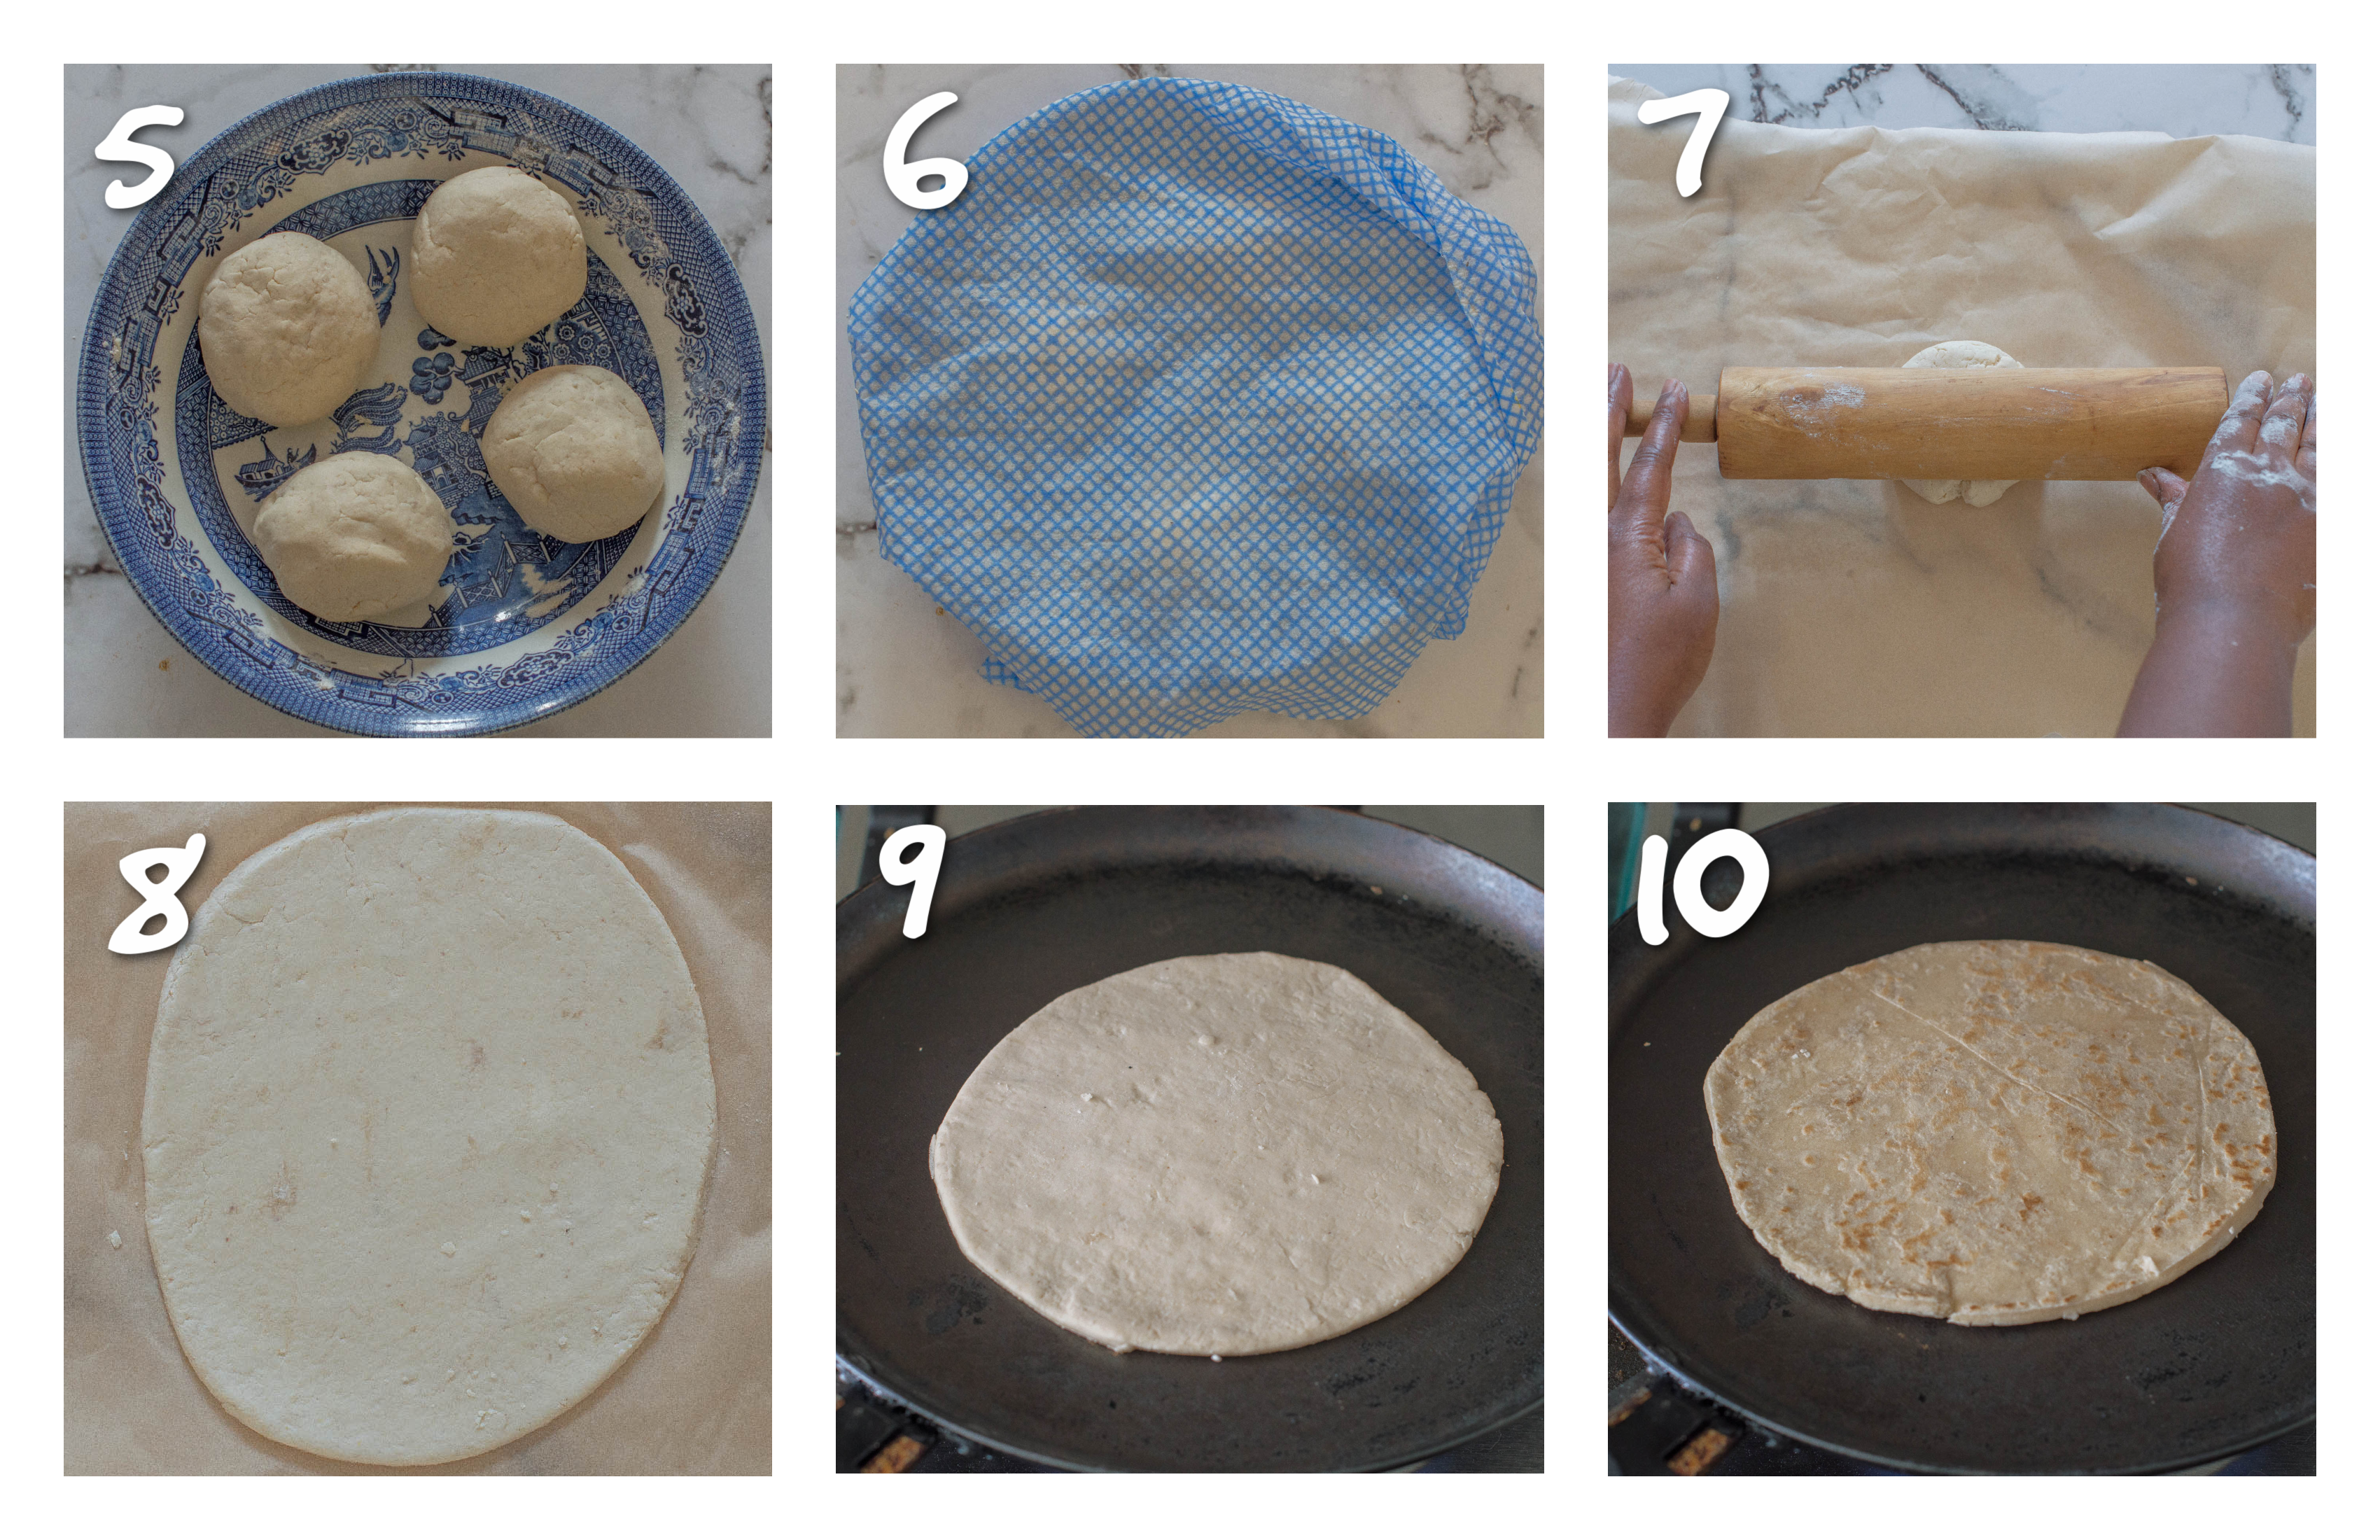
- Slice the dough into 4 quarters then roll each piece into a small ball then cover the bowl with a damp cloth.
- Lay some parchment paper on a clean surface and place one of the doughballs on the paper while keeping the rest of the dough covered.
- Lightly dust a rolling pin with cassava flour then proceed to roll the dough as thin as possible to make a disc. Use a pizza cutter or knife to trim around the edges or to form a small-medium sized circle if you are finding this difficult.
- Repeat the above step placing each disc on some parchment paper until 4-6 discs (depending on size) are made. Shake off any excess dust if needed
- Heat up the tawa/crepe pan or skillet on high heat, you want the pan to be piping hot before starting. Hover your hand over the pan to determine its readiness.
- Place the dough on the hot pan then reduce the heat so it is slightly below high heat (not medium but not high so the roti burns, just in between).
- Leave the dough to cook for about one minute, until small bubbles start to form and the side directly exposed to the tawa starts to brown a little (use an egg spatula or tongs to check this)
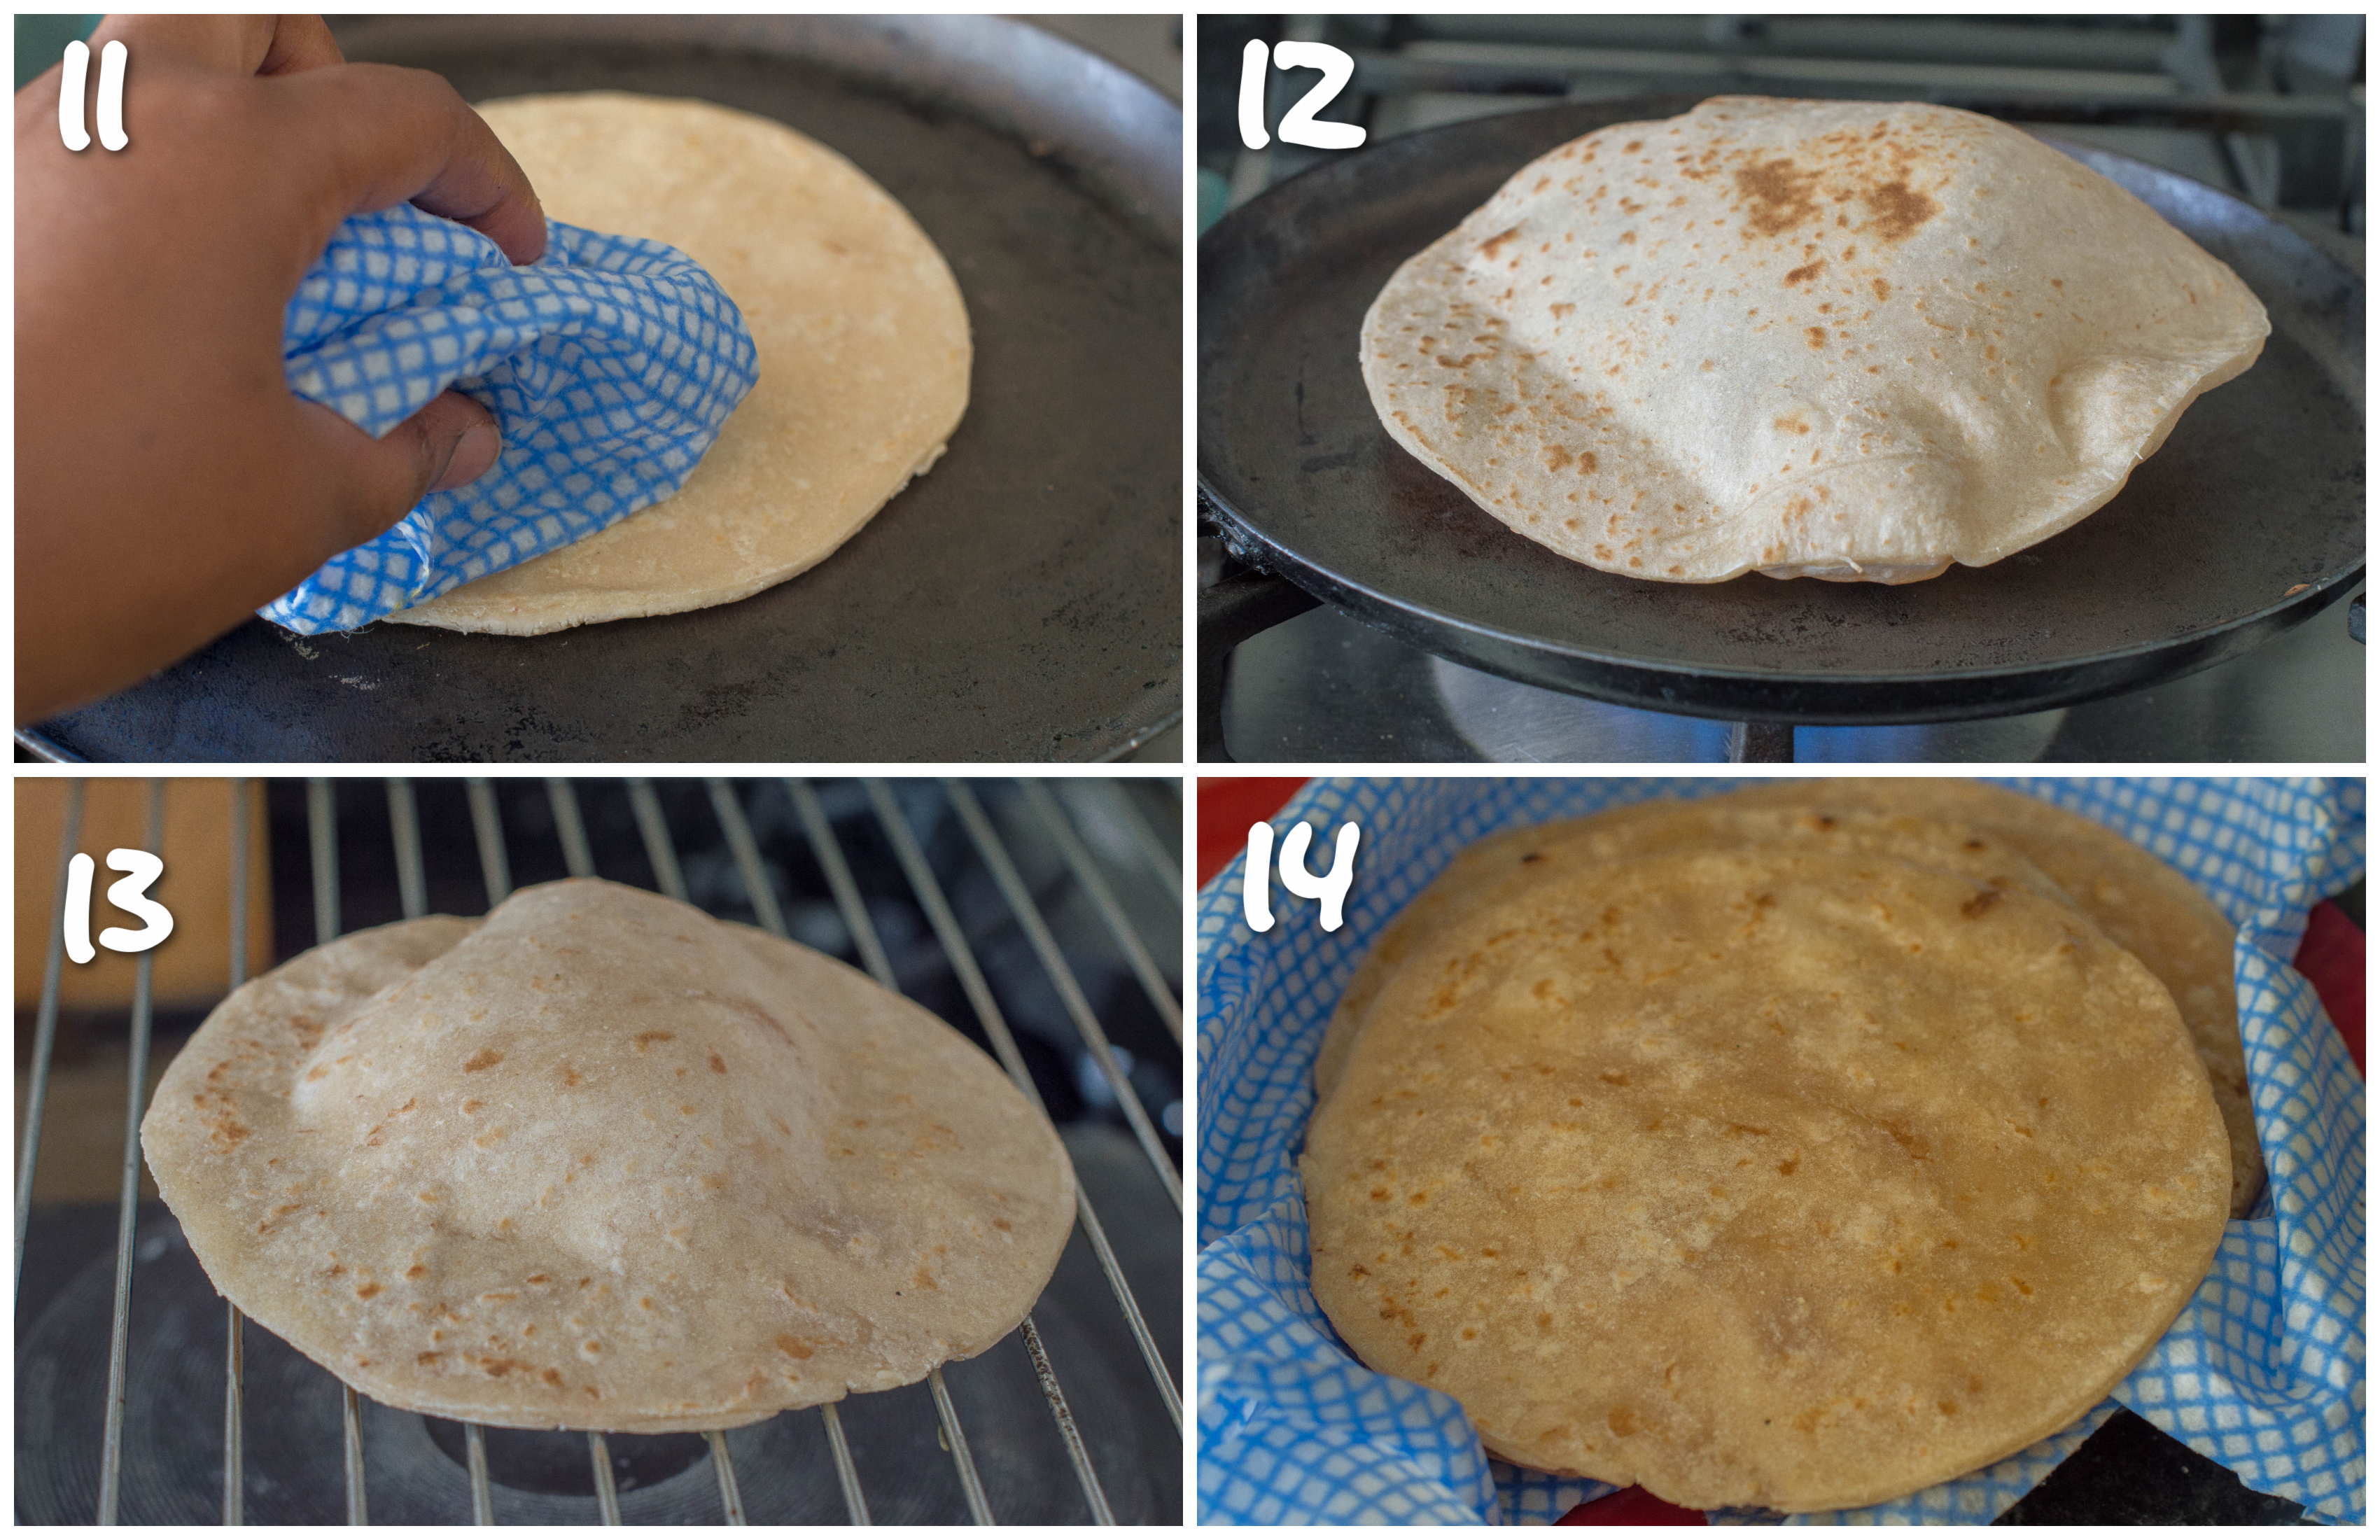
- Once the first side is ready, flip it over until the other side is slightly brown.
- Flip the roti again, reduce the heat to low and then push your tawa/pan slightly to one side so only half of it is on the burner/stovetop and push the roti so it is hanging slightly off the edge of the tawa.
- Use a damp cloth to apply gentle pressure while moving the roti in a counter clockwise motion while it starts to puff up (the amount of swelling will vary, some will completely while others only a few bubbles, this is normal especially being gluten free).
- As soon as it puffs put the tawa/pan directly back on the heat.
- Leave the roti for about 30 seconds before removing.
- Coat both sides of the roti, lightly with some melted vegan butter then place each roti skin on a plate lined with a damp cloth and cover.
Frequently asked questions
Why won't my roti puff up?
First of all, NOT every single roti skin will puff up. However, you should always see some bubbles in your roti, that is a given.
There are a few reasons as to why your roti doesn't puff up. First of all make sure you measure out your ingredients. You need the exact quantity to yield the results that are shown.
Also, as I said not every roti skin will puff up, some will show a few isolated bubbles while others will turn into a giant puff.
Make sure your tava/skillet is hot and never gets cold, ideally you want to cook your roti on heat is just below high heat and keep the temperature constant.
Also make sure that you pre-heat your pan, as this will effect whether or not your roti will bubble/puff up.
The dough needs to be rolled out evenly, meaning the same thickness all around and rolled as thinly as possible. I find that thicker roti (gluten free) doesn't puff up as much a thinly rolled roti does.
Can you freeze the roti once it has been cooked?
Yes, you can although, I wouldn't encourage this practice where possible. The roti skins do hold up in a freezer that doesn't produce any freeze burn (ice).
If you plan on freezing the roti, wrap them up (when completely cool) individually with parchment paper and aluminium foil for up to a month (I haven't test them longer).
Simply thaw them out before heating up (see notes), they should thaw out quite quickly when left on the countertop at room temperature.
Notes and tips
- Make sure you're using hot (boiling) water NOT warm, it must be hot in order to make this roti.
- To make roti making easier I do recommend investing in a Roti Grill especially with an induction hob or electric burners.
- This recipe makes about 4-6 roti skins, depending on the size.
- Roll out the dough of your roti as thin as possible, if it tears, it's too thin, you want it to be very thin and the texture very soft as this increases the likelihood of swelling.
- Don't substitute any ingredients unless they are listed. If I haven't listed an alternative that means either I haven't tried it or I do not recommend it.
- Use good quality ingredients i.e Bob Red Mills Cassava flour and Tiana (for the UK based) Cassava flour.
- Cassava is NOT the same as TAPIOCA STARCH. They are NOT interchangeable, they have been listed separately because they play different roles (see my post, for details).
- For best results, serve the roti while it is still warm.
- If you need to re-heat the roti then wrap it in aluminium foil and warm in the oven for a few minutes.
- If you want to double the recipe then do so SEPARATELY, make 2 individual batches. I haven't tested this with any other way.
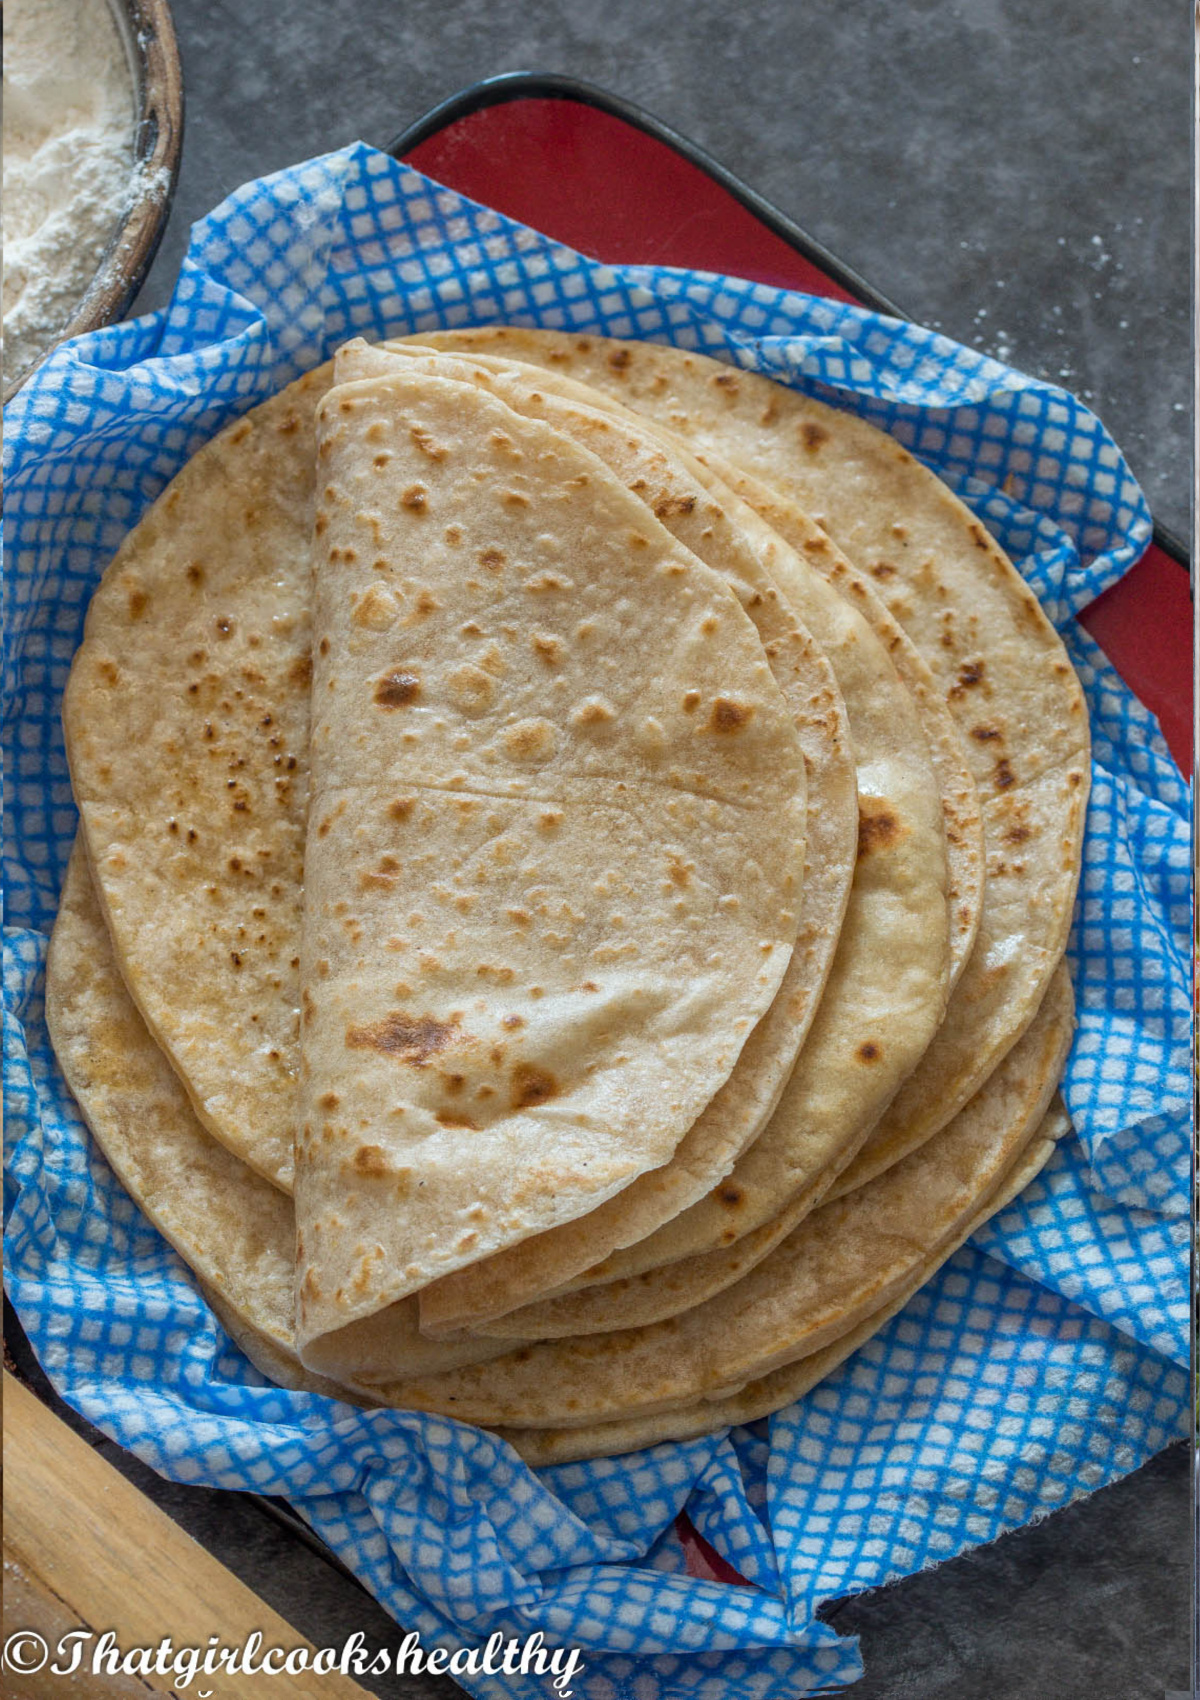
- If you are a beginner then make your roti skins small, small roti is much easier to work with. I like mine quite large but to keep this beginner friendly I purposely made them small (as pictured).
Recipes to pair with your roti
- Jamaican Curry Goat
- Slow Cooker Curry Goat (Coconut Milk Version)
- Coconut Curry Chicken
- Refried Gungo Peas (Vegan)
- Tomato Choka (Vegan)
- Baigan Choka (Vegan)
- Curry Channa and Aloo
- Jamaican Stew Beef
- Trinidad Stew Chicken
Other bread recipes to try
- Gluten Free Naan Bread
- Dhal Puri Roti
- Gluten Free Dinner Rolls
- Vegan Gluten Free Hot Cross Buns
- Brown Rice Flour Bread
Other roti recipes to try
**Don't forget to comment below and star rate if you have tried my recipes. Let's be friends and engage on YouTube, Facebook and Instagram I also like to pin on Pinterest, where you can find more amazing recipes.**
Gluten Free Roti Recipe
Ingredients
- 1 cup cassava flour (120g)
- ¼ cup tapioca starch (30g)
- ⅓ cup brown rice flour (52g) sorghum and amaranth works too.
- 1 teaspoon psyllium husk (5g) (powdered or whole works or xanthan gum)
- 2 teaspoon baking powder (8g)
- ½ teaspoon pink salt (3g)
- 1 tablespoon olive oil (15ml)
- 2½ cups hot water (590ml)
- melted vegan butter and extra cassava flour for dusting
Instructions
Preparing the dough
- Place all of the dry ingredients in a medium sized bowl - cassava flour, tapioca starch, brown rice flour, psyllium husk, baking powder and pink salt.
- Use a whisk or large spoon to evenly combine all of the dry ingredients.
- Drizzle in the olive oil then start to pour in the hot water, a little at a time, so in other words, do so in increments using a spatula/spoon to form a big pliable doughball (you won't need all of the hot water).
- The dough should be soft, firm but not too sticky.
- Slice the dough into 4 quarters then roll each piece into a small ball then cover the bowl with a damp cloth.
- Lay some parchment paper on a clean surface and place one of the doughballs on the paper while keeping the rest of the dough covered.
- Lightly dust a rolling pin with cassava flour then proceed to roll the dough as thin as possible to make a disc. Use a pizza cutter or knife to trim around the edges or to form a small-medium sized circle if you are finding this difficult.
- Repeat the above step placing each disc on some parchment paper until 4-6 discs (depending on size) are made. Shake off any excess dust if needed.
Cooking the roti
- Heat up the tawa/crepe pan or skillet on high heat, you want the pan to be piping hot before starting. Hover your hand over the pan to determine its readiness.
- Place the dough on the hot pan then reduce the heat so it is slightly below high heat (not medium but not high so the roti burns, just in between).
- Leave the dough to cook for about one minute, until small bubbles start to form and the side directly exposed to the tawa starts to brown a little (use an egg spatula or tongs to check this)
- Once the first side is ready, flip it over until the other side is slightly brown.
- Flip the roti again, reduce the heat to low and then push your tawa/pan slightly to one side so only half of it is on the burner/stovetop and push the roti so it is hanging slightly off the edge of the tawa.
- Use a damp cloth to apply gentle pressure while moving the roti in a counter clockwise motion while it starts to puff up (the amount of swelling will vary, some will completely while others only a few bubbles, this is normal especially being gluten free).
- As soon as it puffs put the tawa/pan directly back on the heat.
- Leave the roti for about 30 seconds before removing.
- Coat both sides of the roti, lightly with some melted vegan butter then place each roti skin on a plate lined with a damp cloth and cover.
Cooking the roti (electric stove/induction hob)(easier version)
- Heat up the tawa/crepe pan or skillet on high heat, you want the pan to be piping hot before starting. Hover your hand over the pan to determine its readiness.
- Place the dough on the hot pan then reduce the heat so it is slightly below high heat (not medium but not high so the roti burns just in between).
- Leave the dough to cook for about one minute, until small bubbles, start to form.
- Flip the roti, then place the flipped over side on the roti grill/metal grill/trivet.
- Place the roti grill directly above your hob then wait until the roti starts to inflate.
- As the roti swells, flip it over a few times.
- Repeat these steps, coat the roti skins with vegan butter then place on plate with a damp cloth and cover.
Video
Notes
- Make sure you're using hot (boiling) water NOT warm, it must be hot in order to make this roti.
- To make roti making easier I do recommend investing in a Roti Grill especially with an induction hob or electric burners.
- This recipe makes about 4-6 roti skins, depending on the size.
- Roll out the dough of your roti as thin as possible, if it tears, it's too thin, you want it to be very thin and the texture very soft as this increases the likelihood of swelling.
- Don't substitute any ingredients unless they are listed. If I haven't listed an alternative that means either I haven't tried it or I do not recommend it.
- Use good quality ingredients i.e Bob Red Mills Cassava flour and Tiana (for the UK based) Cassava flour.
- Cassava is NOT the same as TAPIOCA STARCH. They are NOT interchangeable, they have been listed separately because they play different roles (see my post, for details).
- For best results, serve the roti while it is still warm.
- If you need to re-heat the roti then wrap it in aluminium foil and warm in the oven for a few minutes.
- If you want to double the recipe then do so SEPARATELY, make 2 individual batches. I haven't tested this with any other way.
- If you are a beginner then make your roti skins small, small roti is much easier to work with. I like mine quite large but to keep this beginner friendly I purposely made them small (as pictured).
Nutrition
**Disclaimer: This page may contain affiliate links, which simply means that I earn a commission if you purchase through those links, but your price remains the same.**



Cat says
This is my favorite, and the best roti recipe, thank you!! I have been experimenting with your recipe to try and get the least gummiest roti, I really don't mind a lil extra chewiness because that is the trade off for making a gluten free roti. I have found that cassava flour can be a really fine grind or a coarser grind and this makes a big difference in the amount of water you will have to use. The finer grind uses less water, and my intial change was using only enough water to bring the dough together, and depending on the flour I found that the amount of water changed a lot. Next up I realized that 1tsp of psyllium husk by weight is actually around 1 TBSP by measure. When I adjusted the psyllium husk, I did have to use more water especially with a coarser grind cassava flour. Still trying to get the least gummy roti, I decided to leave out the tapioca flour and by mistake I forgot the psyllim husk as well, and I added 2 tsp of golden flax seed meal, the resulting dough was so easy to work with, the least gummy but not soft, but it cooked up dry and hard. However, I steamed it and it made for a great filled dumpling dough, I will try boiling it next because I love boiled dumpling. The dumpling dough also refrigerated well, I did make the wrapper first then refrigerated. I tried baking it as in aloo pie, but it was too dry, but your roti dough makes a good aloo pie dough. So after that experiment, I realized that the tapioca starch was needed to make it soft and the psyllium husk. Right away I made another half batch and was very happy with it. I made a full batch a few days later and it was the same, I could also make the dough a bit softer now and still have the least gumminess. My cassava flour at the moment is a finer grind one, for the recipe I only need 1 Cup of boiling water plus a smidge extra, I only use 1 tsp of oilve oil, I added 2 tsp on golden flax meal, and I used 1 Tbsp of psyllium husk, those were the changes I made and I love the results, thank you again and I know it was a long comment but hopefully it is helpful.
Charla says
Hi Cat, thank you the feedback, the length is fine. I love any feedback positive or negative. I'm just happy you tried the recipe and are pleased with it.
Humi says
Hello! Im excited to try this! Just wondering can you put the dough in the fridge and use throughout the week or is it best to make all the rotis and reheat when needed?
Charla says
Hi Humi, for this particular recipe, you want the dough to be soft. Refrigerating the dough would make it too firm, so it would be better to make the roti and re-heat as instructed.
Val A says
Measured the ingredients with a food scale. The recipe works well, you’ve got to be careful when pouring the water don’t over do. I recommend letting the little balls of dough rest covered for about 10 - 20 minutes before you roll them out to make sure everything is well hydrated. The dough rolls out well, it’s very easy to work with. It also puffs up nicely, I used a cast iron griddle. Tastes familiar but not exact (no gluten). I also used sorghum flour instead of brown rice, will try it with the brown rice next time. Soft and pliable. Thanks for the recipe.
Charla says
Thanks for the feedback Val. I'm planning to do a video on this recipe because I feel that a video would really support the written version so my audience have visual to work with. To keep the individual dough balls hydrated, I have some hot water in a jug to hand and dip them in the water before rolling them out.
Sanchita says
I too want to use Sorghum .. did you use the same amount listed ( 52 g) as the brown rice flour ?
I also want to use Xanthum as good quality psyllium is difficult to source and quite expensive . So do we use the same amount of Xanthan as the psyllium husk mentioned ?
can we omit the baking powder ? Indian rotis dont use that .
Thanks
Sanchita
Charla says
Hi Sanchita, yes you would use the exact same amount in sorghum flour and xanthan gum. The baking powder is needed especially in this gluten free version as it will help to puff up the roti. You can omit it if it bothers you from a cultural perspective but your roti will be flat. I hope that helps 🙂
Jan Reinhart says
This is hands down the best non-wheat roti recipe I have encountered. Not only were they flexible and delicious, they had volume! Most non-wheat rotis I have tried are disappointing dinky things that take enormous effort. This one was a breeze and nearly whole grain.
Charla says
Hi Jan. Thank you so so much for your positive feedback. I am humbled 🙂
Jan S. Reinhart says
Oh, I formed mine with a cast aluminum tortilla press. It was incredibly easy.
I am going through some of your other vegan recipes. We vegans need inspiration and you have many winners.
Charla says
Thanks Jan. Glad the roti recipe was easy enough for you. Also, happy to have another vegan on board, I'm trying my very best to be more mindful of my vegan audience, making my recipes vegan friendly where possible or offering an alternative so they are included.
Simran says
Hi can I skip baking powder or is there any substitute for it
Charla says
Not really because this really helps to raise the roti especially with it being gluten free. If you choose to omit the baking powder be aware that the roti probably won't puff up.
Maddie says
Brown rice flour is hard to find in my area. will white rice flour still work do you think?
thanks in advance! Can’t wait to try them!
Charla says
Hi Maddie, yes white rice flour would definitely work in place of brown rice flour. Brown rice flour is more nutritionally dense (hence the reason why the recipe calls for it) but if you aren't able to get it then use that if you must.
Mosh says
Can I make and store the flour mix (flours, baking powder, husk and salt) to make dough whenever I want?
Charla says
Hi Mosh, yes you can. I would suggest doing this in single batches though. In an air tight container and stored in a cool area and use at your leisure! 🙂
Ava says
Hello and thank you for doing the research to create this wonderful recipe! Do you think I can I substitute coconut oil or ghee for olive oil without it affecting the outcome?
Charla says
Hi Ava, Ghee/coconut oil is fine to substitute with. As long as which ever you decide to use is completely melted at all times. Thank you for reaching out to me and enjoy!
Ava says
OMG that was fast! Thank you so much for your prompt response! I will be making this today and will let you know how it turns out…which I’m sure it will be amazing!
Charla says
Hi Ava, I always aim to respond ASAP (where possible). You are very welcome and enjoy! Always happy to help 🙂
neema says
Hi,
Can tapioca starch be replaced with tapioca flour
Charla says
Hi Neema. You would need to use the ingredients exactly as listed in order for the recipe to successfully work. It's 2 parts flour and one part starch. Too much tapioca starch and the recipe would fail because it would be too gummy and inedible. I hope that helps and thanks for asking!
Vasu Reddy says
The rotis came out really awesome. I found that the longer the dough sat, the better and easier it was to roll the rotis. Thank you so much for this recipe. This is the first time the GF rotis cane out pliable and yummy!
Charla says
Thank you so much for your wonderful feedback Vasu.
Candice says
This is such a great recipe and has become a staple in my home. So quick and easy and gluten-free - love it! My rotis always puff up. I use a pizza stone cooker, for that intense heat. If you follow her recipe to the exact detail, you'll have great results. I used the Tiana cassava flour. So delicious, they act and tear just like one with 'normal' flour. Thank-you so much!!!
Charla says
Thank you so so much Candice, I really appreciate the postive feedback.
Suki sahota says
Thank you so much for sharing this recipe... can’t wait to try it! A couple of questions about ingredients..., if using sorghum flour instead of brown rice, will it yield same results? Also is it best to stick with psyllium husk as opposed to xanthum gum or is there really no difference?
Charla says
Hi Suki, thank you for reaching out to me. You will get the same results if you do decide to use sorghum flour. I do find that sorghum has a slight after taste which is why I prefer to use brown rice flour instead. Both psylluim husk and xanthan gum act as a binder for the flour. Psyllium husk swells when it comes into contact with water so that's how it works. Some people are gut sensitive to xanthan gum however if that isn't the case with yourself I would use xanthan gum instead. Ultimately, You will get the results as pictured, whatever you decide to use! I hope that helps and enjoy!
Andrew Stein says
The recipe worked when I resorted to cups. But please fix the metric measures. They're almost all wrong. I had to throw out my first batch trying to do it by weight. For example 1 cup of cassava flour is much, much more than the 90 grams you list in your recipe. It's less than half a cup.
Charla says
Hi Andrew. My apologies! Yes, you are correct the first 3 ingredients were slightly off. I re-measured all of the ingredients and it turns out that one of my scales is faulty (I usually rotate between 2). I tossed those out to avoid any further recipe errors and adjusted the metric measurements so all are accurate now. Feel free to use either cups or metrics the next time you make the recipe, sorry about the waste but so glad you were able to make it in cups 🙂
Shanelle says
I have tried several different recipes online, even mixing my own flours to no success. But omg was this recipe good! From the mixing to the kneading to rolling, the rotis held their form. And the best of all they tasted delicious!!!! Thank you so much for all the work you put into this so we don’t have to and thank you for sharing. You don’t know how happy you have made many of us here who can’t tolerate gluten! You have a fan! 💐
Charla says
Hi Shanelle, you are so very welcome. It is hard work making gluten free recipes of all kinds but I am here to serve YOUR needs. I am very happy that this recipe has worked out for you. Thank you so much for your kinds words and support.
Nachatr says
Your gluten free Roti recipe was my last hope after giving up a few years ago from trying multiple recipes.
This recipe really delivered! These rotis are delicious and like the texture!
And they are not hard to roll out.
Thanks very much!
Charla says
OMG! Nachatr! Thank you so much for your wonderful feedback. I'm so glad this recipe worked out for you.
Ayesha says
This blew my mind. it worked perfectly and tasted like heaven. I leapt straight in and tried dalpouri, and it was a crazy success. This is literally the no 1 thing I've been missing since going gluten-free years and years ago. Thank you so much!
Charla says
You are so welcome Ayesha, I will definitely make dalpouri at some point. It's on my to do list of GF recipes to make 🙂
Ann says
Hi there! I am so happy to have come across a great gluten free recipe. Definitely going to get the ingredients and try it as soon as I can. Can I replace the brown rice flour with buckwheat flour?
Charla says
Hi Ann, thank you and welcome! I haven't tried using buckwheat in this particular recipe but it is a flour that I have worked with before. Roti tends to be quite soft in texture which is why I purposely avoided buckwheat flour which is a more dense flour in comparison to brown rice. You should be able to get away with using buckwheat because it is not a stand alone ingredient but the results of the roti might be more dense, so just keep that in mind.
Harp says
Is tapioca flour the same as tapioca starch?
Charla says
no, it's not.
Charlie says
Thank you for sharing your recipe - these are AMAZING!!!!!!
With love and gratitude x
Charla says
Thank you so much Charlie, it really means a lot to me.
Susana says
Can you replace arrowroot for the tapioca starch?
Charla says
Yes you can, go for it!!
Jani says
Thank you so much for the recipe, we loved it as it complemented our home made hummus!
I weighed each ingredient but noticed that the amount of water you mentioned was too much (590ml), I added 400 ml and ended up with a very sticky consistency, was able to save the situation by adding little more to tapioca flour. All ingredients were from Bobs Red Mill brand.
Charla says
Hi Jani, I'm so glad that you loved the recipe. Just as a heads up, just add the water in small amounts next time until you get the consistency that is needed to avoid getting that sticky mess. It's okay if you don't use all of the water, the consistency of the dough is more important than using all of the water that is stated.
The good thing is that you can always had a bit more flour which will salvage the recipe (which is what you did) so you don't end up with a recipe fail.
Thanks for trying the recipe, much appreciated!
Jack Mailloux says
You said "It's soft, It flakes, It bends and folds!" I would add, they're perfect and delicious. I hadn't found a GF roti recipe that lived up to it's billing, until now.I made these tonight and my better half spent the meal humming with delight. We love stuffed rotis. I made these with a Mediterranean/Caribbean flare, stuffed with blackened tofu, spinach, feta and olives. The roti was not just a wrapper, it was amazing. You are deity. I used every ingredient you specified and followed every instruction to a T. With success! Thanks for the attention and care you put into the recipe. I am a fan!
Charla says
Thank you so much Jack. I'm so glad to hear that yourself and your better half enjoyed the roti. It certainly took A LOT of trial and error to finally perfect the recipe.
Riley says
This recipe is extremely thorough and we were super impressed how well the roti shell held up to a substantial filling. Thank you for your hard work in creating something my St Lucian husband and gluten-free self could both enjoy! xo
Charla says
Thank you so much Riley. I'm so glad that yourself and hubby were able to enjoy the roti.
Aimee Mars says
This is exactly the recipe I have been looking for! I've had to cut gluten from my diet and so I've been researching ways to replace some of my favorite foods and I'm going to use this roti for EVERYTHING! Thank you for taking years to perfect it.
Charla says
Thanks Aimee, years of trial and error but definitely worth the wait. Enjoy!
Beth says
This looks so yummy. I can't wait to make these and I will keep them small. I hope I can find all the ingredients at my grocery store.
Charla says
I'm excited for you Beth, yes small is recommended for ease and it's more beginner friendly too.
Natalie says
I'm on a GF diet from recently. Thanks for sharing this recipe with GF flour. I will prepare this roti tonight for dinner.
Charla says
Yay! That's great to hear. I'm excited for you Natalie.
Dannii says
You can't beat homemade roti. Perfect with a homemade curry.
Charla says
I totally agree Dannii 🙂
Jacqueline Meldrum says
Those look gorgeous! Thanks for the recipe.
Charla says
You are very welcome Jacqueline.
Aramantha says
Can you freeze them
Charla says
This information is already in the post, please ensure that you read through as most of the info and questions are covered already. I will copy that info here "Can you freeze the roti once it has been cooked?
Yes, you can although, I wouldn't encourage this practice where possible. The roti skins do hold up in a freezer that doesn't produce any freeze burn (ice).
If you plan on freezing the roti, wrap them up (when completely cool) individual with parchment paper and aluminium foil for up to a month (I haven't test them longer).
Simply thaw them out before heating up (see notes), they should thaw out quite quickly when left on the countertop at room temperature."