Learn how to make naan bread that is free from gluten. A vegan friendly homemade rendition that is pillow soft, chewy and is equally as delicious as what you would get from a restaurant.
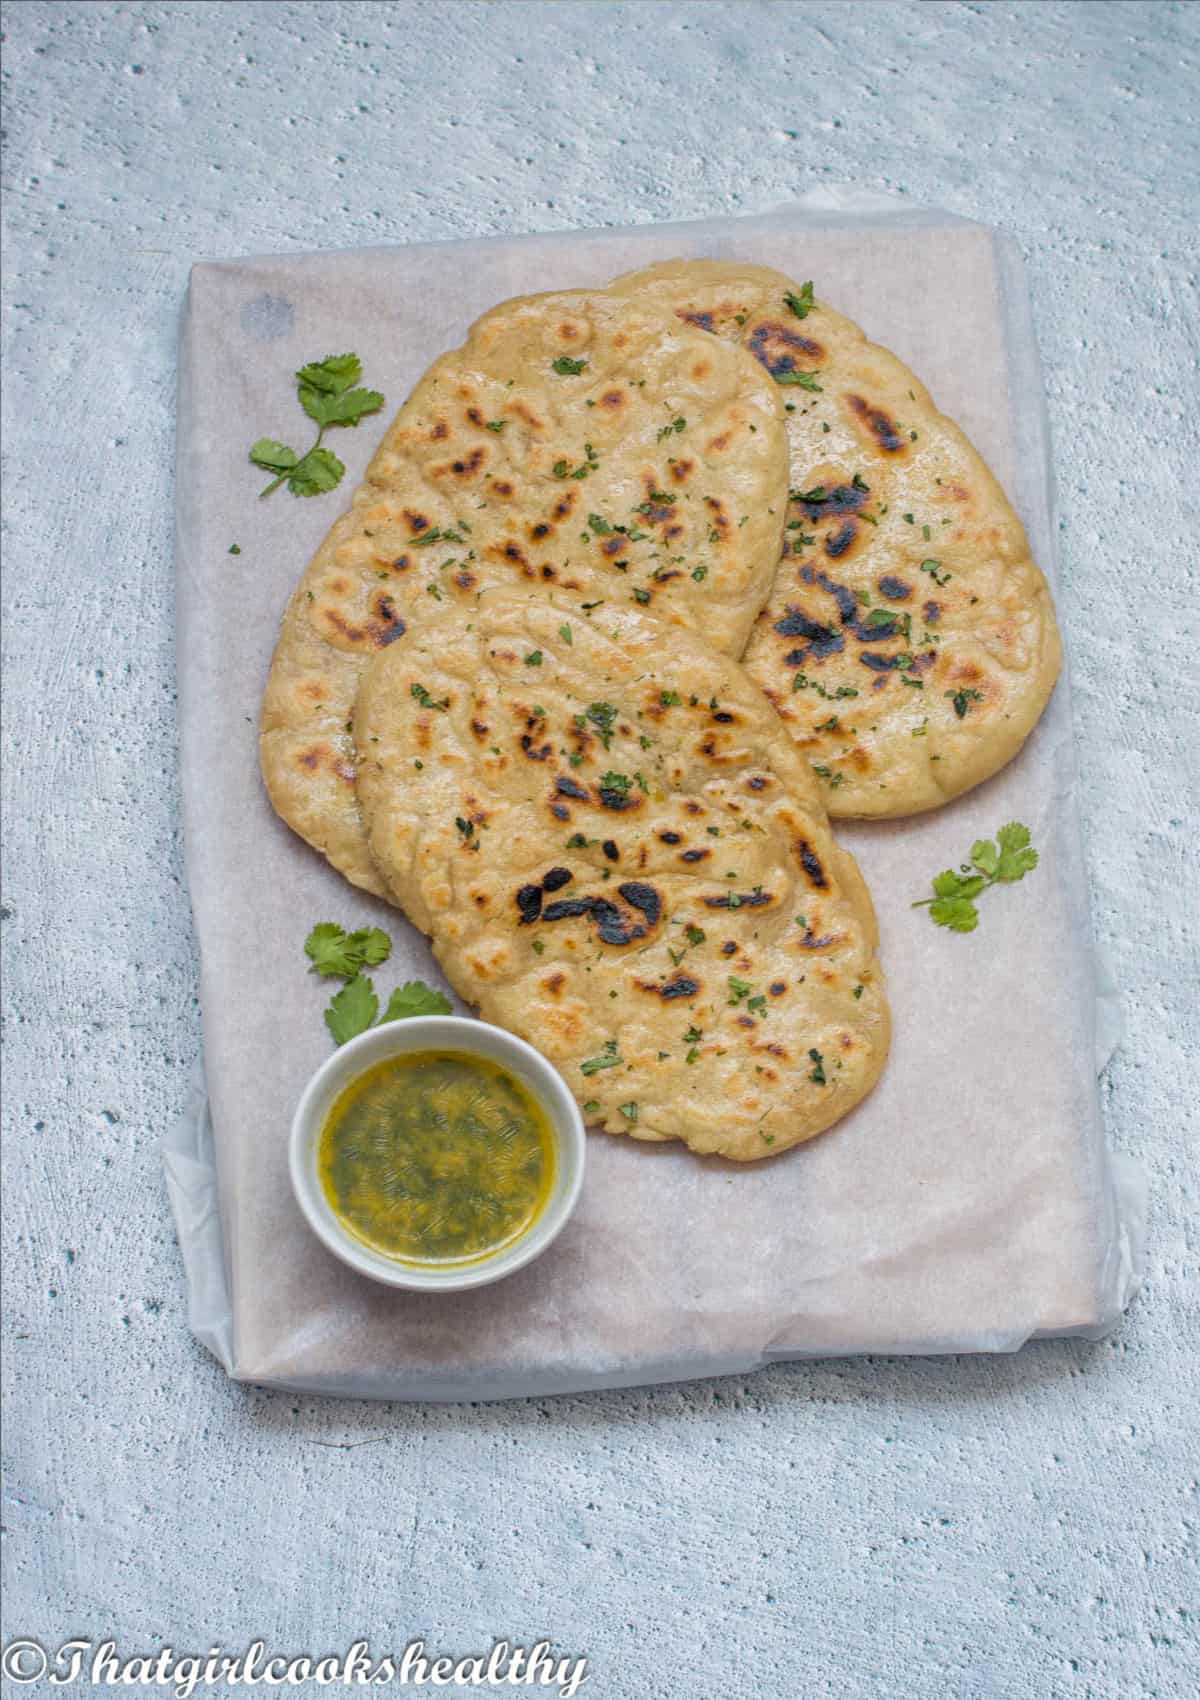
Let me tell you that making gluten free bread recipes isn't easy by any means. It's really difficult and not fun at times.
I work at snail pace when it comes to making bread recipes, testing said recipe at what feels like a million times.
I would rather be the guinea pig, doing the costly waste because the bread just didn't work out. Rather than have my royal readers waste their hard earned money on a recipe which is an epic fail.
Anyway, let's talk, gluten free naan bread..one word.....wow! A lot of work but I finally nailed it.
Before I got to work with making naan bread, the gluten free kind. I brought some store bought ones, just to give me an idea of what was out there, the taste and texture.
I tried a few store bought naans with my infamous Jamaican Coconut Curry Chicken to mop it up and all of which were awful.
I was so disappointed, knowing that gluten intolerant people weren't forced to eat what tasted like cardboard (not that I have eaten cardboard, but if I tried it, it would be that).
I made it my mission to make a naan bread, that is gluten free and actually tasted fit for human consumption (I'll discuss the ingredients that were used further on).
What is naan bread?
Naan is a type of flatbread eaten in the middle east, Asia and certain parts of the Caribbean.
It is generally a leaven bread made with yeast or a bread starter (leftover unused dough).
Naan is made by sometimes mixing 2 flours blends together (whole wheat and white flour), dry active yeast, water and salt.
Many of the modern/regional versions of naan see yoghurt or milk being used which imparts a more softer texture.
Once the ingredients are add together, it is kneaded to make a soft dough then set aside to prove (rise) for a few hours.
When the dough has risen, it is then divided into small balls which are rolled out to an elongated circle/teardown shape and then cooked in a tandoor.
Although naan is cooked in a tandoor it is not uncommon for it to be cooked on a cast iron skillet or frying pan, especially in the western hemisphere.
When the naan bread has cooked depending on the culture/region it is either brushed with water or ghee/butter with garlic, herbs and nigella seeds.
Naan is used to scoop up food, you can also fill it with cheese, lamb (keema) or serve on a bed of vegetables, see how versatile it is!
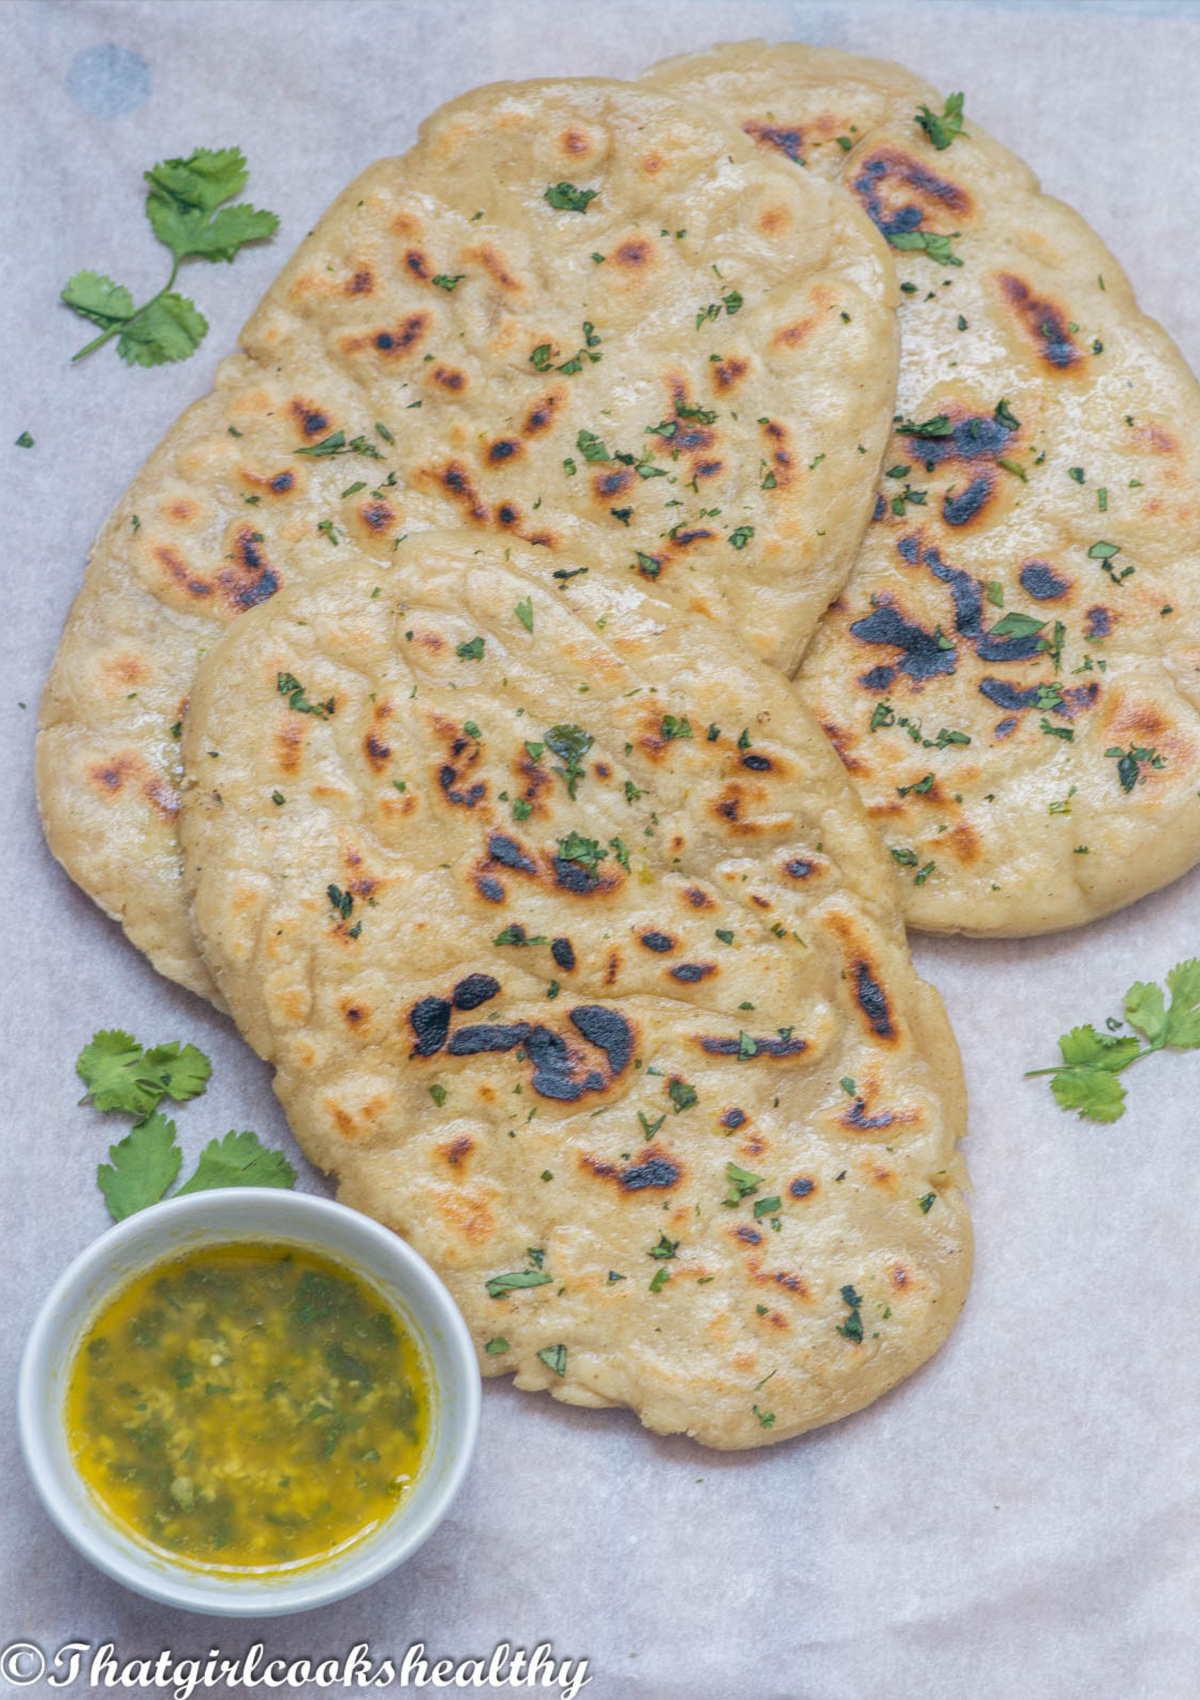
Is naan the same as roti?
No, it's not, although they are similar and serve the same purpose which is to scoop/mop up food/gravy they are not the same.
Roti is an unleavened flatbread (although in the Caribbean raising agents are used) that is rolled out quite thin, it's round and is cooked on a flat iron griddle known as a "tava".
Unlike naan, roti doesn't contain yeast or any type of yoghurt or milk.
In terms of texture, naan bread is thicker than roti, more dense, chewier, soft with a crispier exterior and typically served with nigella seeds (subject to the region).
The naan bread and ingredients
Similar to most bread recipes, gluten is crucial but when dealing with gluten free bread we need to account for this with a substitute.
Just like my Sada Roti (Gluten Free Roti) Recipe and Gluten Free Dinner Rolls Recipe it is imperative that you follow the ingredients/instructions to a TEE, very very important.
If you don't like measuring and want to guestimate your way through this recipe then please scroll on as this recipe isn't for you!!
Ingredients you will need
Sorghum flour - This is a mild earthy like gluten free flour and the closest replica to wheat flour. While it does work very well, it does have an after taste so it's best to mix with another gluten free.
Brown rice flour - another whole grain flour that works well with sorghum it balances that earthy tone and normalises the taste of the naan.
Tapioca starch - this is the gluten free "glue" as I like to call it for the bread, this stuff helps to bind both flours together and gives a realistic chew to the bread without without being too chewy, that's where both flours counteract any chewiness.
Xanthan gum and psyllium husk - both of these ingredients help with the chewiness and elasticity of the bread.
Instant yeast - helps the dough to rise, works much quicker than active yeast as it absorbs the liquid quicker and doesn't need hydrating.
Coconut yoghurt - helps to make the naan bread soft in texture.
Raw cane sugar - works in tandem with the yeast, helps to active it and aids with proving.
Warm water/pink salt and dairy free butter - the typical ingredients that you will find in bread making, self explanatory!
The steps
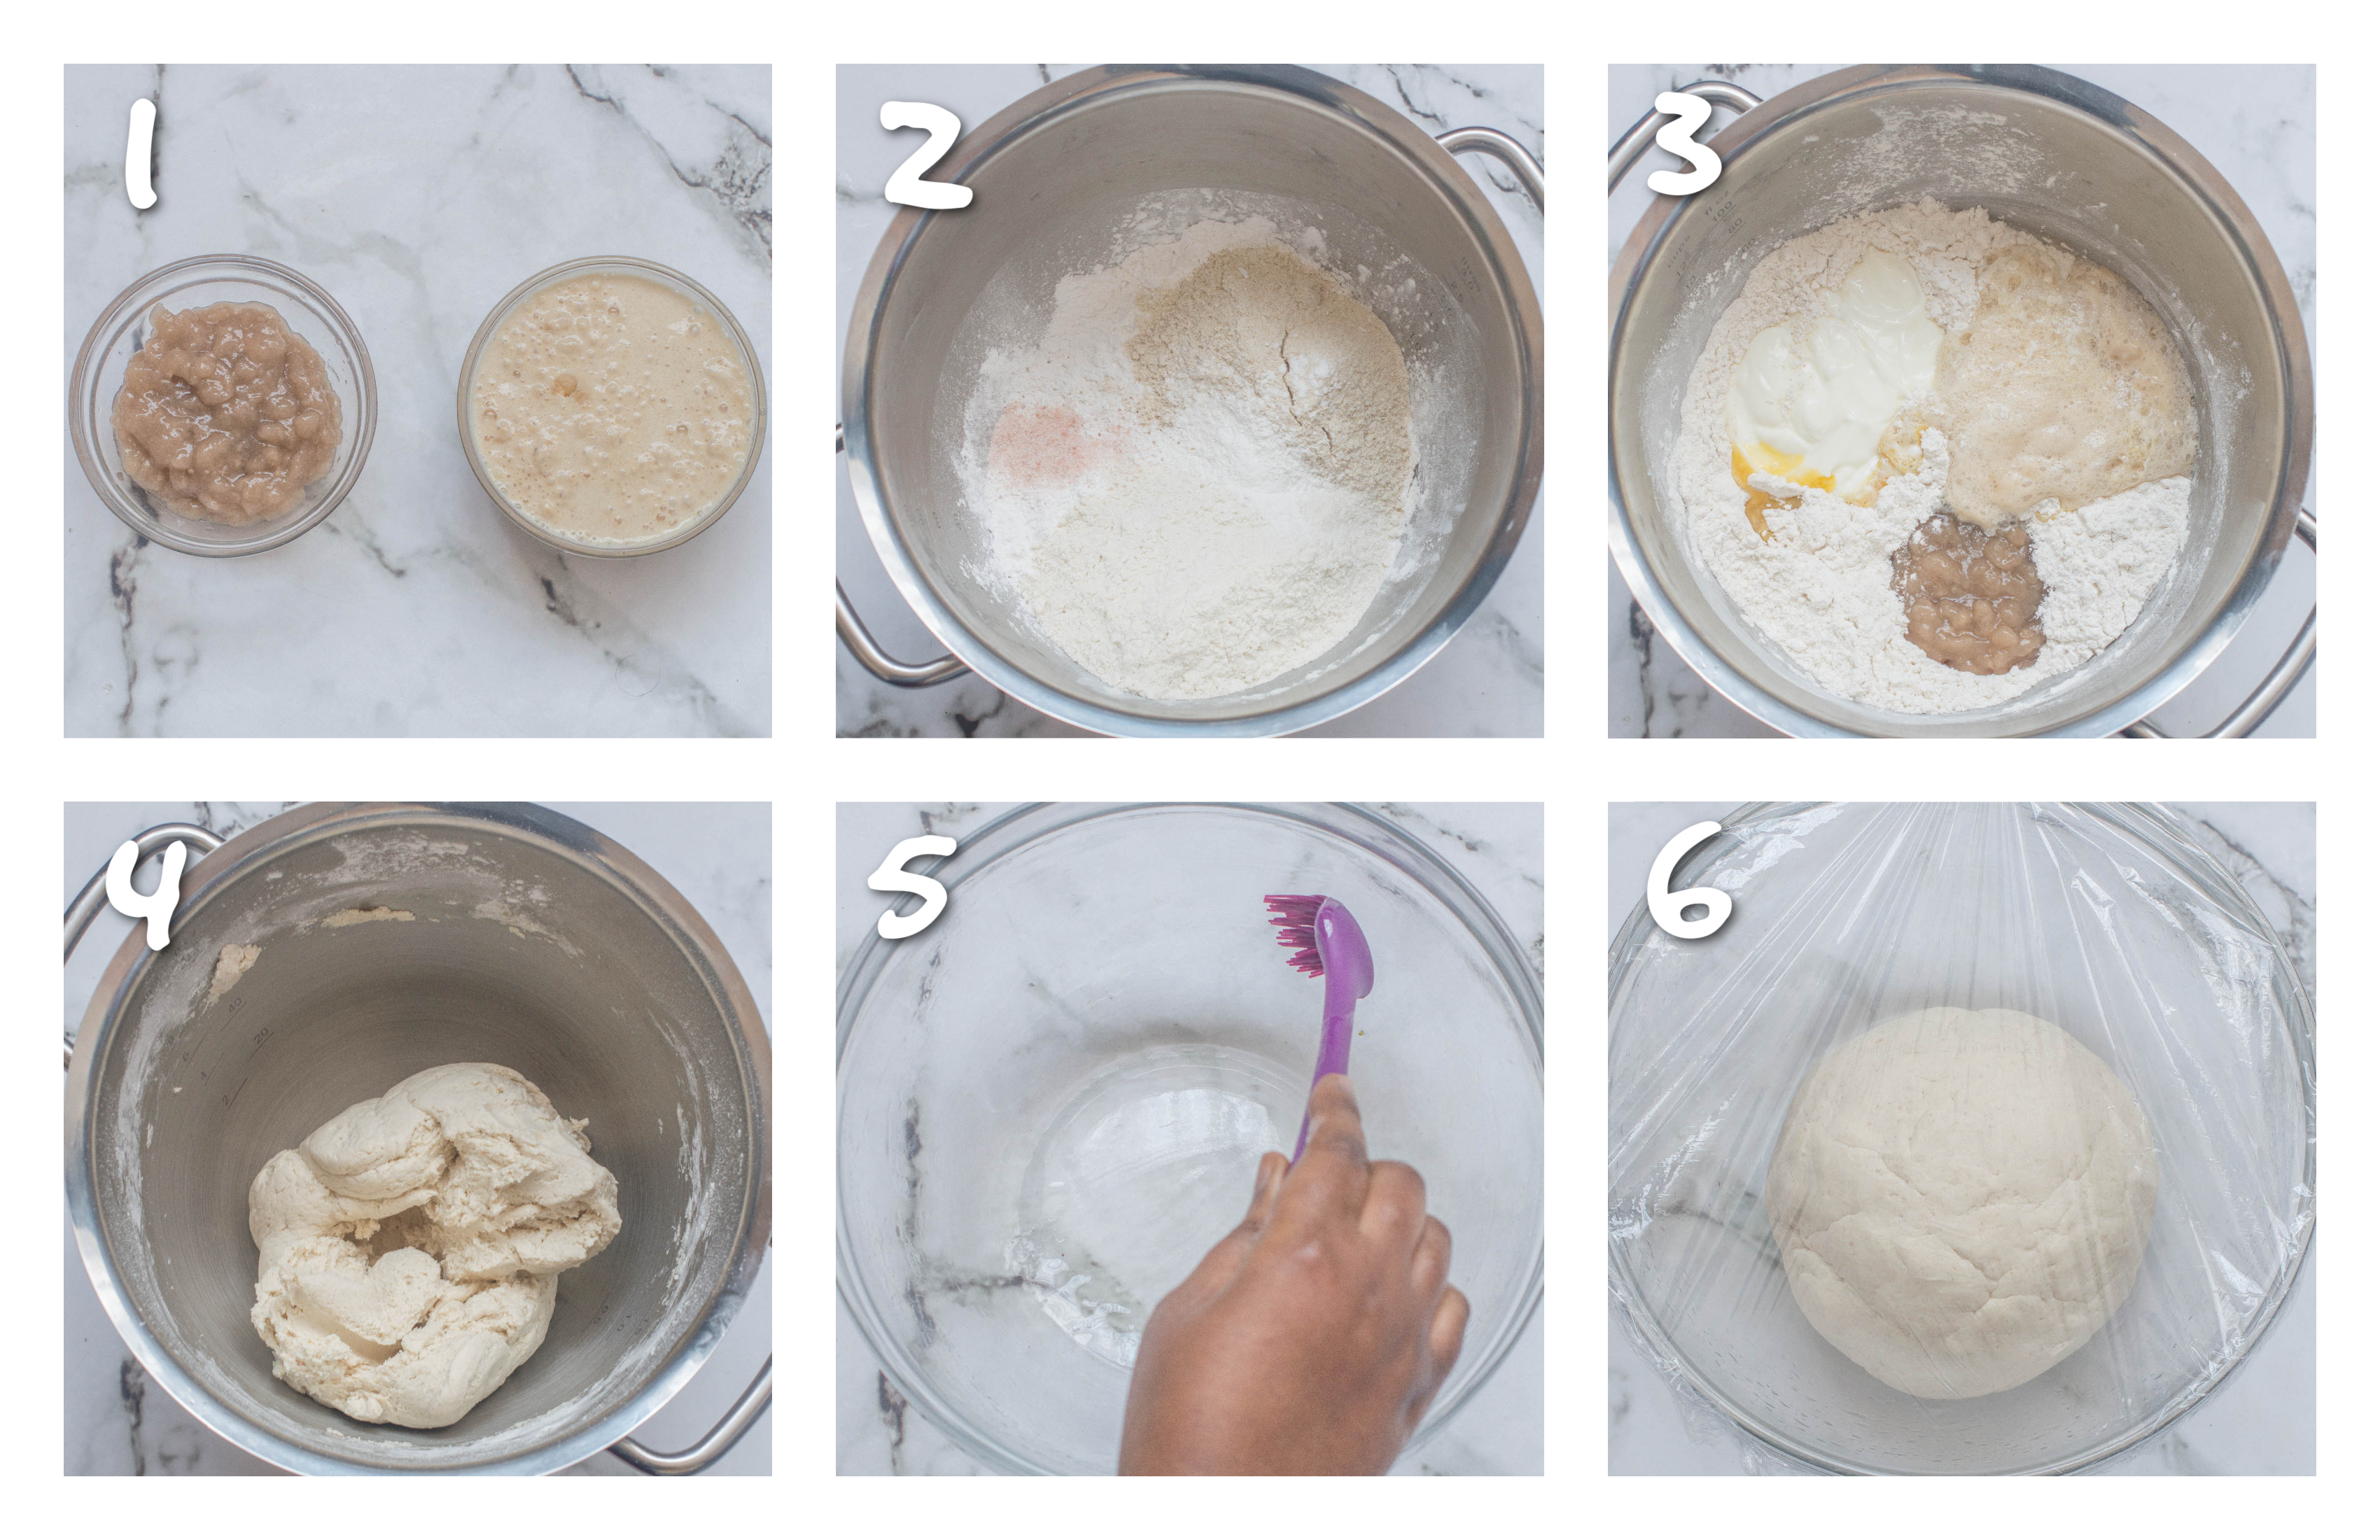
- In a small bowl whisk the psyllium husk powder with ½ cup of the warm water to form a gelatinous consistency and set aside.
- In another small bowl, combine the raw cane sugar, dried instant yeast and ½ cup of warm water, whisk until foam appears on the top and set aside.
- Add the dry ingredients to the bowl of a stand mixer bowl (fitted with a dough hook) - tapioca starch, brown rice flour, sorghum flour, xanthan gum and pink salt into a bowl and mix to combine.
- Now add the wet ingredients - psyllium husk paste, coconut yoghurt and melted butter.
- Knead until a pliable dough ball is formed, at first the mixture will appear dry but give it a few minutes to come together. Stop the machine to scrap down the sides, incorporating any dry, flour spots if necessary.
- Place the dough into an medium sized oiled bowl and cover with a damp cloth/saran wrap (cling film).
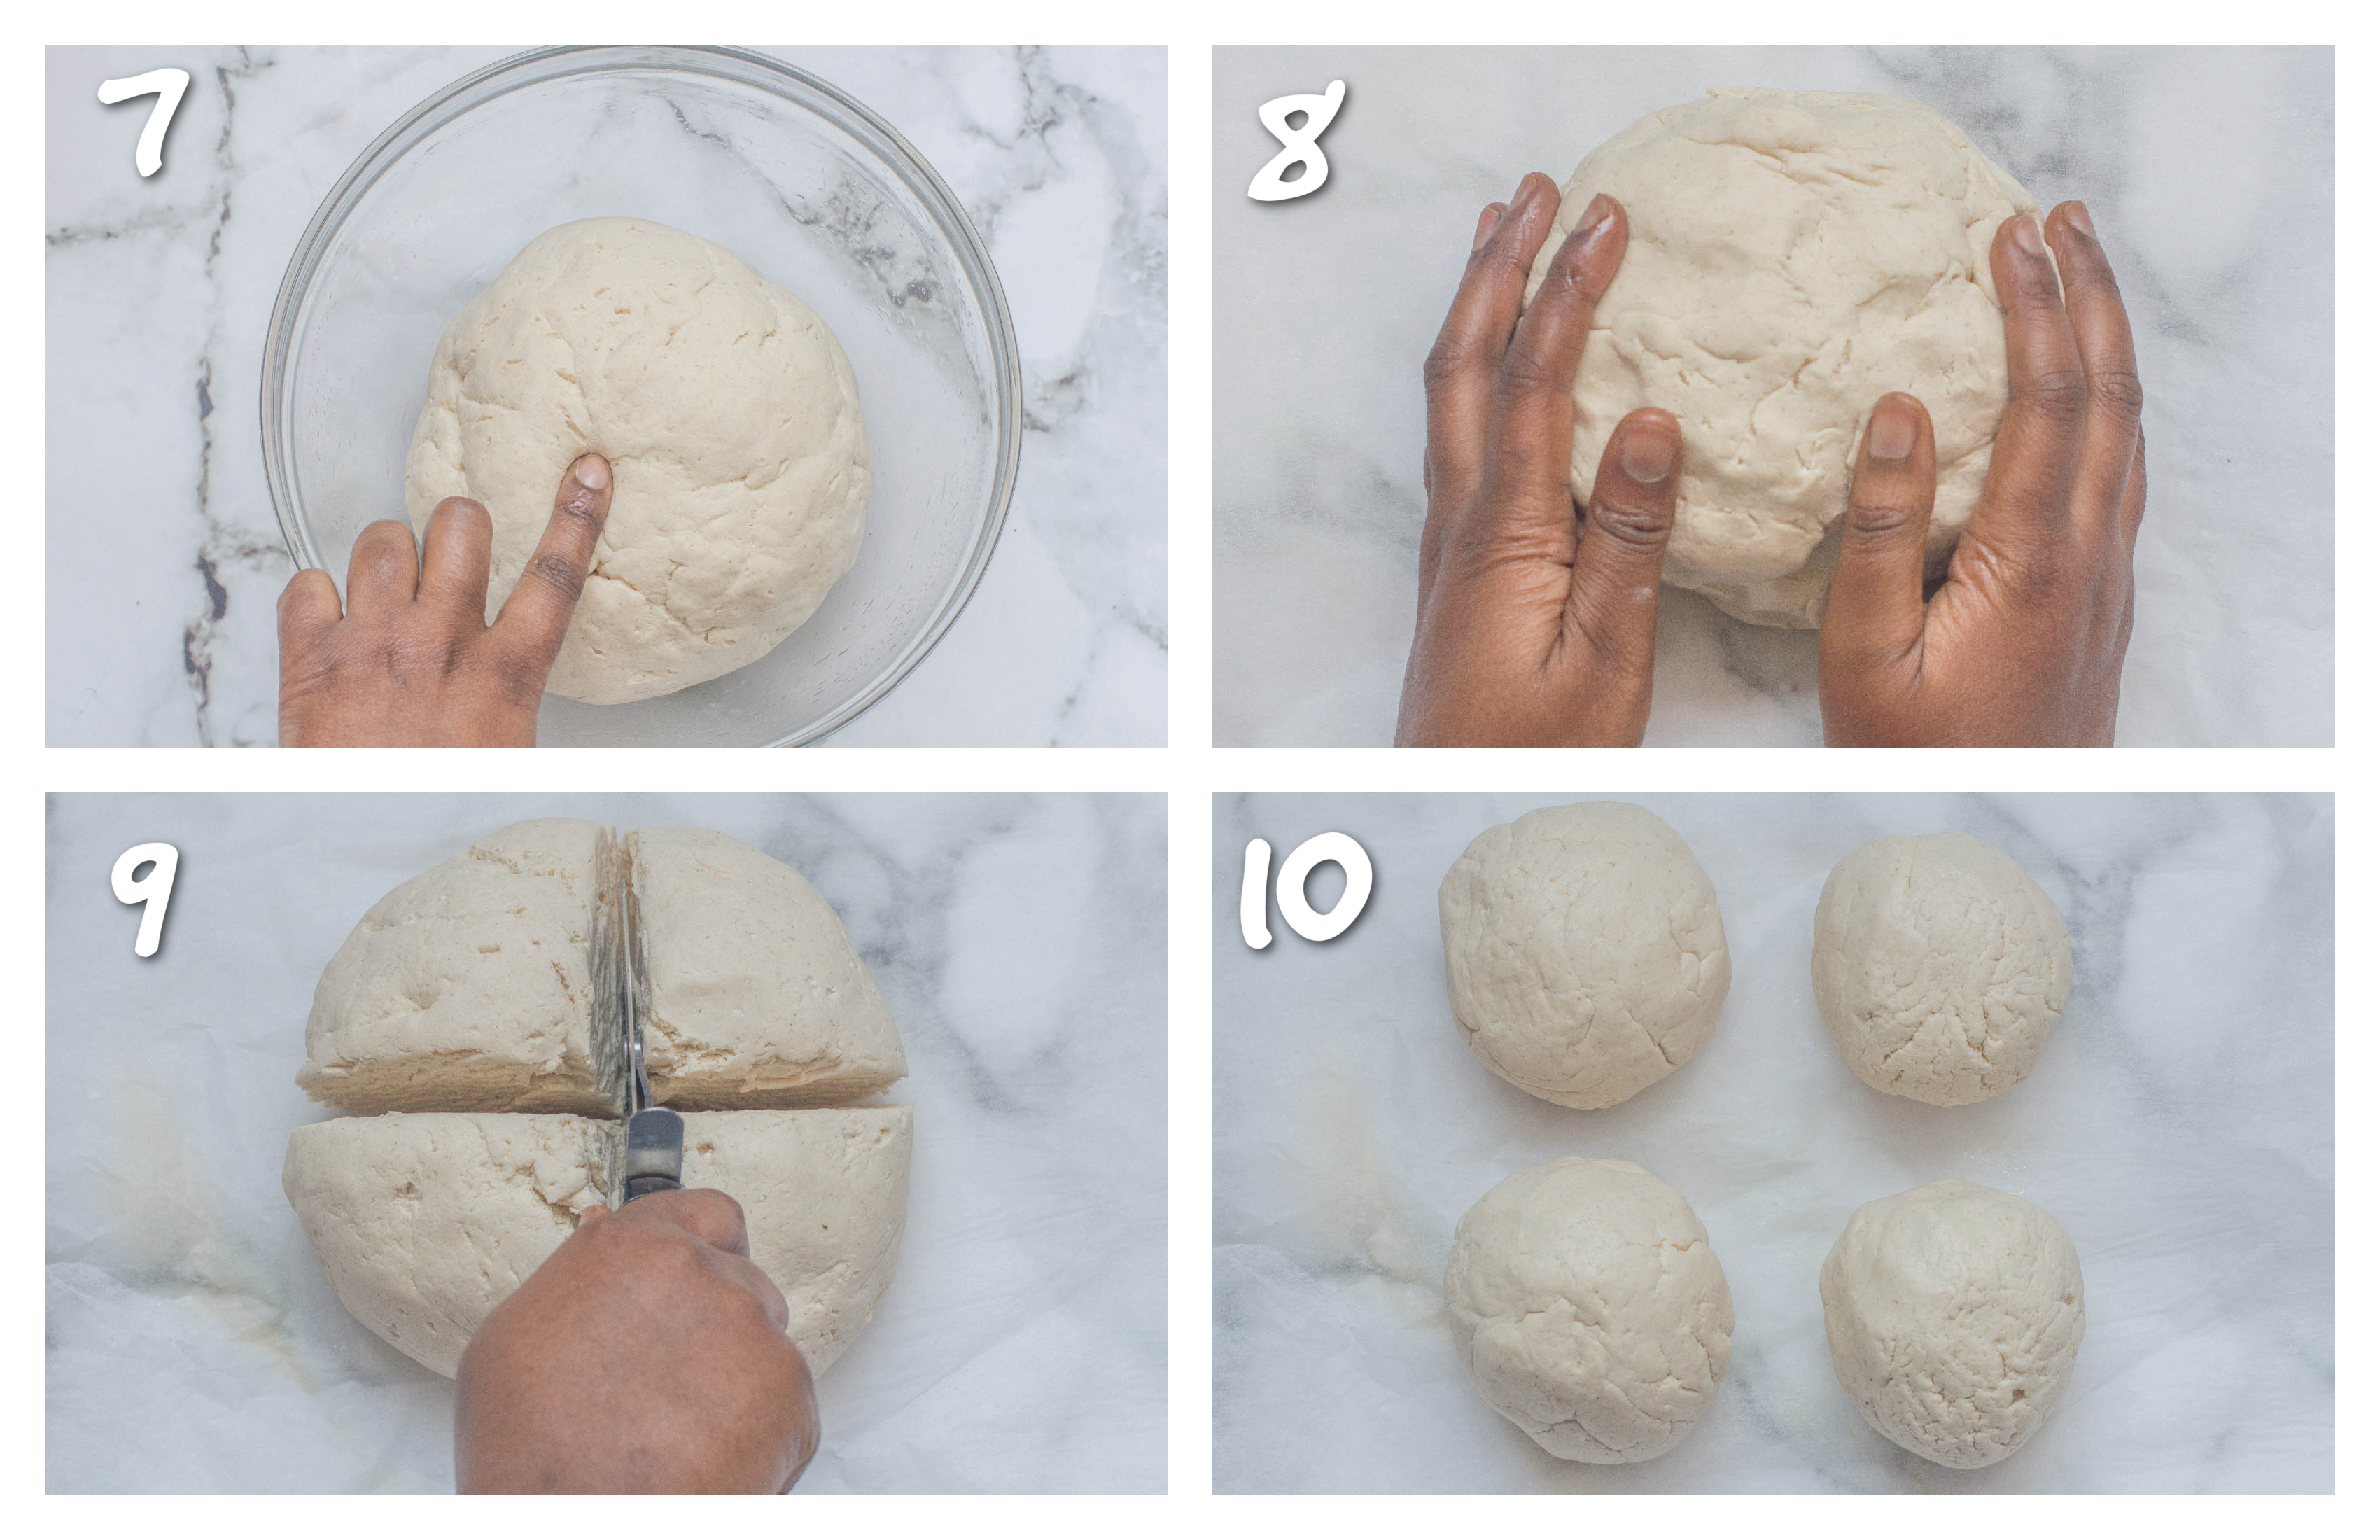
- Leave the dough to prove for 60-90 minutes in a warm place (The dough will have expanded but not as much as conventional/wheat flour).
- Line a work surface with parchment paper and lightly sprinkle with flour.
- Divide the dough into equal sized balls - you should get about 4-6 in total depending on how big you want your naans.
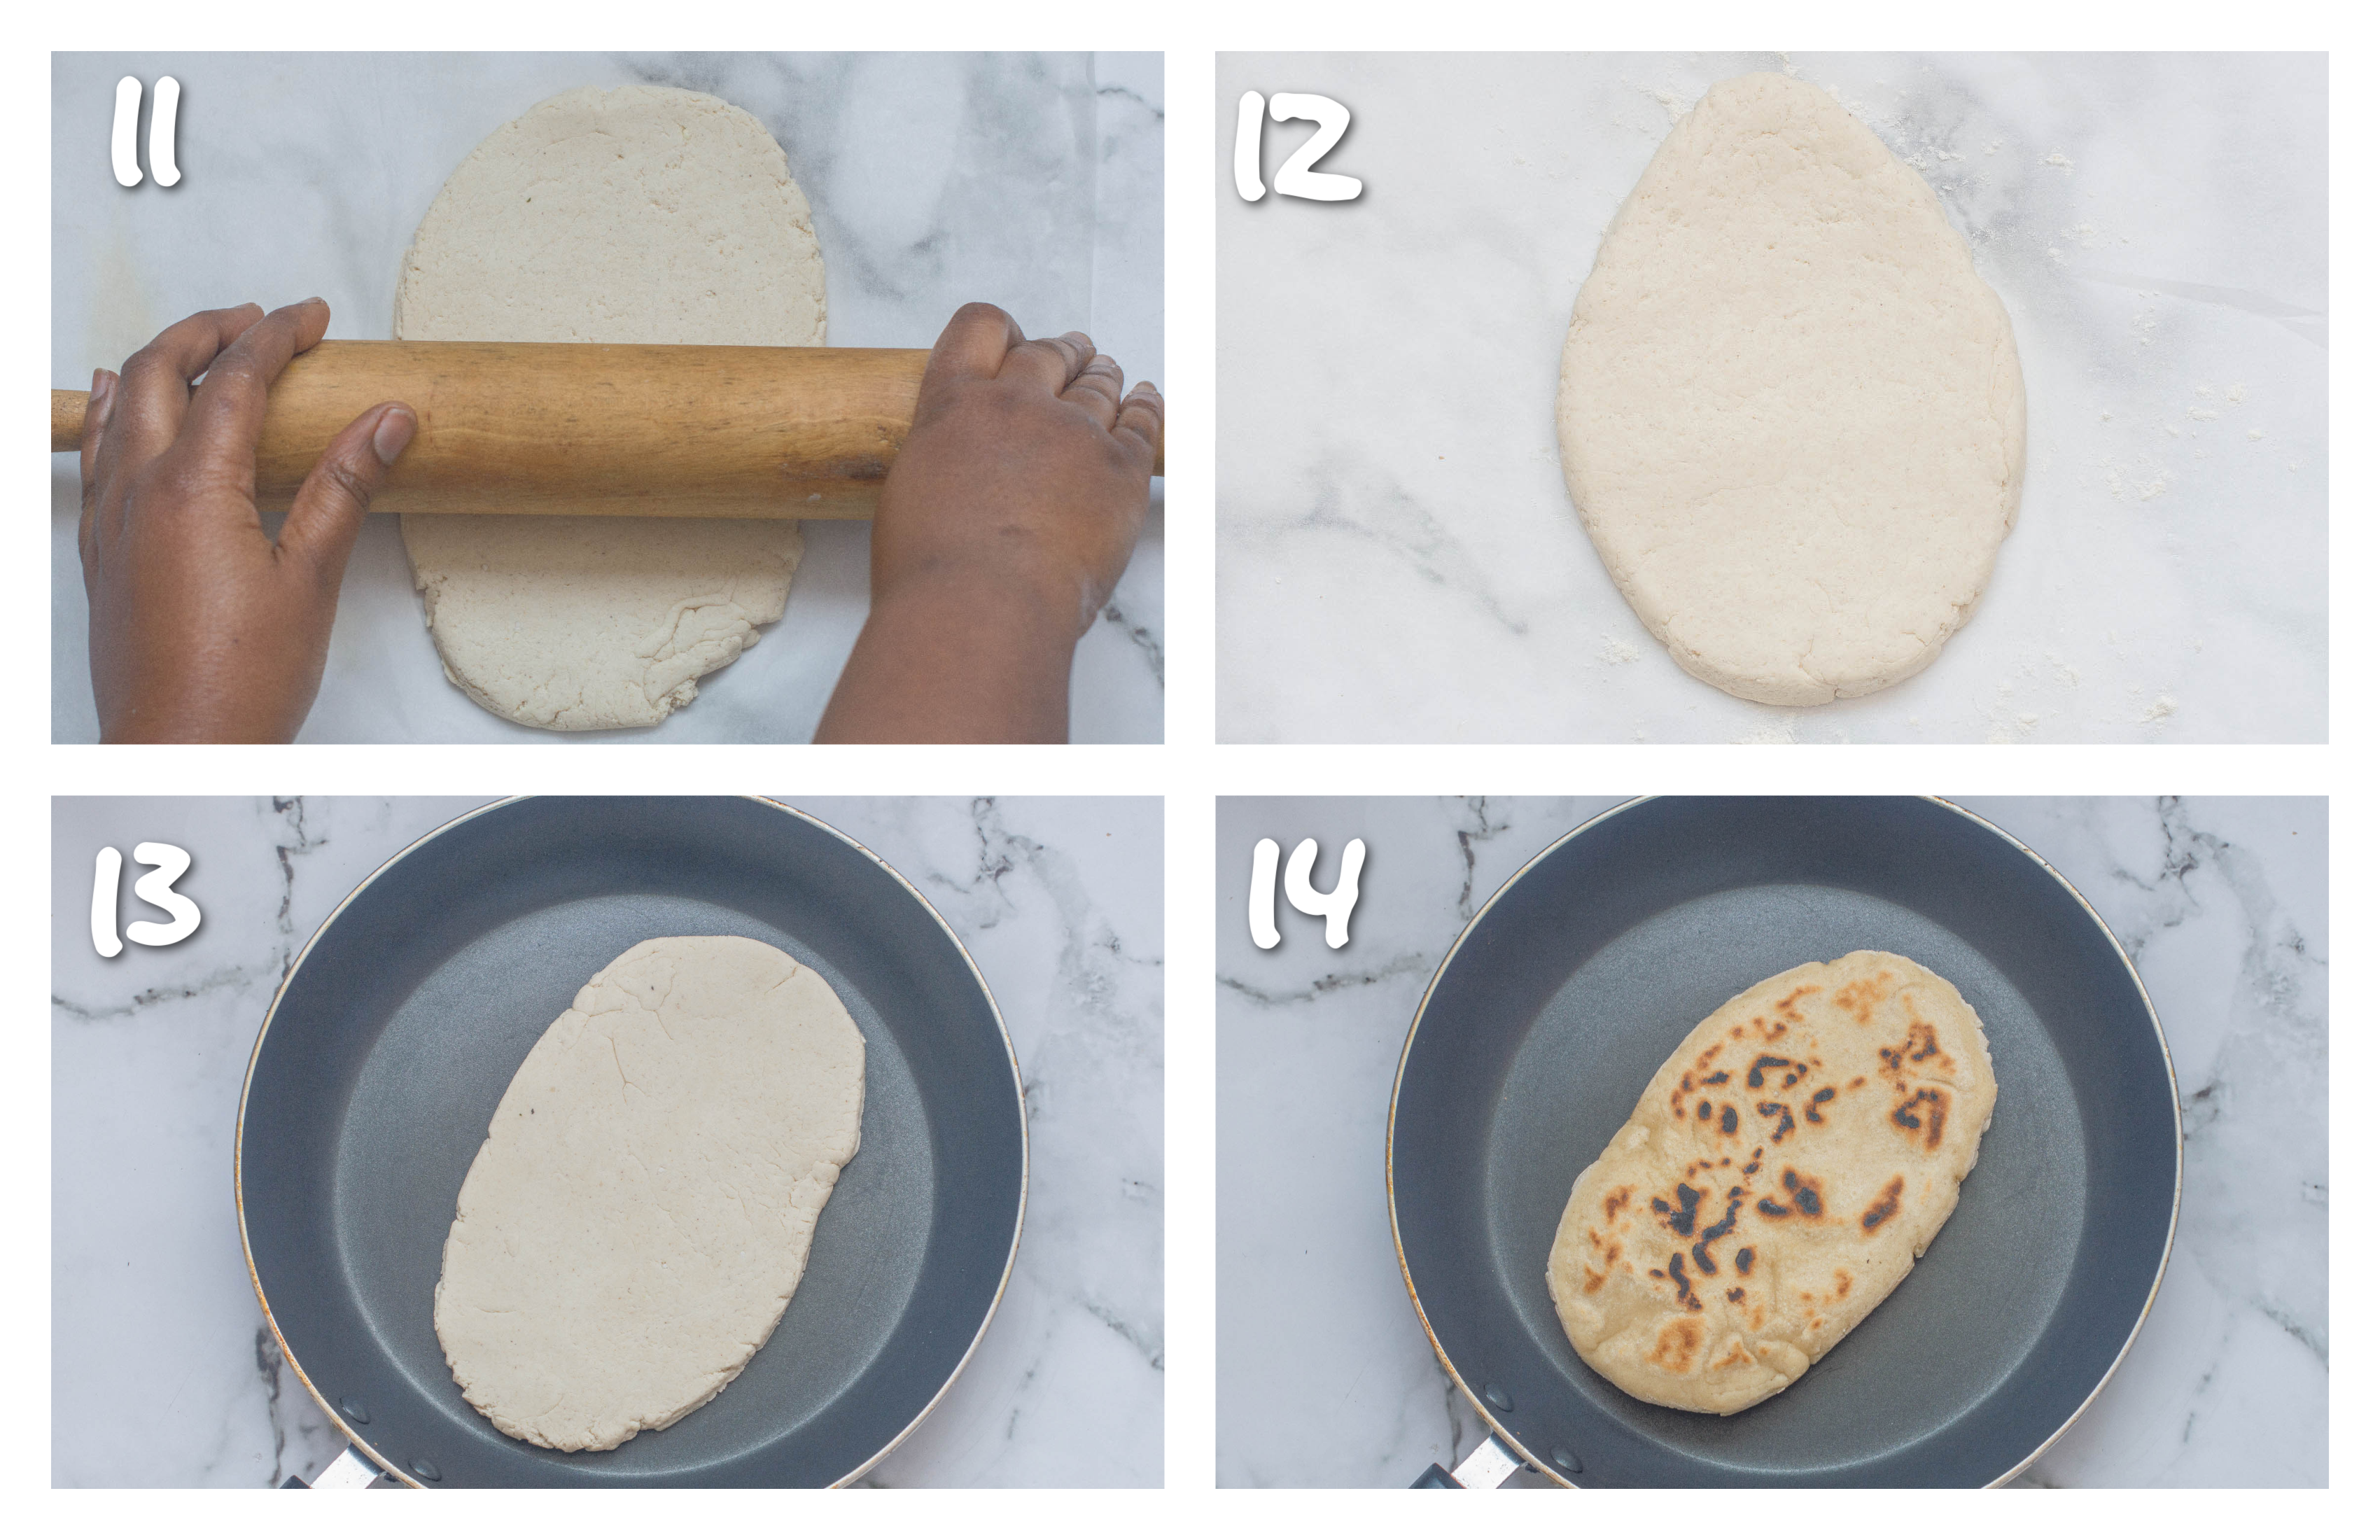
- Use a rolling pin to roll the dough ball into an elongated circle or a tear drop shape.
- The dough will be only slightly fragile and crack while you roll it, this is normal. Do not make your naan thin, you want some thickness about ¼'' inch no more. You may want to use a pizza slicer to cut/tidy up the sides.
- Preheat a large frying pan or a skillet on medium-high.
- Coat the pan with a layer of water.
- Once the pan/skillet is hot, place the naan bread on the pan to cook.
- Allow the first side to cook until slightly golden then flip it over.
- Let the other side cook until golden or dark patches form (depending on how well done you want your naan, if it starts to brown too quick, reduce the heat. During the cooking process your naan may start to puff up (this happens sometimes and is normal).
- Once the naan is ready, mix together the cilantro/coriander, garlic and melted butter in a small bowl.
- Brush the naan with the melted garlic butter mixture and then set aside on kitchen towel. Repeat steps 10-16 with the remaining dough.
Frequently asked questions
Yes, you can use active yeast instead and the good thing is because I mix the yeast with water regardless of whether i'm using instant or active yeast, anyone can follow along to the recipe without having to make adjustments.
Yes, follow the instructions, only use your hands for kneading the dough. Make a well in the centre of the dry ingredients and add your wet ingredients.
Use your hands, to fold and knead until a pliable dough is formed. Since you are using your hands and not a stand mixer, it will be a bit more work.
Do have about ⅓ cup of coconut yoghurt/mixed with ½ cup of warm water on stand by and add in increments if the mixture seems too dry but please do not over saturated the dough by making it sticky.
I find that the texture is more chewy when it is served cold. It is advised to eat the naan when it is warm.
If you need to re-heat the naan bread then wrap it in aluminium foil and warm in the oven for a few minutes.
I haven't tried doing this just yet, so will update once I test it out.
Yes and no. Like most gluten free food there always that slight distinction where you can just tell something is different.
In respect to this naan bread, it's a very very good replica but has a very very slight chew to it which is indicative of gluten free food/bread.
This is probably due to making the bread too thick.
However, if that isn't the case, you can salvage the recipe my baking your bread in the oven at about 356F/180C for a few minutes until the centre is cooked through.
Okay no problem! You will need to add some fat i.e butter to the pan to prevent the naan from sticking.
Keep in mind gluten free flour doesn't behave like conventional flour so when making dough and needing it to prove, don't treat it like wheat flour.
The proving process will vary from reader to reader, the main thing is that the dough will and should swell.
How much the dough swells will vary, it should expand by at least ¼ of what it was when left to rest.
My dough varies, so this is normal. One thing that I do recommend is putting it somewhere warm to prove.
What I like to do is preheat the oven while I prepare the dough and open the oven door then balance the bowl on the open oven door to attract some heat.
I do this for about the first 20-30 minutes to help hasten the proving stage.
Notes and tips
- The number of naan bread that you make, depends on the size that you want. Jumbo naan will make about 4, small sized ones will make up to 6.
- You may find it easier to use your blender to mix the psyllium husk powder with water to omit any lumps from forming.
- You will need TAPIOCA STARCH for this recipe NOT CASSAVA FLOUR.
- Don't substitute any ingredients unless they are listed. If I haven't listed an alternative that means either I haven't tried it or I do not recommend it.
- DO NOT roll out your dough too thick, no more than ¼"inches in depth. If you do, the inside won't be cooked and will be raw on the inside,
- It's best to eat the naan immediately for best results.
- DO NOT freeze the naan bread, it holds up better when frozen.
- If using instant yeast, you don't have to hydrate the yeast, I prefer to do this just to know that the yeast is active plus it saves confusion in case someone makes the recipe with active yeast.
- If you want to double the recipe then do so SEPARATELY, make 2 individual batches. I haven't tested this with any other way.
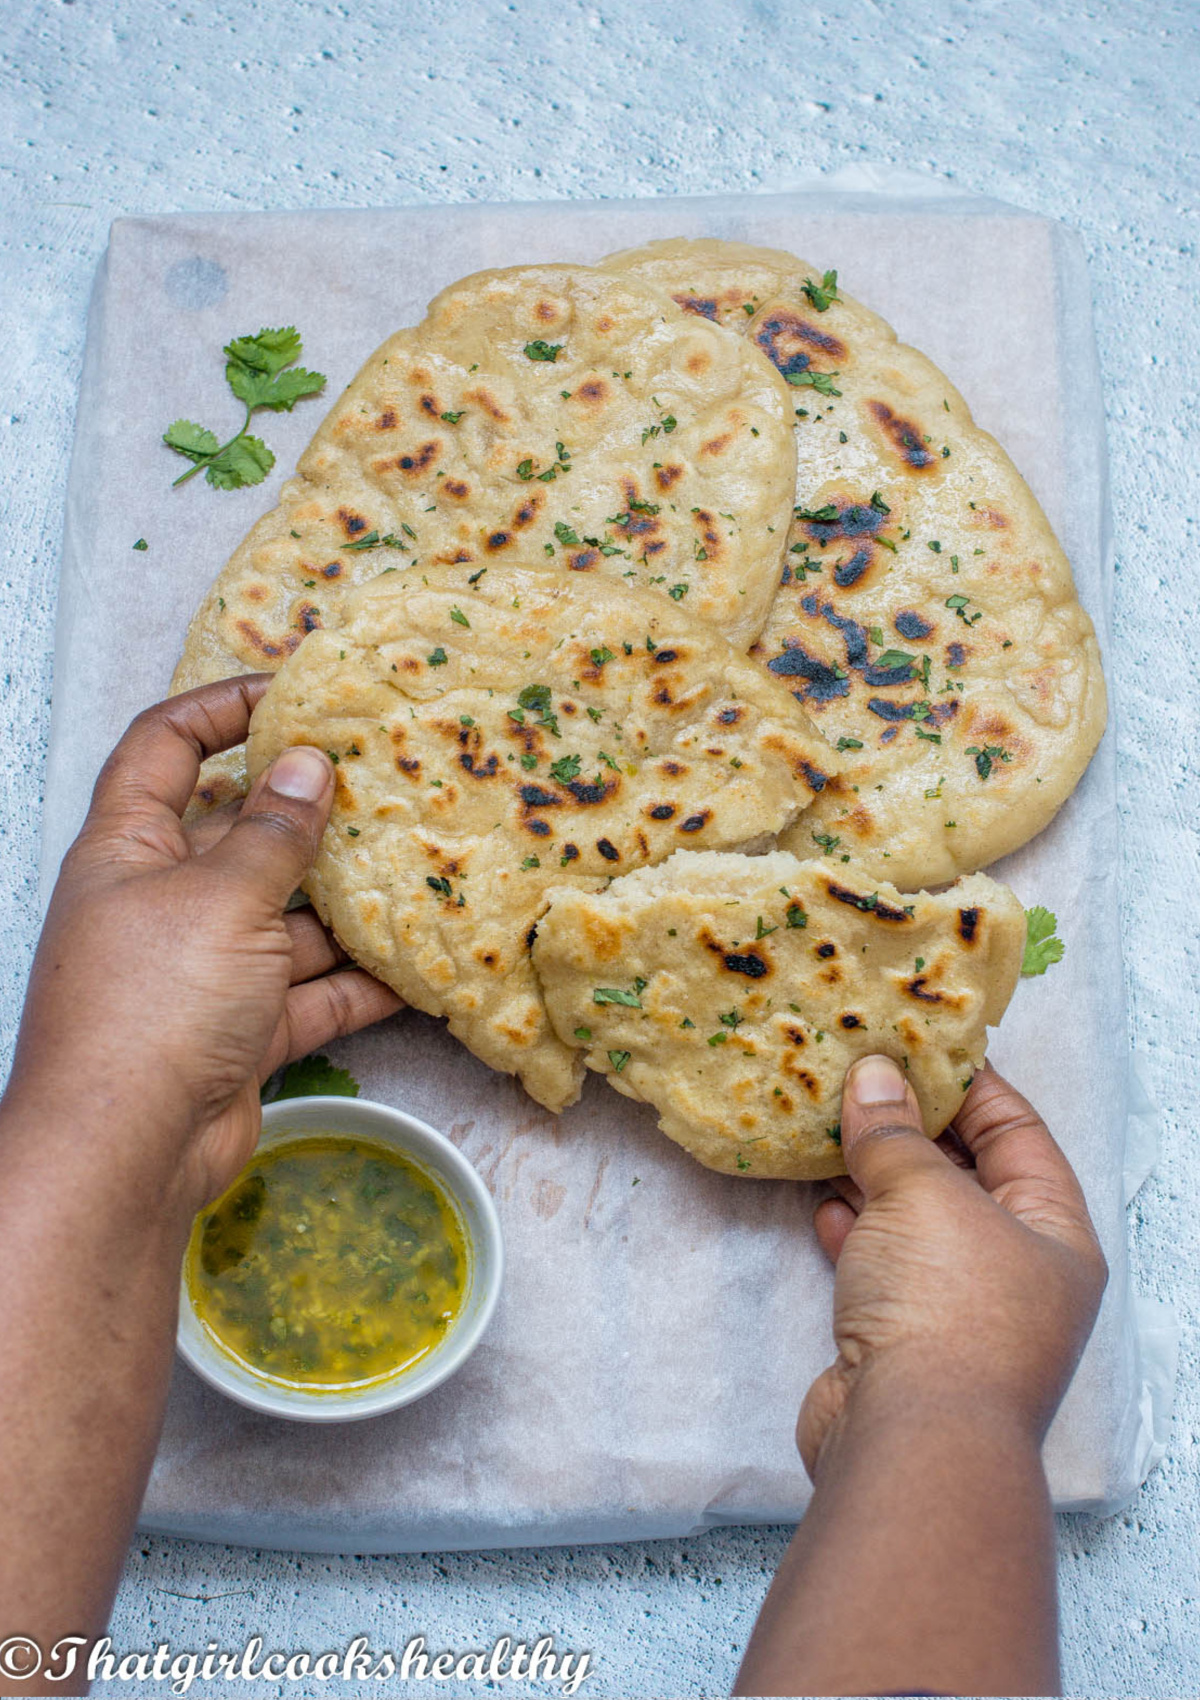
Recipes to use with this naan bread
- Broad Beans Curry (Vegan)
- Black Bean Curry (Vegan)
- Jamaican Curry Chickpeas (Vegan)
- Black Eyed Peas Curry (Vegan)
- Curry Gungo Peas (Vegan)
- Curry Channa and Aloo (Vegan)
- Jamaican Curry Goat (Slow cooker version)
- Creamy Curry Chicken
- Curry Cod
Other bread recipes to try
**Don't forget to comment below and star rate if you have tried my recipes. Let's be friends and engage on YouTube, Facebook and Instagram I also like to pin on Pinterest, where you can find more amazing recipes.**
Gluten Free Naan Bread
Ingredients
- 1 tbsp psyllium husk powder (10g)
- 2½ teaspoon dried instant yeast (8g)
- 1 teaspoon raw cane sugar (13g)
- 1 cup warm water (250ml)
- 2 cups tapioca starch (235g)
- 1 cup brown rice flour (120g)
- ½ cup sorghum flour (75g)
- ½ tablespoon xanthan gum (3g)
- 1 teaspoon pink salt (3g)
- ½ cup coconut yoghurt (135g)
- ¼ cup dairy free butter (60ml) melted
To make the garlic butter
- ⅓ cup dairy free butter (80ml)melted
- 3 garlic cloves minced
- 2 teaspoon cilantro (2g) (coriander)
Instructions
- In a small bowl whisk the psyllium husk powder with ½ cup of the warm water to form a gelatinous consistency and set aside.
- In another small bowl, combine the raw cane sugar, dried instant yeast and ½ cup of warm water, whisk until foam appears on the top and set aside.
- Add the dry ingredients to the bowl of a stand mixer bowl (fitted with a dough hook) - tapioca starch, brown rice flour, sorghum flour, xanthan gum and pink salt into a bowl and mix to combine.
- Now add the wet ingredients - psyllium husk paste, coconut yoghurt and melted butter.
- Knead until a pliable dough ball is formed, at first the mixture will appear dry but give it a few minutes to come together. Stop the machine to scrap down the sides, incorporating any dry, flour spots if necessary.
- Place the dough into an medium sized oiled bowl and cover with a damp cloth/saran wrap (cling film).
- Leave the dough to prove for 60-90 minutes in a warm place (The dough will have expanded but not as much as conventional/wheat flour)
- Line a work surface with parchment paper and lightly sprinkle with flour.
- Divide the dough into equal sized balls - you should get about 4-6 in total depending on how big you want your naans.
- Use a rolling pin to roll the dough ball into an elongated circle or a tear drop shape.
- The dough will be only slightly fragile and crack while you roll it, this is normal. Do not make your naan thin, you want some thickness about ¼'' inch no more. You may want to use a pizza slicer to cut/tidy up the sides.
- Preheat a large frying pan or a skillet on medium-high.
- Coat the pan with a layer of water
- Once the pan/skillet is hot, place the naan bread on the pan to cook.
- Allow the first side to cook until slightly golden then flip it over.
- Let the other side cook until golden or dark patches form (depending on how well done you want your naan, if it starts to brown too quick, reduce the heat. During the cooking process your naan may start to puff up (this happens sometimes and is normal)
- Once the naan is ready, mix together the cilantro/coriander, garlic and melted butter in a small bowl.
- Brush the naan with the melted garlic butter mixture and then set aside on kitchen towel. Repeat steps 10-16 with the remaining dough.
Notes
- The number of naan bread that you make, depends on the size that you want. Jumbo naan will make about 4, small sized ones will make up to 6.
- You may find it easier to use your blender to mix the psyllium husk powder with water but omit any lumps from forming.
- You will need TAPIOCA STARCH for this recipe NOT CASSAVA FLOUR.
- Don't substitute any ingredients unless they are listed. If I haven't listed an alternative that means either I haven't tried it or I do not recommend it.
- DO NOT roll out your dough too thick, no more than ¼"inches in depth. If you do, the inside won't be cooked and will be raw on the inside,
- It's best to eat the naan immediately for best results.
- DO NOT freeze the naan bread, it holds up better when frozen.
- If using instant yeast, you don't have to hydrate the yeast, I prefer to do this just to know that the yeast is active plus it saves confusion in case someone makes the recipe with active yeast.
- If you want to double the recipe then do so SEPARATELY, make 2 individual batches. I haven't tested this with any other way.


Lisa Wilkins says
This sounds delicious! I'm ready to try it. Is your nutrition information for the whole batch? That is my assumption.
Charla says
Thanks Lisa, enjoy and yes your assumption is correct!
Linda says
Hi, I made these gluten free flatbreads today and they are really good. I see in your tips that you advise against freezing. I wondered if you have tried freezing the dough before it's cooked. Thanks so much for the recipe.
Charla says
Hi Linda, unfortunately I haven't tried freezing the dough. Do let me know if you try it though and I'm so glad you liked the naan bread.
Danielle says
What a great option for naan! This came out great!
Charla says
Yay! I'm so glad to hear that Danielle.
Dijana says
We love naan! I'm going to make some gyros and kebabs with this!
Charla says
Sounds like a plan, so excited for you!
Ieva says
Wonderful recipe! My mother-in-law is gluten-intolerant and these were so delicious, that everyone enjoyed them! These may actually replace my usual recipe...
Charla says
Awesome stuff! Happy to have helped!
Amanda Wren-Grimwood says
These look so good I can't tell that they are gluten free and thanks for all the tips too.
Charla says
You are so welcome
Tavo says
We love naan and were looking for a GF option as aI have a celiac friend coming for our Indian-inspired dinner and this recipe was perfect! thank you!
Charla says
Yay! I'm so glad to hear the recipe went down well.