
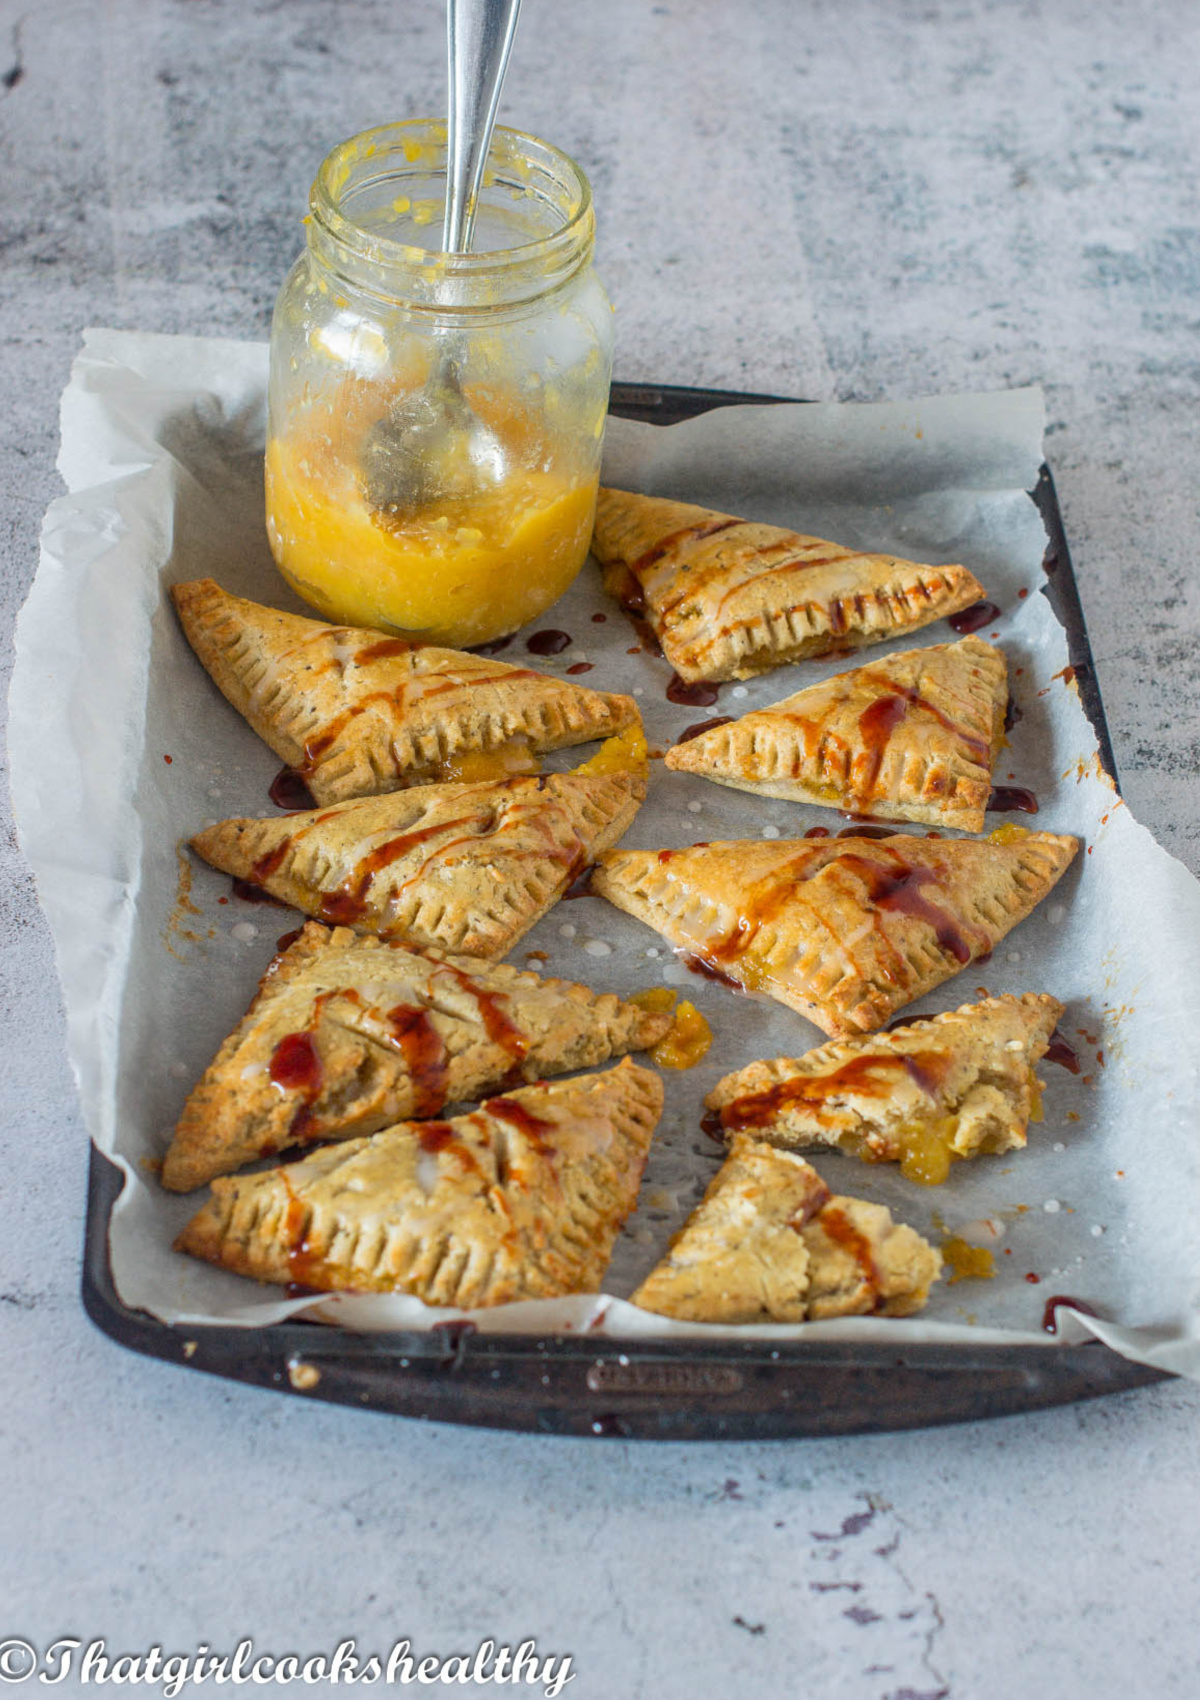
Homemade gluten free shortcrust pastry filled with mango jam. These tarts are a vegan spin on the infamous Guyanese pine tarts and are just as tasty and as equally addictive.
I know what some of you maybe thinking, but Charla these look like turnovers and not tarts.
Some regions of the world refer to turnovers as tarts so the word in a sense is interchangeable.
I digress, this recipe is inspired by the Guyanese pine tarts. Pine is just an abbreviation for pineapple.
The original pine tarts are small, bite sized and shaped like a triangle. The filling is made from crushed pineapple that is simmered with spices.
My rendition
My version of these tarts are slightly different from the original. First of all the crust is gluten free which I will go into more detail about later.
It's more of a pastry with slight flakiness which isn't always easy to achieve with gluten free baking and the filling is made from my homemade mango jam.
Also, the shape of the tarts are different as mine are folded over, unlike the pine tarts where the corners are folded on top of each other to make a more open faced style type of tart.
The crust
My favourite part of the recipe, the crust! I'm a crust type of girl. What makes a good tart/turnover is the crust and as a gluten free blogger, the struggle is real.
After doing my own research and doing lots of trial and error with branded flour blends as well as making my own blend.
Needless to say the results were sub par and a disappointment to the point where I was about to give up.
Then I came across Alanna from The Bojon Gourmet who make this outstanding flaky crust.
Believe me when I say this crust is amazing and ticks all the right boxes. This will be my to go recipe from now on, so all credit goes to this amazing food blogger.
I have deviated ever so slightly from her recipe by adding a small amount of some raw cane sugar and doubling most of the ingredients.
Not only is it gluten free but it is grain free and made with wholesome ingredients (almond flour, tapioca starch, cassava flour, butter and ground chia).
Wholesome ingredients are what I'm always looking for first and foremost but sometimes the end result can be more dense, thankfully this wasn't the case here.
The biggest challenge especially for my novice audience is rolling the dough. I must stress how important it is to use flour periodically while rolling the dough between parchment paper and keeping the dough chilled where possible.
The reason for this is in order to achieve flaky pastry, the dough needs to have some butter pieces.
As the butter melts in the oven and creates steam, it traps inside the dough making air pockets.
Once the dough cools down, these air pockets become delicate layers of flaky pastry. If the dough is rolled too much it will be more dense and less flaky,
In other words, we need to strike a fine balance between the butter bits in the dough for more flakiness without the dough being a sticky mess, something in between is the ideal goal.
When rolling and lifting the tarts, additional tools such as a pizza cutter for cutting the dough and an egg lifter for transferring the tarts to the baking tray are required.

Making the recipe
Just like the Jamaican Easter Bun and Roti recipe, measurements are crucial along with following the ingredients as written.
For example, you may want to use regular room temperature water in favour of ice water when in fact, the freezing cold water is crucial to keep the butter cold.
Speaking of butter, as this is a vegan recipe I will share what Brand of butter I used along with a few tips.
For those of you who are dairy free/vegan I'm sure you have tried countless different brands of butter. The one that I am using for this recipe is a British brand called "Vitalite"
What I have found with vegan butter is that although it looks very similar to the conventional kind, it doesn't behave that way for some recipes.
The texture isn't as firm/solid so recipes that call for extra firm/cold butter .i.e making a crumble or pastry, the butter needs a bit of a helping hand.
What I do ahead of time is place the amount of butter that I need in the freezer to keep it "extra firm".
The butter shouldn't shouldn't completely freeze, instead it should be a lot firmer than its original state.
Although this may sound daunting, it's actually a fun recipe to make. If you have worked with puff pastry recipes before then you will know the biggest drawback is keeping the dough chilled to prevent sticking.
The end results of these tarts is what will win you over, we cannot get enough of them. We have eaten a few batches of them, as they are so miniature and highly additive.
The steps
Preparing the dough

- Combine the ice water with the lime juice in a jug or a pitcher and set aside.
- Add the cassava flour, almond flour, tapioca starch, raw cane sugar and ground chia seeds in a food processor fitted with an S blade.
- Proceed to pulse (press the pulse button or use the lowest setting if you don't have one) as you slowly pour in the ice water in increments.
- Once the mixture becomes crumbly (it shouldn't be too dry nor should it be too sticky, add more ice water or flour if you need to.).
- Remove the mixture from the food processor and form into a pliable dough ball.
- Wrap the dough ball in saran/cling film and place in the freezer for 30 minutes to chill.
Rolling the dough

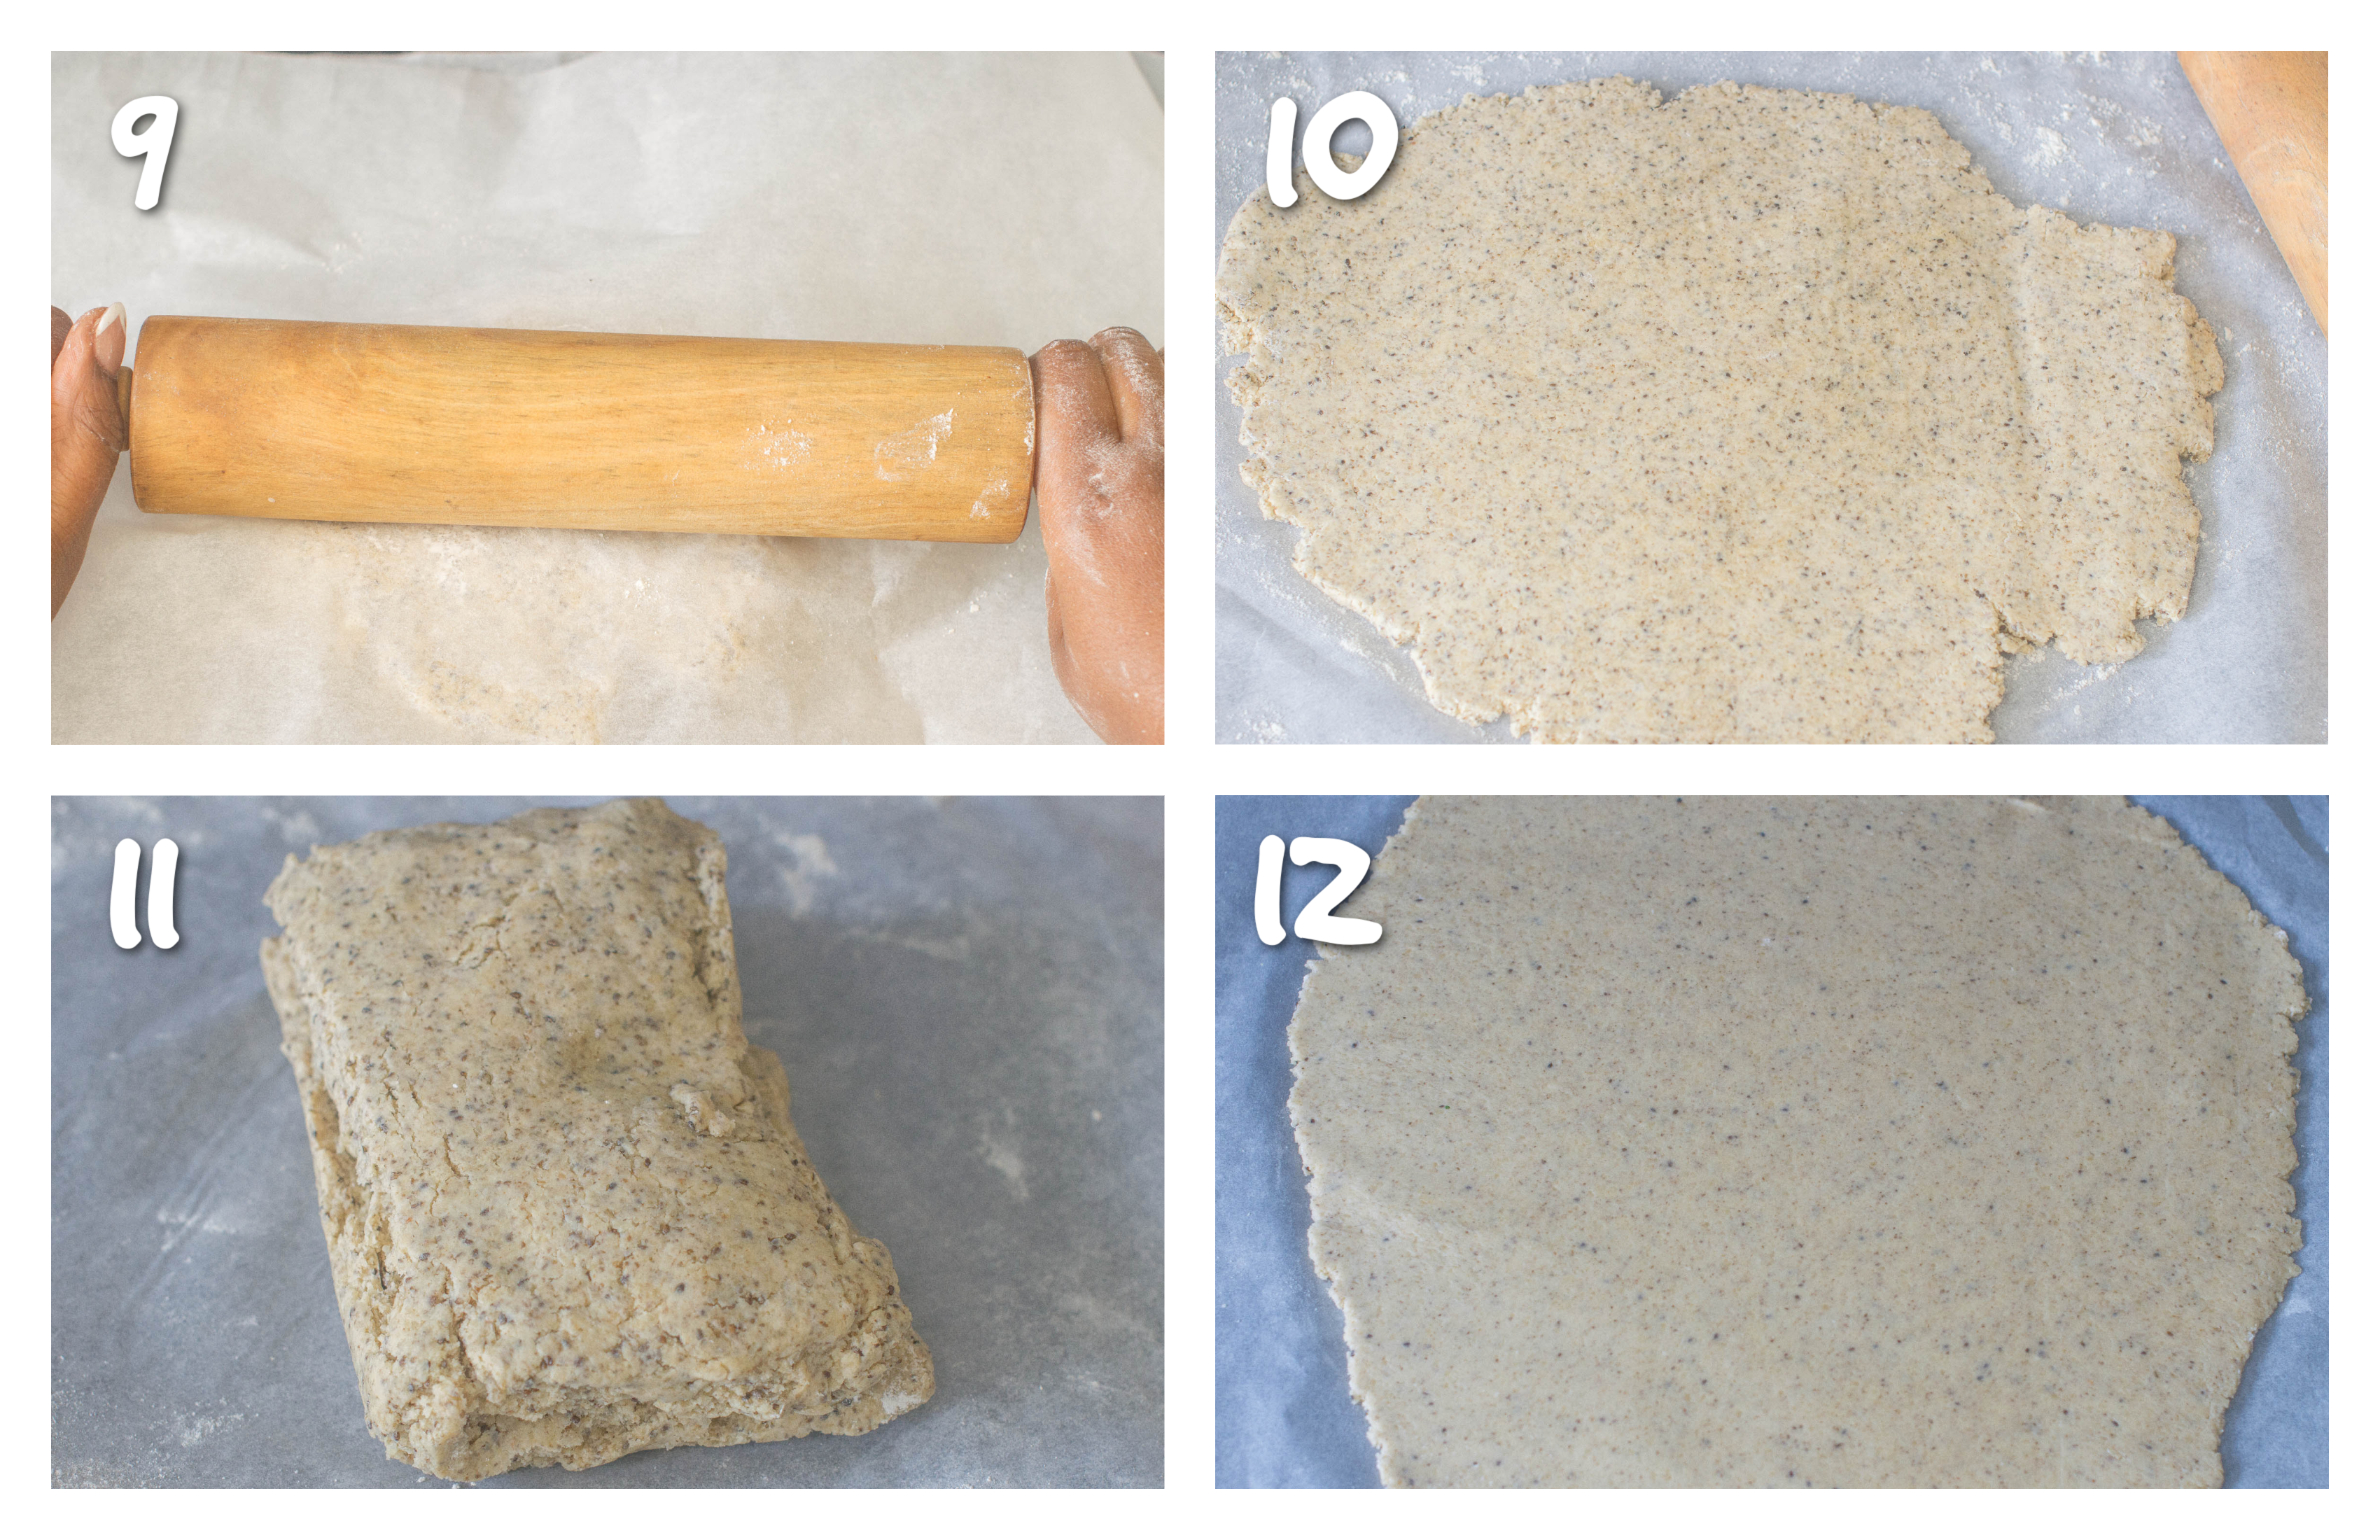
- After 30 minutes, unwrap the dough and lay a piece of slightly floured parchment paper on a clean surface.
- Place the dough ball on the floured parchment paper then place another piece of floured parchment paper on top of the dough ball.
- Use a rolling pin to roll out the dough into a rectangle (it doesn't have to be precise) about ½ -1 inch thick.
- Fold the dough into thirds, as if you are folding an envelope or a letter.
- Re-wrap the dough and place it in the freezer for another 30 minutes.
Making the tarts
- Preheat the oven at 180c/375f.
- Unwrap the dough again, the place the dough on a clean surface sandwiched. between 2 lightly floured pieces of parchment paper.
- Proceed to roll out the dough into a rectangle about ¼ inch thick.
Filling the tarts

- Use a pizza cutter so slice the dough into 4 x 4 inch squares.
- Place a few tablespoons of mango jam slightly off centre towards one half of each square (not too close to the edge, don't worry if a little jam seeps out).
- Fold each square in half diagonally to create a triangle.
- Use the tines of a fork to gently press around the edges of a tart to release the air then make 2-3 shallow slices on top of each tart.
- Place the tarts an inch apart on a baking sheet lined with parchment paper.
- Brush each tart with a "flax egg".
- Bake in the oven for about 15-20 minutes or until the tarts are slightly golden with brown edges.
Frequently asked questions
I have only tested Alanna recipe and not made any changes to the flour blend so I cannot confidently say whether or not it will have a negative or positive impact.
Both of these ingredients aren't paleo approved so unless you can making this recipe to fall in line with the paleo lifestyle then you can add ½ teaspoon if you want to.
I have only tried freezing the tarts when they are uncooked. If you want to freeze the tarts when they are in their uncooked state be sure to put the tarts on a baking tray with parchment paper and shrink wrap the tray with saran/cling film.
Store them in the freezer for up to a month (I haven't test them past this point)
Absolutely! It is very similar formula, add the dry ingredients first, then add the butter.
You will want to add the ice water/lime in increments to determine how much liquid is needed.
Keep in mind that gluten free puff pastry won't behave exactly the same as non gluten free pastry will, it is not 1:1 recipe, it's about 80% close to the real thing.
With that being said, if your pastry is too dense and not flaking, even if small amount then it could be because you didn't use enough butter to flour, the butter was rolled out way too much or that you incorporated way too much flour at some point.
If your dough becomes unmanageable and too sticky then you can remedy this by either placing the dough in the freezer to chill.
You may find yourself having to do this several times throughout the preparation. This may include put extra scraps in the freezer to chill or even the baking tray with uncooked tarts as you apply the filling.
Notes and tips
- This is the homemade Mango Jam that you will need to make this recipe.
- This recipe should make up to 10 tarts.
- If you are using vegan/dairy free butter, it is a good idea to place the required amount of butter in the freezer ahead of time.
- Please stick to the ingredients listed, I have tested any substitutes so if you choose to do so you are doing this at your own risk.
- Keep the dough chilled at all times especially during the rolling process, if you find the dough becoming too soft even after sprinkling more flour on the parchment paper, then it is time to store the dough in the freezer.
- You can refrigerate your dough but I find that the freezer gives a good blast of cool air without freezing the dough.
- Store any leftover tarts in a air tight container and consume within 2 days.

More mango recipes
- Mango Pineapple Hot Sauce
- Orange Mango Smoothie
- Sweet Mango Banana Pineapple Smoothie
- Mango Coconut Water Smoothie
- Mango Chia Pudding
More sweet treats to try
- Vegan Coconut Popsicles
- Vegan Sticky Toffee Pudding
- Coconut Drops
- Sweet Potato Pudding
- Black Forest Ice Cream
- Cassava Pone
- Grater Cake
- Mango Cheesecake
**Don't forget to comment below and star rate if you have tried my recipes. Let's be friends and engage on YouTube, Facebook and Instagram I also like to pin on Pinterest, where you can find more amazing recipes.**

Mango Tarts
Ingredients
- 8-10 tablespoon Ice cold water (118ml)
- 1 tablespoon lime juice (15ml)
- 1 cup cassava flour (120g)
- 1 cup almond flour (112g)
- ½ cup tapioca starch (60g)
- ¼ teaspoon pink salt (1.5g)
- 4 tablespoon chia seeds (48g), ground
- 1 tablespoon raw cane sugar (12g) ground
- 10 tablespoon cold vegan butter (140g) chopped in small pieces, chilled in freezer, see notes
For the filling
- homemade mango jam see notes
The "egg wash"
Instructions
Preparing the dough
- Combine the ice water with the lime juice in a jug or a pitcher and set aside.
- Add the cassava flour, almond flour, tapioca starch, raw cane sugar and ground chia seeds in a food processor fitted with an S blade.
- Proceed to pulse (press the pulse button or use the lowest setting if you don't have one) as you slowly pour in the ice water in increments.
- Once the mixture becomes crumbly (it shouldn't be too dry nor should it be too sticky, add more ice water or flour if you need to.).
- Remove the mixture from the food processor and form into a pliable dough ball.
- Wrap the dough ball in saran/cling film and place in the freezer for 30 minutes to chill.
Rolling the dough
- After 30 minutes, unwrap the dough and lay a piece of slightly floured parchment paper on a clean surface.
- Place the dough ball on the floured parchment paper then place another piece of floured parchment paper on top of the dough ball.
- Use a rolling pin to roll out the dough into a rectangle (it doesn't have to be precise) about ½ -1 inch thick.
- Fold the dough into thirds, as if you are folding an envelope or a letter.
- Re-wrap the dough and place it in the freezer for another 30 minutes.
Making the dough
- Preheat the oven at 180c/375f.
- Unwrap the dough again, the place the dough on a clean surface sandwiched. between 2 lightly floured pieces of parchment paper.
- Proceed to roll out the dough into a rectangle about ¼ inch thick.
- Use a pizza cutter so slice the dough into 4 x 4 inch squares.
Filling the tarts
- Place a few tablespoons of mango jam slightly off centre towards one half of each square (not too close to the edge, don't worry if a little jam seeps out).
- Fold each square in half diagonally to create a triangle.
- Use the tines of a fork to gently press around the edges of a tart to release the air then make 2-3 shallow slices on top of each tart.
- Place the tarts an inch apart on a baking sheet lined with parchment paper.
- Brush each tart with a "flax egg".
- Bake in the oven for about 15-20 minutes or until the tarts are slightly golden with brown edges.
Notes
- This is the homemade Mango Jam that you will need to make this recipe.
- This recipe should make up to 10 tarts.
- If you are using vegan/dairy free butter, it is a good idea to place the required amount of butter in the freezer ahead of time.
- Please stick to the ingredients listed, I have tested any substitutes so if you choose to do so you are doing this at your own risk.
- Keep the dough chilled at all times especially during the rolling process, if you find the dough becoming too soft even after sprinkling more flour on the parchment paper, then it is time to store the dough in the freezer.
- You can refrigerate your dough but I find that the freezer gives a good blast of cool air without freezing the dough.
- Store any leftover tarts in a air tight container and consume within 2 days.
Leave a Reply